Execute test runs
After you create your test runs and assign them to a tester, you're ready to start testing.
Choose the method to perform test runs that best fits how you want to test and record your results:
-
Use Quick Run to record essential results without filling in extra detail.
-
Use the TestPad to record detailed results, statuses, and defects for each test step.
-
Pair the TestPad with Web Explorer or Desktop Explorer to record your testing session.
-
Schedule and run automated tests on a recurring basis.
Before you start
Make sure you are assigned permissions to execute test runs:
-
Execute Test Runs: Use this permission to perform test runs in the TestPad.
-
Execute Test Runs with Quick Run: Use this permission to perform test runs with Quick Run.
-
Approve Test Cases: Use this permission to approve test cases during testing, so you can run the most recent version. Without this permission, you can only run the most recently approved version, which may be outdated.
Start a test run
You can start test runs from the Test executions tab.
To do so, follow these steps:
-
Select a test object in the tree panel, such as a release, a test cycle, or a test suite.
-
In the Statistics tab, select the test runs you want to start.
-
From here, you have several options:
-
Quick Run: Select this option to start an abbreviated test run that lets you record the basics of your test.
-
TestPad only: Select this option from the Run dropdown to open the TestPad and record details for each individual test step.
-
TestPad + Desktop Explorer: Select this option from the Run dropdown to open the TestPad and record your test with Desktop Explorer.
-
TestPad + Web Explorer: Select this option from the Run dropdown to open the TestPad and record your test with Web Explorer.
You can select Run to automatically open the last testing tool you selected from the dropdown.
-
-
If the test run you selected is attached to a test case with an unapproved latest version, you need to choose which version of the test case you want to run. In the Execute Approved Test Case window, you have these options:
-
Current executed version: Choose the most recent test case version that you have, which has already been executed as a test run.
-
Latest approved version: Choose the latest approved version of the test case.
-
Latest unapproved version: Choose the latest unapproved version of the test case.
-
Run tests with Quick Run
Use Quick Run to record essential information about a test run without filling in additional details:
-
Enter the planned time and actual time.
-
Update the overall test run status, such as passed or failed.
-
Submit defects, as needed.
To perform test runs withQuick Run, follow these steps:
-
Start your test with Quick Run.
-
Complete the following information on the Test Run Quick Run dialog, as needed:
-
Planned Time: Enter how long you expect the test run to take.
-
Actual Time: Enter how long the test run actually took.
-
Mark quick result: Select the status of the test run.
-
Defect ID: Enter a defect ID to link a defect to the test run, then select Link to add the defect to the defect grid. Or, select New to create a new defect on the Defect Submission screen.
If you selected more than one test run, you can complete this information in bulk on the Test Suite Quick Run dialog.
-
-
Select OK to save the execution information.
Run tests with the TestPad
The TestPad is a tool that lets you record your tests and results in detail. This section covers the main workflows and provides an overview of how to navigate the TestPad.
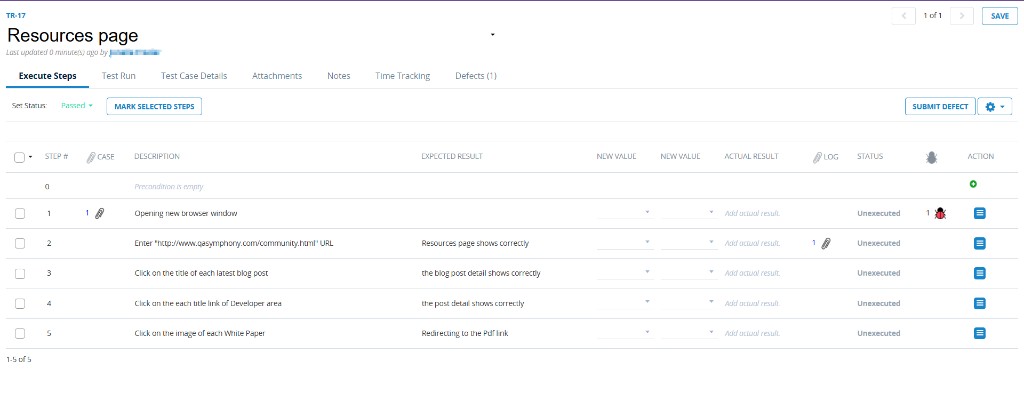
Use the TestPad to record and work with your test results on a detailed level.
With the TestPad, you can:
-
Perform your test run. Record details, such as actual results, defects, and statuses.
-
Edit test steps or test run properties. As you run your test, you can edit anything associated with the test run. Change descriptions, expected results, and test steps.
-
Edit test case descriptions. Make changes directly to the test case associated with the test run.
-
Add, view, and remove attachments. Store any files related to your test run with the associated test case or the test run itself.
-
Add notes. Maintain information related to your executed test run for review in the test log later.
-
Record time tracking. Use the automatically generated times, or overwrite them with your manual calculations.
Your web browser pop-up blocker may prevent the TestPad from opening. If the TestPad doesn't display, make sure you always allow pop-ups from your qTest URL in your browser settings. After you change the settings, you may need to refresh your browser or sign out and then sign back in to qTest Manager.
Run your test
When you created your test case, you built a set of steps to follow during your test run. From the Execute Stepstab, you can follow those steps and write out actual results, assign statuses, add defects, and work with your test on the go.
Statuses give a quick overview of how the test run went, either for an individual step or the entire test run. For example, you can choose whether the test run Passed or Failed. Or, if you have custom test run statuses set up, you can select those here.
You must select an overall status for your test run before you can save your test run results.
Assign a status for the whole test run or for individual steps in the following ways:
-
Select the overall test run status: Select a status from the Set Status dropdown, such as Passed, Failed, or Incomplete.
-
Select the status for one step: Hover over the Status column and select a status.
-
Select the status for several steps: Select the checkboxes for the steps, choose a status from Set Status, then select Mark Selected Steps.
Create new defects, or search for existing ones, to add to your test run.
Add a defect to the test log or to a specific test step in the following ways:
-
Add a defect to the test log: To attach a defect to the overall test, select Submit Defect at the top of the Execute Steps tab. The number of defects you added to this test displays in parentheses on the button. This count doesn't include defects attached to an individual test step.
-
Add a defect to a test step: Select
 Add Defect in the Defects column to attach a defect to an existing test step. The column then displays how many defects are attached to that individual test step.
From the Add Defects window, you can search for an existing defect, or enter a defect ID and then select Link to add the defect. Or, select New to create a new defect on the Defect Submission screen.
Any changes you make here apply to the test case your test run is attached to when you save.
Editing test steps increases the test case version.
Edit, rearrange, and record results for test steps in the following ways:
-
Edit a step: If you need to edit your test run on the go, select theDescription or Expected Result field to change the step text.
-
Add an actual result: If your test differed from the expected results, enter what happened in the Actual Result field. Entering information in this field doesn't affect the original test case.
-
Rearrange a step: Select
 Action, then select Move up or Move down.
 -
Add a step: Select
Action, then select Add. The new step appears after the current step. -
Delete a step: Select
Action, then select Delete.
Navigate the TestPad
This section breaks down the TestPad according to its individual tabs. Here, you can find out what each tab does and how you can use it for testing.
The TestPad header is at the top of the TestPad. Use it to view details about the test run you're working in, or to navigate between test runs, if you're running more than one test at a time.
Here's what each field in the header means:
|
Item |
Description |
|---|---|
|
Test Run ID |
The ID of the currently displayed test run. |
|
Test Run name |
The name of the currently displayed test run. |
|
Test Run menu |
Use this option to navigate between multiple test runs. If you perform more than one test run at a time, select the arrow to the right of the test run name to display a dropdown menu that contains your active test runs. |
|
Time stamp |
The date and time of the last update to the test run, along with the user who made it. |
|
Previous and Next buttons |
If you're completing more than one test run at a time, select the Previous button to display the previous test run in the list. Select the Next button to display the next test run in the list. |
|
Save |
Select Saveto save any changes in the TestPad. You must select an overall status for your test run before you can save your test run results. |
|
Load Last Log |
Select Load Last Logto use the most recent result of the currently displayed test run as a base for your new run. Any changes you make here will be saved as a new test log. Review the last log of a test run to identify test steps that previously failed. Use this information to determine which steps may need additional attention during the current test run. |
Here are the fields you can use while you run your test in the Execute Steps tab:
|
Item |
Description |
|---|---|
|
Set Status |
Select the overall test run status, such as Passed, Failed or Incomplete, from this dropdown. You must select an overall status for your test run before you can save your test run results. |
|
Mark Selected Steps |
Assign a test status to one or more individual steps. To do this, select the checkboxes next to the steps you want to update, and choose a status from the Set Status field. Then, select Mark Selected Steps to assign the status to the steps you selected. |
|
Submit Defect |
Select Submit Defect to submit a defect for the test log. The number of submitted defects displays in parentheses on the button. For more information about submitting defects with the TestPad, check out Submit Defects in Test Execution. |
|
Step # |
The test step number. Preconditions are listed as step 0. |
|
|
Select After you upload an attachment, the Case column displays the number of attachments the test step has. You can also view this test step attachment in the associated test case. Adding an attachment to a test case increases its version. |
|
Description |
The test case description. Select the Rich Text Editor icon |
|
Expected Result |
The result expected from the test step. Select the Rich Text Editor icon |
|
Actual Result |
The actual outcome of the test step. Select the Rich Text Editor icon The actual result for a test step is optional. Enter an actual result if it differs from the expected result, or to provide details on why a test step failed. |
|
|
Select After you upload an attachment, the Log column displays the number of attachments the test step has in the test run. |
|
Status |
Select a status from the dropdown in this column to choose a status for the individual test step. |
|
|
Select Add Defect For more information about submitting defects using the TestPad, check out Submit Defects in Test Execution. |
|
Action |
The Action column lets you organize your test steps while you run your test. Any changes you make here apply to the test case your test run is attached to when you save the test run. Select
Editing test steps increases the test case version. |
 Case
Case
 to display a rich text editor, which you can use to format the text in this column.
 Defects
The Test Run tab lets you view and change test run properties, such as the execution type, the priority, and the planned start and end dates. Changes you make on this tab update the latest version of the test run properties and the test log.
The Test Case Detailstab displays the test case details entered on theTest Design tab. You can edit the test case's Description from this tab.
Use the Attachments tab to view and add new file attachments for a test case or a test log, such as screenshots. These attachments are associated with the entire test case or test log, not to an individual test step.
From this tab, you can do the following:
-
Upload a new attachment: Select Add Test Case Attachmentto add an attachment to both the test log and the test case associated with the test run. Select Add Test Log Attachmentto add an attachment only to the test log for the current test run.
-
Delete an attachment: Select
 inDelete from the Action column to delete an attachment from the test run.
 -
View attachment details: View the Name, Uploaded by, andDate fields to seethe attachment name, who uploaded it, and when. Use the Type field to see which type of object the attachment belongs to.
-
Preview an attachment: Select an attachment to preview the file in qTest. Note that you can't preview PDF and Excel files, so you must download these files to view them.
This tab has a rich text editor that you can use to document information about the test run. View notes entered here in the Test Log Details section of the test run's Execution History tab, with a timestamp and the name of the user who added the note.
Use this tab to manually change the planned and actual execution times calculated for the test run.
Use this tab to see defects associated with related historical test runs. This lets you focus your testing to see if your previous bugs have been squished.
The Defects tab displays all defects linked to:
-
Previous test logs: Defects attached to test logsfrom previous runs ofthis test run.
-
Sibling test runs: Defects attached to test logs created from test runs attached to the same test case.
The columns that display on the Defectstab are configurable. Select the  Gear to display a list of columns. Select the checkboxes next to the columns you want to view on this tab.
Save work on the TestPad
When you're done with the test run,select an overall status for the test run, then select Save to save your work on the TestPad.
The Execution Timedialog calculates the test run time based on your start and end time. Before you save the test run, you can enter minutes in thePlanned Time and Actual Time fields to override this calculation.
After your test run is saved, you can close the TestPad. qTest automatically adds a test log, which records the test run, to the test run'sExecution Historysection.
What's next
After you complete your testing session, you can edit the test log to update statuses, defects, or attachments.