View and edit test logs
Whenever you complete a test run, qTest creates a test log. You can change the test run after you execute it. Those changes affect future executions, but they don't change the test log from executions that already happened.
Each executed test run adds another log, so one test run can have multiple logs on the Execution History tab. The test log with the highest number is the latest execution.
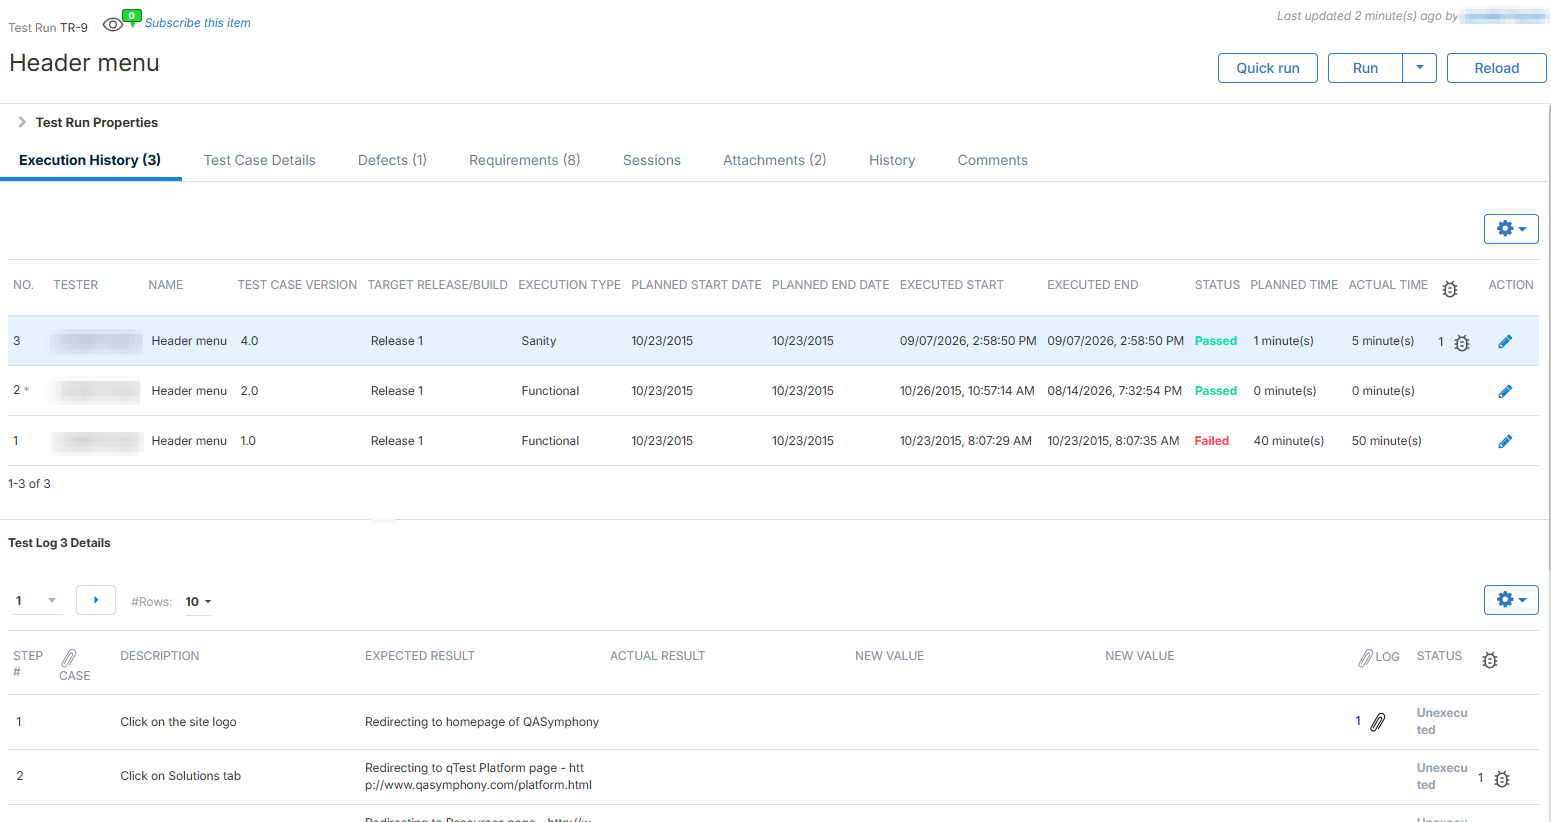
On the Execution History tab, each completed test run appears as a test log listed with its status, time, and linked defects
Before you start
To edit test logs, make sure you have the right permissions in your User Profile.
You must be one of the following:
-
The assigned tester with the permissions to Modify Test Logs (executed by others).
-
A user with the permissions to Modify Test Logs (executed by others).
Open a test log
To find a test log for a completed test run, follow these steps:
-
Go to the Test executions tab.
-
In the tree panel, select the object that contains the test run, such as a release, a test cycle, or a test suite.
-
On the Statistics tab, select the ID of the test run you want to view.
-
On the Execution History tab, view all test logs for completed test runs.
-
Select the test log you want to view. Then, check out the following sections:
Each time you complete a test run, the Execution History section adds a test log for it, which contains the following information:
|
Field |
Description |
|---|---|
|
No. |
The test log number. The log number starts at 1 goes up incrementally with each completed test run. |
|
Tester |
The user who executed the test run. |
|
Name |
The name of the test run. If you edit the test run name, all previous test log names also update. |
|
Test Case Version |
The version of the test case that was run. |
|
Target Release/Build |
The release or build that the test run belonged to. |
|
Execution Type |
The execution type of the test run. |
|
Planned Start Date and Planned End Date |
The dates the test run was planned for. |
|
Executed Start and Executed End |
The date and time that the test run actually started and ended. |
|
Status |
The overall status of the test run, such as Passed or Failed. |
|
Planned Time |
The expected amount of time the test run would take in minutes. |
|
Actual Time |
How long the test run actually took in minutes. |
|
Defects |
Displays a defect icon if one or more defects is linked to the test run. |
The Test Log Details section displays the historical step-level details of a test run execution, including expected and actual results. If you added notes during the test run, they also appear in Test Log Details, with a timestamp and the name of the user who added the note.
Edit test logs
You can still change the test log after a test run is completed. For example, to add a defect or some extra notes.
Note that you can't change every field. For example, you can't add test steps or edit any descriptions.
To edit a test log, follow these steps:
- Open the test log you want to edit and select
 Edit in the Action column to open it in the TestPad.
 -
Use the TestPad window to edit your test log.
Here's what you can edit on each tab:
Field
Description
Execute Steps
Edit the Status for both the test run and the test steps, Actual Results, Attachments, and Defects.
If you edit a status, the executed end date of the test log automatically updates to the date you edited the status.
Test Log
Edit the Execution Type, Planned Start Date, and Planned End Date. Note that you can't edit the Status from this tab.
Attachments
Add or remove test log and test case attachments.
Notes
Edit or add notes to your test log.
Time Tracking
Edit Planned Time and Actual Time for the historical test run.
-
Save your changes.
Add defects to a saved test log
If you didn't submit a defect during the test run, add or link one from the saved test log. Use this when you report failed results from automation, including scheduled test automation.
To add a defect from Execution History, follow these steps:
-
Open the test log that needs a defect.
-
Select the defect icon for the log or for a test step:
-
On the test log line in the Execution History grid, to add a defect to the whole test log.
-
In Test Log Details, to add a defect to an individual test step.
-
-
In the Add Defects window, search for an existing defect, or enter a defect ID and select Link. Or, select New to create a new defect.
-
Close the window when you finish.
To remove a linked defect from the test log, select the Delete icon in the Add Defects window.
You can also open the test log in the TestPad and add defects from Execute Steps, the same way you do during a live run.
View edit history of test logs
After you edit a test log, an asterisk appears next to the test log number on the Execution History tab. Go to the History tab to review a summary of changes made to test logs.
What's next
Create and manage defects on the Defects tab when you need an ad-hoc defect, a clone, or an Excel import.