Create test runs
After you set up your test execution hierarchy, create test runs to schedule and track testing. A test run links a test case to a test cycle or test suite, so testers can run the test case and log results.
You can't add test runs to objects that are linked to objects in Tosca OnPremises or Tosca Cloud.
Access the Add Test Runs dialog
Most methods for adding test runs start in the Add Test Runs dialog. You can work in either tree view or data query view, depending on how you prefer to find objects.
To open the Add Test Runs dialog and start adding test runs, follow these steps:
-
In qTest Manager, go to the Test executions tab.
-
In the tree panel on the left, select the release, test cycle, or test suite that you want to add runs to. You can't add test runs directly under the root project.
When you add a test run to a test cycle or test suite, it inherits properties from that cycle or suite at the time you add it. If you change cycle or suite properties later, you must manually update the test run properties.
-
Select the Add Test Runs icon
 in the toolbar to open the Add Test Runs dialog.
Use tree view
The first time you open the Add Test Runs dialog, it opens in tree view. After this, Manager remembers the view you had open the last time you were in Add Test Runs. If you switch to data query view, you can return to tree view at any time by selecting Tree view in the bottom left corner.
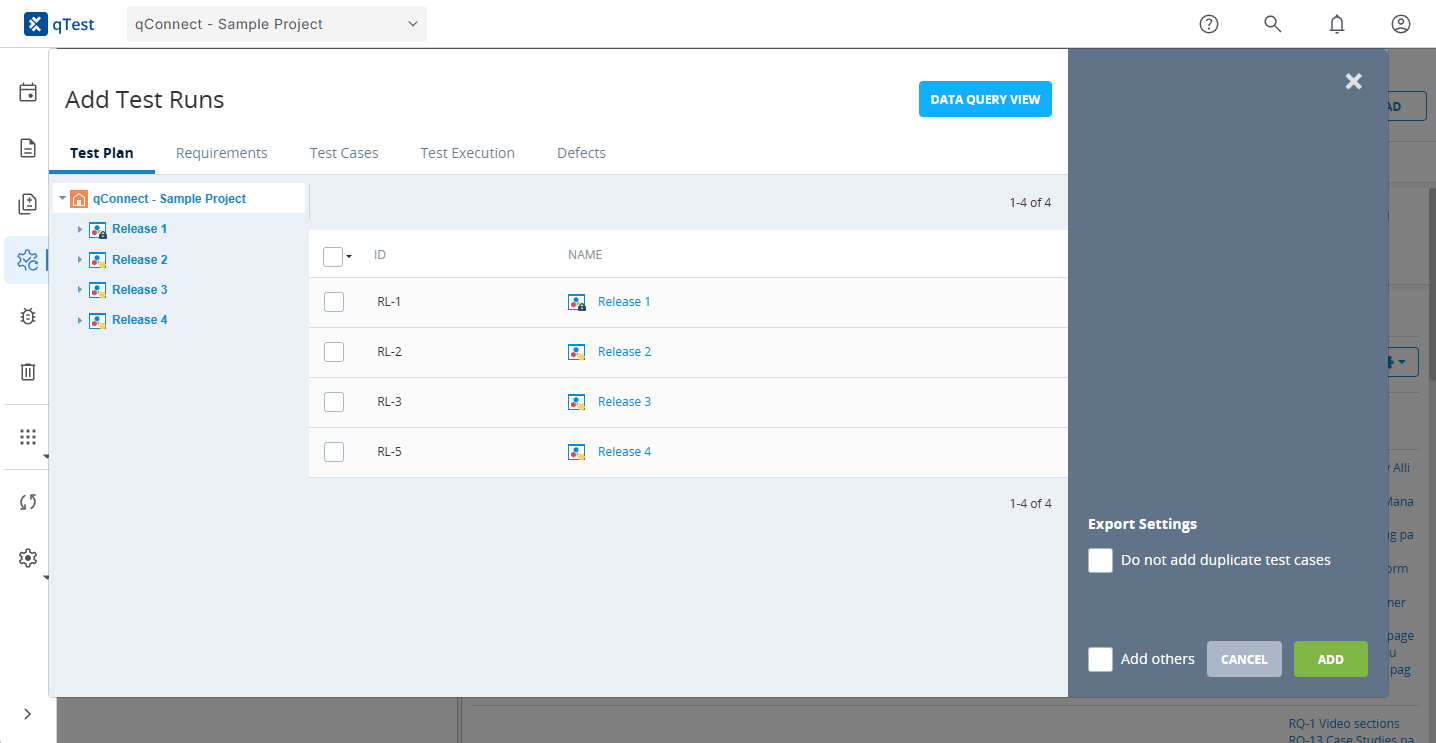
Tree view displays your test objects that are ready for test runs with the same organization they have in qTest Manager.
When you select an object in the tree, it displays the related sub-objects in a list in the middle of the dialog. For example, on the Test Plan tab, select a release in the tree to display builds and requirements that belong to that release in the list.
Selections persist when you navigate the tree or switch tabs, so you can combine objects. For example, you can select five requirements on the Test Plan tab and three test cases on the Test Cases tab. When you select Add on the Test Cases tab, qTest creates test runs for all eight selected objects.
Tree view is organized into tabs that reflect the structure of Manager. Here's each tab and what you can do from it:
| Tab | Description |
|---|---|
| Test Plan | Select releases, builds, or requirements to create test runs. |
| Requirements |
Select requirements to create test runs. Use the Search field to find requirements by ID or name. |
| Test Cases |
Select test cases to create test runs, or create test runs from test cases in another project. Use the Search field to find modules or test cases by ID or name. You can also select Display test cases that have not been added to refresh the grid and show only test cases that haven't already been added to the current project. |
| Test Execution | Select existing test runs, test cycles, or test suites to create new test runs. You can also use the Search field to find test runs, test cycles, or test suites by ID or name. |
| Defects |
Select internal or externally tracked defects to create test runs. Select Fetch to pull the latest defect data from your external defect tracking system and refresh the Defects grid. |
Create test runs in tree view
You can create test runs from several types of objects in tree view, depending on your testing process and need. Although there are certain differences, the general workflow is the same.
To create test runs in tree view, follow these steps:
-
Select the tab for the type of object you want to create test runs from. If you're not sure which object you want to use, take a look at the objects you have available.
-
Use the tree panel on the left to navigate to the object you want to use.
This tree reflects the structure of each tab's tree, as you've previously organized your hierarchy. When you select an object in the tree panel, all of its sub-objects display in the list on the right.
-
You have the following options for the objects displayed in the list:
-
Select the checkbox next to the object you want to create a test run for.
-
Select the checkbox at the top of the checkbox column to create a test run for every object in the grid.
-
-
Optionally, configure export settings.
-
Select Add to save your new test runs and close the Add Test Runs dialog. Manager displays a message letting you know how many test runs were successfully created.
Choose the object you want use to create a test run
While all test runs are attached to a test case, you can select different kinds of objects in tree view to find the test case, or test cases.
For example, selecting a requirement lets you create a test run for each test case attached to that requirement, helping you organize your tests and save time when you're testing an upcoming release.
Select your use case to learn which object best meets your needs:
All test runs are attached to a single test case, so this is the most basic form of test case creation. This is useful if you know the exact test case, or module of test cases, that you need to run tests for.
To find a test case, go to the Test Cases tab in the Add Test Runs dialog. When you create a test run from a test case, you can select one or more test cases, or you can select a module to create test runs for every test case in that module.
When you create test runs from requirements, qTest adds a test run for each test case linked to the requirements you select. This approach works well when you're testing new features.
For example, let's say you have a release coming up that contains two requirements. After you've created test cases for those requirements, you can add test runs for all of these test cases to a single test suite with just one step.
To find a requirement, go to either the Requirements or the Test Plan tab. Optionally, if you are in the Requirements tab, you can use the Search field to find requirements by ID or name.
You can create new test runs from defects linked to previously executed test runs. This option is useful when you're retesting defects after they've been fixed. To create or import those defects first, see Create and manage defects.
To find a defect, go to the Defects tab. This is the only tab without a file tree. The list displays all defects linked to a test run. Optionally, use the Search field to find defects by ID or summary.
The list displays both internally tracked defects, as well as any defects from external systems, such as Jira. Internal defects display a status icon in the Status column. External defects don't display a value in the Status column. Select the Display internal defects only checkbox to show only defects tracked in qTest. Leave the checkbox clear to display both external and internal defects. Select Fetch to pull the latest defect data from your external defect tracking system and refresh the Defects grid.
Creating a test run from a linked defect starts a new test run with its own execution history. To continue the execution history of an existing test run instead, drag and drop the test run into the new test suite. For more information, see Copy and move objects.
If you need to execute the same test cases across multiple projects, you can create test runs from test cases in another project. Before you can do this, share test cases from one project to another. For more information, see Share test cases with another project.
Then, when you're in the Test Cases tab, you can use the Projects field to select the project you want to add test cases from.
If you have a previous test you want to run again, you can use that object to create a new, identical test run that's attached to the same test case as the previous test run. For example, if you have a test run that's failed, you can use it to create an unexecuted test run to check your fixes.
To add previously executed test runs to the current release, go to the Test Execution tab. From there, you can select test runs, or you can select an entire test suite, test cycle, or release to add test runs in bulk.
You can also copy previously executed test runs in bulk to the current release. For more information, see Copy and move objects.
Use data query view
To switch to data query view, select Data Query View in the top-right corner when you're in tree view.
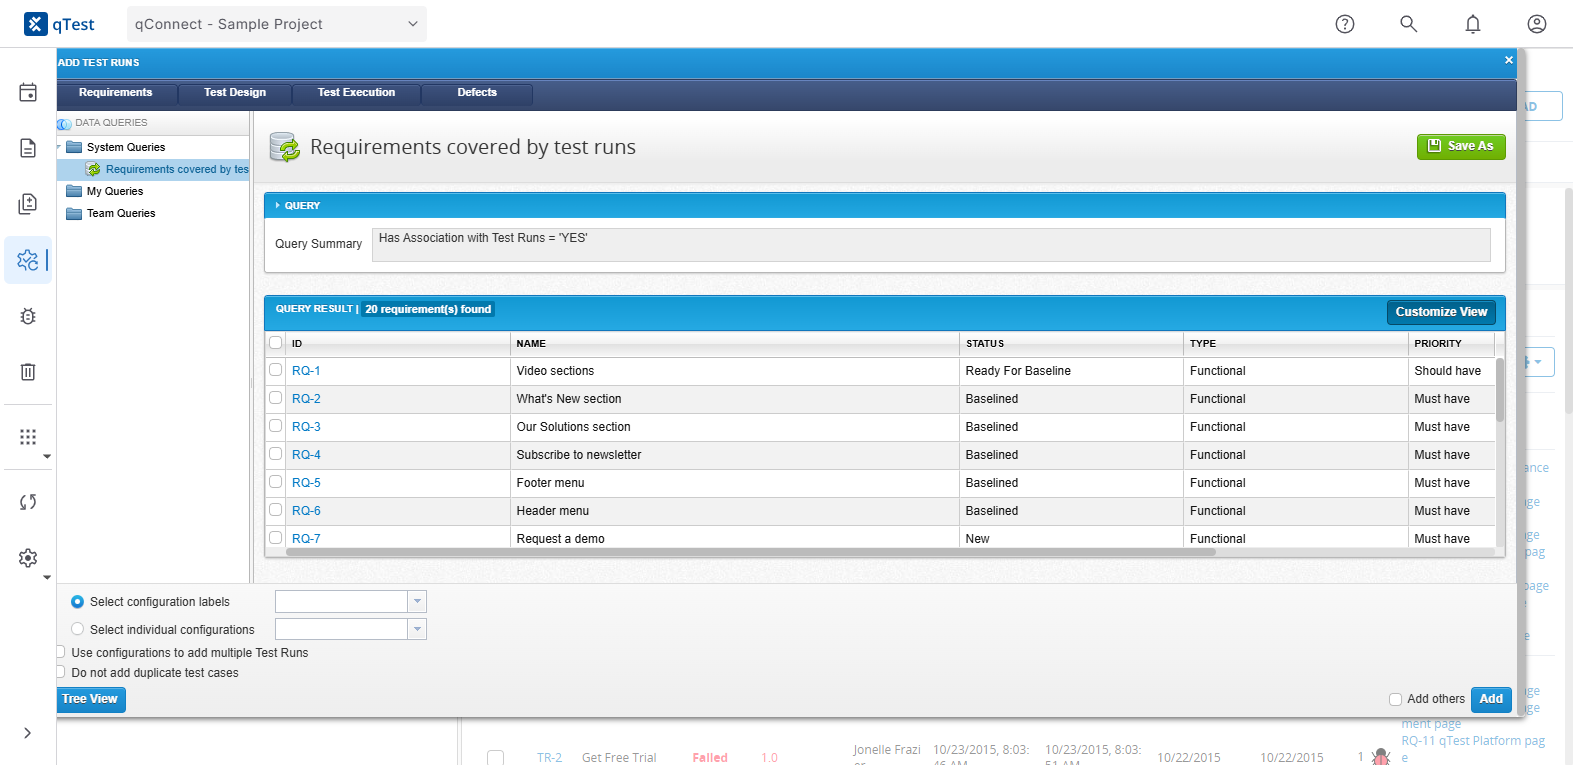
Use data query view to create new or access existing queries that find testing objects according to your needs.
In data query view, you can search for and select objects using qTest's Data Query feature.
The following tabs are available in data query view:
| Tab | Description |
|---|---|
| Requirements | Run queries for requirements, such as queries that display unassigned requirements. |
| Test Design | Run queries for test cases, such as queries that display all approved test cases or test cases without test steps. |
| Test Execution | Run queries for test runs, such as queries that display unassigned test runs or test runs not associated with requirements. |
| Defects |
Run queries for defects, such as queries that display only closed defects. |
Create test runs in data query view
In data query view on the Add Test Runs dialog, you can build queries to search for objects and create test runs for the results. Use this to filter and add test runs in bulk or according to your specific needs.
To create test runs with data query, follow these steps:
-
Select Data Query View.
-
On the appropriate tab, select or build a query to find the objects you want to create test runs for.
Custom queries you build and save in data query view on the Add Test Runs dialog aren't saved to the Data Query feature on other qTest Manager tabs, such as the Requirements or Test Execution tabs. Queries you save on the Add Test Runs dialog also can't be shared across a team.
-
Select the objects you want to create test runs for.
-
Optionally, configure export settings. This is located at the bottom of the window in data query view.
-
Select Add to save your new test runs and close the Add Test Runs dialog. Manager displays a message letting you know how many test runs were successfully created.
Export settings
Export settings are available in both tree view and data query view. Use them to control how test runs are added, such as whether to skip duplicate test cases or keep the dialog open after you add test runs.
See the table below for the available export options:
| Option | Description |
|---|---|
| Retain test design structure |
Select this checkbox to use your established module structure from Test Design on your test runs on the Test Execution tab. Modules on the Test Design tab that contain submodules are created as test cycles on the Test Execution tab. Modules without submodules are created as test suites. This checkbox only displays when you select a single module in the Test Cases tab. There is currently a known issue that causes test cycles and test suites to be created in reverse order when you select Retain test design structure. You may need to manually reorder these objects after creating your test runs. |
| Do not add duplicate test cases |
Select this checkbox to add test runs only to the current project. This option is useful when you add test runs from test cases shared with another project. If you leave this checkbox clear when you add test runs from shared test cases, test runs are added to both the current project and the project the test cases are shared from. |
| Use configurations to add multiple Test Runs |
Select this checkbox to create test runs based on legacy configurations. Legacy configurations let you maintain a single test case that you can use for multiple test runs, with each test run representing a different configuration of the same test case. For example, you can create multiple test runs to execute a single test case in multiple browsers: Chrome, Firefox, and Safari. Before you use this feature, you must set up Legacy Configurations. Then, when you select this checkbox, you can select the configuration labels and values that you've previously set up. |
| Add others |
Select this checkbox to keep the Add Test Runs dialog open after test runs are added so you can continue adding more. When test runs are added with this option selected, a success message appears and the dialog stays open. If you leave this checkbox cleared, the dialog closes after you add test runs. |
What's next
After you create test runs, assign them to testers or start running them.
If your test cases use parameters, see Create Test Runs using Parameters and Datasets for another way to create test runs.