Complete Row by Row Comparison module
The Complete Row by Row comparison module performs reconciliation tests by comparing every source row with every target row. These tests are more accurate than aggregated tests, but they can take significantly more time and system resources depending on the size of the data sets.
This topic lists all the row by row comparison test step values that you need for your reconciliation tests.
Define your source and target
Fill out the Source and Target test step values to connect to your data source and target. You can choose between the following data types:
We support both ODBC and JDBC databases. Depending on what you want to use in your tests, fill out the following test step values:
|
Value |
Description |
Optional |
|---|---|---|
|
Connection |
Use this module attribute if you want to use one of the connections you have defined in the Data Integrity connections. The Connection module attribute replaces the module attributes DSN, UserID, Password, and ConnectionString. To specify which connection you want to use in your test, click into the Value field and select a connection from the drop-down menu. Note that you can't override the specified connection with dynamic expressions, such as buffers or test case parameters. |
X |
|
DSN |
Specify the data source you want to use for your comparison. Enter the Data Source Name specified in the ODBC Data Source Administrator. After a connection is established, this is also used as ConnectionName. |
X |
|
UserID |
User of the database which you want to use. |
X |
|
Password |
Password of the user. |
X |
|
Connection String |
Uses the defined connection string instead of the DSN, UserID, and Password values. |
X |
|
SQL Statement |
The SQL statement you want to execute. You can use our SQL editor to draft and test your query. To do so, hover over the SQL Statement test step and select |
|
|
Options - Connection Timeout |
Time in seconds after which Tosca Cloud aborts an active connection. |
X |
|
Options - Command Timeout |
Time in seconds after which Tosca Cloud aborts an active command. |
X |
|
Options - Byte Array Handling |
Defines which encoding Tosca Cloud should use if the data type is a byte array. |
X |
 then
then 
|
Value |
Description |
Optional |
|---|---|---|
|
Connection String |
JDBC connection string to access the database. Example: jdbc:sqlserver://1.2.3.4:49789;instanceName=SampleInstance;databaseName=TestDB;user=myUser;password=myPassword |
|
|
Class Name |
JDBC driver class name that you want to instantiate. Example: com.mysql.jdbc.Driver |
|
|
Driver Directory |
Directory of the JDBC driver. |
|
|
SQL Statement |
The SQL statement you want to execute. You can use our SQL editor to draft and test your query. To do so, hover over the SQL Statement test step and select |
|
|
Options - Fetch Size |
Define how many rows Tosca Cloud should fetch at a time until it has all source/target rows. The default number depends on your JDBC driver. |
X |
To use a file as your source or target, fill out the following test step values:
We support Avro files as source or target.
Limitations
Working with Avro files has the following limitations:
-
Supported compression codecs are GZIP, Snappy, and 'none'.
-
Avro maps aren't supported.
-
Skipping rows isn't supported.
-
Data Integrity supports only one level of nesting for the result of a JSONPath. Deeper nested objects and arrays are stringified. To express access to deeper nested objects, use a separate JSONPath.
-
Data Integrity doesn't support cartesian products, which is when two JSONPaths return values from two different arrays.
Work with JSONPaths
JSONPaths allow you to transform a hierarchical Avro file into a tabular format. The Reconciliation Module only supports tabular comparisons.
To determine and test JSONPaths, we recommend that you convert the Avro file into a JSON representation and then use the JSON output in a JSONPath tester like JSONPath Online Evaluator (opens in new tab).
You can create a file with JSONPaths to select specific column names and transformation logic from your Avro file. This helps flatten the file.
Use a file with JSONPaths to select column names from an Avro file. First, you use an Avro file reader to convert the content of your file to JSON format:
{
"date": "2021-01-14T10:14:04.997",
"url": "www.tricentis.com",
"persons": [
{
"firstName": "John",
"lastName": "Doe",
"age": 30,
"address": {
"streetAddress": "Home street",
"city": "Melbourne",
"postalCode": "4000"
}
},
{
"firstName": "Jane",
"lastName": "Doe",
"age": 30,
"address": {
"streetAddress": "Home street",
"city": "Brisbane",
"postalCode": "6000"
}
}
]
}
To select columns names, you create a file that contains JSONPaths in the following format:
{
"Paths": [
{
"Name": "Date",
"JSONPath": "$.date"
},
{
"Name": "Url",
"JSONPath": "$.url"
},
{
"Name": "Firstname",
"JSONPath": "$.persons[*].firstName"
},
{
"Name": "Address",
"JSONPath": "$.persons[*].address"
}
]
}
The row-by-row comparison can now read the file in the following way:
Date,Url,Firstname,Address.city,Address.postalCode,Address.streetAddress
2021-01-14T10:14:04.997,www.tricentis.com,John,Melbourne,4000,Home street
2021-01-14T10:14:04.997,www.tricentis.com,Jane,Brisbane,6000,Home street
Choose one of the following Avro file types:
|
Value |
Description |
Optional |
|---|---|---|
|
Path |
Full path to an Avro file or a folder that contains multiple Avro files with the same schema. You can use wildcards*. If you use a folder or wildcard, Data Integrity orders the files by name and reads them first to last. Examples: C:\MyAvroFolder\Sample.avro C:\MyAvroFolder C:\MyAvroFolder\Samples*.avro |
|
|
JSONPaths Filename |
Full path to a file with JSONPaths. This allows Tosca Cloud to select column names and transformation logic. The JSONPaths file must be in the same bucket/directory as the data files or in a sub-bucket/directory. If the file is in a sub-bucket/directory, enter the relative path together with the file name. If you leave this value empty, Data Integrity uses a wildcards* as JSONPath. It unpacks hierarchical structures one level deep. Sample content for JSONPath: Copy
For Name, note the following:
|
|
|
Value |
Description |
Optional |
|---|---|---|
|
Access Key Id |
S3 access key ID. |
|
|
Bucket Name |
Name of the bucket that contains the file. If you store the file in a sub-folder, enter the path in the following format: <bucket name>/<sub-folder>. Example: MyBucketName/MyFolder/AnotherFolder |
|
|
Filename |
Full name of your source/target file. Use wildcards* to specify multiple files. |
|
|
Provider Name |
Name of your S3 provider. You can enter one of the following values:
|
|
|
Region |
The physical region where the file is stored. Examples: us-east-1: US Region, Northern Virginia, or Pacific Northwest eu-central-1 : EU (Frankfurt) Region ap-southeast-2: Asia Pacific (Sydney) Region |
|
|
Secret Access Key |
Secret access key. If you want to access the file anonymously, leave the value blank. |
X |
|
JSONPaths Filename |
Full path to a file with JSONPaths. This allows Tosca Cloud to select column names and transformation logic. The JSONPaths file must be in the same bucket/directory as the data files or in a sub-bucket/directory. If the file is in a sub-bucket/directory, enter the relative path together with the file name. If you leave this value empty, Data Integrity uses a wildcards* as JSONPath. It unpacks hierarchical structures one level deep. Sample content for JSONPath: Copy
For Name, note the following:
|
X |
|
Value |
Description |
Optional |
|---|---|---|
|
Service Account Filepath |
Path to the JSON file that contains the service account credentials. |
|
|
Project Id |
Globally unique identifier of the project you want to access. |
|
|
Region |
The physical region where the file is stored. Examples: us-east-1: US Region, Northern Virginia, or Pacific Northwest eu-central-1 : EU (Frankfurt) Region ap-southeast-2: Asia Pacific (Sydney) Region |
|
|
Bucket Name |
Name of the bucket that contains the file. If you store the file in a sub-folder, enter the path in the following format: <bucket name>/<sub-folder>. Example: MyBucketName/MyFolder/AnotherFolder |
|
|
Filename |
Name of your source or target file and its relative path from the bucket root. |
|
|
JSONPaths Filename |
Full path to a file with JSONPaths. This allows Tosca Cloud to select column names and transformation logic. The JSONPaths file must be in the same bucket/directory as the data files or in a sub-bucket/directory. If the file is in a sub-bucket/directory, enter the relative path together with the file name. If you leave this value empty, Data Integrity uses a wildcards* as JSONPath. It unpacks hierarchical structures one level deep. Sample content for JSONPath: Copy
For Name, note the following:
|
X |
|
Value |
Description |
Optional |
|---|---|---|
|
Account |
Storage account name. |
|
|
Key |
Storage account key. |
|
|
SAS Url |
Account-level SAS URL or container level SAS URL. If you use Account and Key instead, leave this value blank. Example: https://blobname.blob.core.windows.net/?sv=2020-08-04&ss=bfqt&srt=sco&sp=rwdlacupitfx&se=2023-12-10T16:46:02Z&st=2021-12-10T08:46:02Z&spr=https&sig=XXXX |
X |
|
Bucket Name |
Name of the bucket that contains the file. If you store the file in a sub-folder, enter the path in the following format: <bucket name>/<sub-folder>. Example: MyBucketName/MyFolder/AnotherFolder |
|
|
Filename |
Name of your source or target file and its relative path from the bucket root. |
|
|
JSONPaths Filename |
Full path to a file with JSONPaths. This allows Tosca Cloud to select column names and transformation logic. The JSONPaths file must be in the same bucket/directory as the data files or in a sub-bucket/directory. If the file is in a sub-bucket/directory, enter the relative path together with the file name. If you leave this value empty, Data Integrity uses a wildcards* as JSONPath. It unpacks hierarchical structures one level deep. Sample content for JSONPath: Copy
For Name, note the following:
|
X |
If you want to integrate a different Cloud Service Provider on your agent machine, you need to create your own rclone configuration. To do so, run the executable file rclone_x64_windows.exe.
|
Value |
Description |
Optional |
|---|---|---|
|
Configuration Filename |
Name of the local rclone configuration file. |
|
|
Remote Name |
Name of the configuration section from the configuration file. |
|
|
Bucket Name |
Name of the bucket that contains the file. If you store the file in a sub-folder, enter the path in the following format: <bucket name>/<sub-folder>. Example: MyBucketName/MyFolder/AnotherFolder |
|
|
Filename |
Name of your source or target file. |
|
|
JSONPaths Filename |
Full path to a file with JSONPaths. This allows Tosca Cloud to select column names and transformation logic. The JSONPaths file must be in the same bucket/directory as the data files or in a sub-bucket/directory. If the file is in a sub-bucket/directory, enter the relative path together with the file name. If you leave this value empty, Data Integrity uses a wildcards* as JSONPath. It unpacks hierarchical structures one level deep. Sample content for JSONPath: Copy
For Name, note the following:
|
X |
For more information about how to configure rclone, click here (opens in new tab).
When you work with CSV files, use the format recommended in RFC 4180 (opens in new tab). This ensures that Tosca Cloud can handle the files properly.
Choose one of the following CSV file types:
|
Value |
Description |
Optional |
|---|---|---|
|
Filename |
Full file path and file name of your source or target file. |
|
|
Options - Column Separator |
Character that delimits columns, if you use a column deliminator in your tables. |
x |
|
Options - Row Separator |
Character that delimits a row. The default value is \r\n. |
x |
|
Options - Skip Lines Starting With |
Character that excludes rows from the test. Tosca Cloud excludes any row that starts with this charater. You can define multiple characters; to do so, enter a semicolon-separated list. |
x |
|
Options - Encoding |
File encoding format. The default value is UTF8. You can specify these file encoding formats:
For a complete list of supported encodings, check out Microsoft documentation (opens in new tab). |
x |
|
Value |
Description |
Optional |
|---|---|---|
|
Hostname |
Name of the host to which you want to connect. By default, port 22 is used. |
|
|
Filename |
Full file path and file name. For example: /demo/data/Customer/DWH_Extract_Hadoop.txt |
|
|
UserID |
User used to connect via SSH. |
|
|
Password |
Password of the user. |
|
|
Options - Column Separator |
Specify the separator, if columns are delimited with a separator. |
|
|
Options - Row Separator |
Character which delimits a row. The default value is \r\n. |
X |
|
Options - Encoding |
File encoding format. The default value is UTF8. You can specify these file encoding formats:
For a complete list of supported encodings, check out Microsoft documentation (opens in new tab). |
X |
|
Options - Buffer Size |
Number of bytes the read buffer uses when fetching data. This should be greater than the number of bytes in each row. The default value is 1024. |
X |
|
Options - Skip Lines Starting With |
Rows which start with the specified values are excluded from tests. To define more than one value, enter a semicolon-separated list. |
X |
|
Value |
Description |
Optional |
|---|---|---|
|
Access Key Id |
S3 access key ID. |
|
|
Bucket Name |
Name of the bucket that contains the file. If you store the file in a sub-folder, enter the path in the following format: <bucket name>/<sub-folder>. Example: MyBucketName/MyFolder/AnotherFolder |
|
|
Filename |
Full name of your source/target file. Use wildcards* to specify multiple files. |
|
|
Provider Name |
Name of your S3 provider. You can enter one of the following values:
|
|
|
Region |
The physical region where the file is stored. Examples: us-east-1: US Region, Northern Virginia, or Pacific Northwest eu-central-1 : EU (Frankfurt) Region ap-southeast-2: Asia Pacific (Sydney) Region |
|
|
Secret Access Key |
Secret access key. If you want to access the file anonymously, leave the value blank. |
X |
|
Options - Column Separator |
Character that delimits columns, if you use a column deliminator in your tables. |
X |
|
Options - Row Separator |
Character that delimits a row. The default value is \r\n. |
X |
|
Options - Skip Lines Starting With |
Rows which start with the specified value are excluded from tests. To define more than one value, enter a semicolon-separated list. |
X |
|
Options - Encoding |
File encoding format. The default value is UTF8. You can specify these file encoding formats:
For a complete list of supported encodings, check out Microsoft documentation (opens in new tab). |
X |
|
Value |
Description |
Optional |
|---|---|---|
|
Service Account Filepath |
Path to the JSON file that contains the service account credentials. |
|
|
Project Id |
Globally unique identifier of the project you want to access. |
|
|
Region |
The physical region where the file is stored. Examples: us-east-1: US Region, Northern Virginia, or Pacific Northwest eu-central-1 : EU (Frankfurt) Region ap-southeast-2: Asia Pacific (Sydney) Region |
|
|
Bucket Name |
Name of the bucket that contains the file. If you store the file in a sub-folder, enter the path in the following format: <bucket name>/<sub-folder>. Example: MyBucketName/MyFolder/AnotherFolder |
|
|
Filename |
Name of your source or target file and its relative path from the bucket root. |
|
|
Options - Column Separator |
Character that delimits columns, if you use a column deliminator in your tables. |
X |
|
Options - Row Separator |
Character that delimits a row. The default value is \r\n. |
X |
|
Options - Skip Lines Starting With |
Rows which start with the specified value are excluded from tests. To define more than one value, enter a semicolon-separated list. |
X |
|
Options - Encoding |
File encoding format. The default value is UTF8. You can specify these file encoding formats:
For a complete list of supported encodings, check out Microsoft documentation (opens in new tab). |
X |
|
Value |
Description |
Optional |
|---|---|---|
|
Account |
Storage account name. |
|
|
Key |
Storage account key. |
|
|
SAS Url |
Account-level SAS URL or container level SAS URL. If you use Account and Key instead, leave this value blank. Example: https://blobname.blob.core.windows.net/?sv=2020-08-04&ss=bfqt&srt=sco&sp=rwdlacupitfx&se=2023-12-10T16:46:02Z&st=2021-12-10T08:46:02Z&spr=https&sig=XXXX |
X |
|
Bucket Name |
Name of the bucket that contains the file. If you store the file in a sub-folder, enter the path in the following format: <bucket name>/<sub-folder>. Example: MyBucketName/MyFolder/AnotherFolder |
|
|
Filename |
Name of your source or target file and its relative path from the bucket root. |
|
|
Options - Column Separator |
Character that delimits columns, if you use a column deliminator in your tables. |
X |
|
Options - Row Separator |
Character that delimits a row. The default value is \r\n. |
X |
|
Options - Skip Lines Starting With |
Rows which start with the specified value are excluded from tests. To define more than one value, enter a semicolon-separated list. |
X |
|
Options - Encoding |
File encoding format. The default value is UTF8. You can specify these file encoding formats:
For a complete list of supported encodings, check out Microsoft documentation (opens in new tab). |
X |
If you want to integrate a different Cloud Service Provider on your agent machine, you need to create your own rclone configuration. To do so, run the executable file rclone_x64_windows.exe.
|
Value |
Description |
Optional |
|---|---|---|
|
Configuration Filename |
Name of the local rclone configuration file. |
|
|
Remote Name |
Name of the configuration section from the configuration file. |
|
|
Bucket Name |
Name of the bucket that contains the file. If you store the file in a sub-folder, enter the path in the following format: <bucket name>/<sub-folder>. Example: MyBucketName/MyFolder/AnotherFolder |
|
|
Filename |
Name of your source or target file. |
|
|
Options - Column Separator |
Character that delimits columns, if you use a column deliminator in your tables. |
X |
|
Options - Row Separator |
Character that delimits a row. The default value is \r\n. |
X |
|
Options - Skip Lines Starting With |
Rows which start with the specified value are excluded from tests. To define more than one value, enter a semicolon-separated list. |
X |
|
Options - Encoding |
File encoding format. The default value is UTF8. You can specify these file encoding formats:
For a complete list of supported encodings, check out Microsoft documentation (opens in new tab). |
X |
For more information about how to configure rclone, click here (opens in new tab).
Tosca Cloud support Parquet files as your source or target.
Limitations
Working with Parquet files has the following limitations:
-
Parquet files are read in tabular format. Hierarchical structures are transformed into a table structure.
-
The supported compression codecs are GZIP, Snappy, and 'none'.
-
Skipping rows isn't supported.
Choose one of the following file types:
|
Value |
Description |
Optional |
|---|---|---|
|
Path |
Full path to an Avro file or a folder that contains multiple Avro files with the same schema. You can use wildcards*. If you use a folder or wildcard, Data Integrity orders the files by name and reads them first to last. Examples: C:\MyAvroFolder\Sample.avro C:\MyAvroFolder C:\MyAvroFolder\Samples*.avro |
|
|
Value |
Description |
Optional |
|---|---|---|
|
Access Key Id |
S3 access key ID. |
|
|
Bucket Name |
Name of the bucket that contains the file. If you store the file in a sub-folder, enter the path in the following format: <bucket name>/<sub-folder>. Example: MyBucketName/MyFolder/AnotherFolder |
|
|
Filename |
Full name of your source or target file. Use wildcards* to specify multiple files. |
|
|
Provider Name |
Name of your S3 provider. You can enter one of the following values:
|
|
|
Region |
The physical region where the file is stored. Examples: us-east-1: US Region, Northern Virginia, or Pacific Northwest eu-central-1 : EU (Frankfurt) Region ap-southeast-2: Asia Pacific (Sydney) Region |
|
|
Secret Access Key |
Secret access key. If you want to access the file anonymously, leave the value blank. |
X |
|
Value |
Description |
Optional |
|---|---|---|
|
Service Account Filepath |
Path to the JSON file that contains the service account credentials. |
|
|
Project Id |
Globally unique identifier of the project you want to access. |
|
|
Region |
The physical region where the file is stored. Examples: us-east-1: US Region, Northern Virginia, or Pacific Northwest eu-central-1 : EU (Frankfurt) Region ap-southeast-2: Asia Pacific (Sydney) Region |
|
|
Bucket Name |
Name of the bucket that contains the file. If you store the file in a sub-folder, enter the path in the following format: <bucket name>/<sub-folder>. Example: MyBucketName/MyFolder/AnotherFolder |
|
|
Filename |
Name of your source or target file and its relative path from the bucket root. |
|
|
Value |
Description |
Optional |
|---|---|---|
|
Account |
Storage account name. |
|
|
Key |
Storage account key. |
|
|
SAS Url |
Account-level SAS URL or container level SAS URL. If you use Account and Key instead, leave this value blank. Example: https://blobname.blob.core.windows.net/?sv=2020-08-04&ss=bfqt&srt=sco&sp=rwdlacupitfx&se=2023-12-10T16:46:02Z&st=2021-12-10T08:46:02Z&spr=https&sig=XXXX |
X |
|
Bucket Name |
Name of the bucket that contains the file. If you store the file in a sub-folder, enter the path in the following format: <bucket name>/<sub-folder>. Example: MyBucketName/MyFolder/AnotherFolder |
|
|
Filename |
Name of your source or target file and its relative path from the bucket root. |
|
If you want to integrate a different Cloud Service Provider on your agent machine, you need to create your own rclone configuration. To do so, run the executable file rclone_x64_windows.exe.
|
Value |
Description |
Optional |
|---|---|---|
|
Configuration Filename |
Name of the local rclone configuration file. |
|
|
Remote Name |
Name of the configuration section from the configuration file. |
|
|
Bucket Name |
Name of the bucket that contains the file. If you store the file in a sub-folder, enter the path in the following format: <bucket name>/<sub-folder>. Example: MyBucketName/MyFolder/AnotherFolder |
|
|
Filename |
Name of your source or target file. |
|
For more information about how to configure rclone, click here (opens in new tab).
Choose your JSON storage technology:
|
Value |
Description |
Optional |
|---|---|---|
|
Filename |
Absolute path to your source or target file. |
|
|
JSONPaths Filename |
Full path to a file with JSONPaths. This allows Tosca Cloud to select column names and transformation logic. The JSONPaths file must be in the same bucket/directory as the data files or in a sub-bucket/directory. If the file is in a sub-bucket/directory, enter the relative path together with the file name. If you leave this value empty, Data Integrity uses a wildcards* as JSONPath. It unpacks hierarchical structures one level deep. Sample content for JSONPath: Copy
For Name, note the following:
|
|
|
Value |
Description |
Optional |
|---|---|---|
|
Access Key Id |
S3 access key ID. |
|
|
Bucket Name |
Name of the bucket that contains the file. If you store the file in a sub-folder, enter the path in the following format: <bucket name>/<sub-folder>. Example: MyBucketName/MyFolder/AnotherFolder |
|
|
Filename |
Full name of your source or target file. Use wildcards* to specify multiple files. |
|
|
Provider Name |
Name of your S3 provider. You can enter one of the following values:
|
|
|
Region |
The physical region where the file is stored. Examples: us-east-1: US Region, Northern Virginia, or Pacific Northwest eu-central-1 : EU (Frankfurt) Region ap-southeast-2: Asia Pacific (Sydney) Region |
|
|
Secret Access Key |
Secret access key. If you want to access the file anonymously, leave the value blank. |
X |
|
JSONPaths Filename |
Full path to a file with JSONPaths. This allows Tosca Cloud to select column names and transformation logic. The JSONPaths file must be in the same bucket/directory as the data files or in a sub-bucket/directory. If the file is in a sub-bucket/directory, enter the relative path together with the file name. If you leave this value empty, Data Integrity uses a wildcards* as JSONPath. It unpacks hierarchical structures one level deep. Sample content for JSONPath: Copy
For Name, note the following:
|
X |
|
Value |
Description |
Optional |
|---|---|---|
|
Service Account Filepath |
Path to the JSON file that contains the service account credentials. |
|
|
Project Id |
Globally unique identifier of the project you want to access. |
|
|
Region |
The physical region where the file is stored. Examples: us-east-1: US Region, Northern Virginia, or Pacific Northwest eu-central-1 : EU (Frankfurt) Region ap-southeast-2: Asia Pacific (Sydney) Region |
|
|
Bucket Name |
Name of the bucket that contains the file. If you store the file in a sub-folder, enter the path in the following format: <bucket name>/<sub-folder>. Example: MyBucketName/MyFolder/AnotherFolder |
|
|
Filename |
Name of your source or target file and its relative path from the bucket root. |
|
|
JSONPaths Filename |
Full path to a file with JSONPaths. This allows Tosca Cloud to select column names and transformation logic. The JSONPaths file must be in the same bucket/directory as the data files or in a sub-bucket/directory. If the file is in a sub-bucket/directory, enter the relative path together with the file name. If you leave this value empty, Data Integrity uses a wildcards* as JSONPath. It unpacks hierarchical structures one level deep. Sample content for JSONPath: Copy
For Name, note the following:
|
X |
|
Value |
Description |
Optional |
|---|---|---|
|
Account |
Storage account name. |
|
|
Key |
Storage account key. |
|
|
SAS Url |
Account-level SAS URL or container level SAS URL. If you use Account and Key instead, leave this value blank. Example: https://blobname.blob.core.windows.net/?sv=2020-08-04&ss=bfqt&srt=sco&sp=rwdlacupitfx&se=2023-12-10T16:46:02Z&st=2021-12-10T08:46:02Z&spr=https&sig=XXXX |
X |
|
Bucket Name |
Name of the bucket that contains the file. If you store the file in a sub-folder, enter the path in the following format: <bucket name>/<sub-folder>. Example: MyBucketName/MyFolder/AnotherFolder |
|
|
Filename |
Name of your source or target file and its relative path from the bucket root. |
|
|
JSONPaths Filename |
Full path to a file with JSONPaths. This allows Tosca Cloud to select column names and transformation logic. The JSONPaths file must be in the same bucket/directory as the data files or in a sub-bucket/directory. If the file is in a sub-bucket/directory, enter the relative path together with the file name. If you leave this value empty, Data Integrity uses a wildcards* as JSONPath. It unpacks hierarchical structures one level deep. Sample content for JSONPath: Copy
For Name, note the following:
|
X |
If you want to integrate a different Cloud Service Provider on your agent machine, you need to create your own rclone configuration. To do so, run the executable file rclone_x64_windows.exe.
|
Value |
Description |
Optional |
|---|---|---|
|
Configuration Filename |
Name of the local rclone configuration file. |
|
|
Remote Name |
Name of the configuration section from the configuration file. |
|
|
Bucket Name |
Name of the bucket that contains the file. If you store the file in a sub-folder, enter the path in the following format: <bucket name>/<sub-folder>. Example: MyBucketName/MyFolder/AnotherFolder |
|
|
Filename |
Name of your source or target file. |
|
|
JSONPaths Filename |
Full path to a file with JSONPaths. This allows Tosca Cloud to select column names and transformation logic. The JSONPaths file must be in the same bucket/directory as the data files or in a sub-bucket/directory. If the file is in a sub-bucket/directory, enter the relative path together with the file name. If you leave this value empty, Data Integrity uses a wildcards* as JSONPath. It unpacks hierarchical structures one level deep. Sample content for JSONPath: Copy
For Name, note the following:
|
X |
For more information about how to configure rclone, click here (opens in new tab).
To use OLAP, fill out the following test step values:
|
Value |
Description |
Optional |
|---|---|---|
|
SSAS |
Connect to SQL Server Analysis Services (opens in new tab). |
|
|
SSAS - Connection string |
Connection string for SSAS. |
|
|
SSAS - Query |
Query to retrieve data to compare. |
|
|
SSAS - Options - Connect Timeout |
Time in seconds after which Tosca Cloud aborts an active connection. The default value is 30 seconds. |
X |
|
SSAS - Options - Command Timeout |
Time in seconds after which Tosca Cloud aborts an active command. The default value is 180 seconds. |
X |
After you build a custom data reader, fill out the following test step values:
|
Value |
Description |
Optional |
|---|---|---|
|
Class Attribute Name |
In the Value field, enter the name of your custom data source reader. The name is declared in the ClassAttributeName of your data source interface. |
|
|
Parameters-> Key |
Specify the key-value pair to pass information to your custom implementation code:
Example: name FilePath, value D:\TestFile.csv If you work with our ready-made COBOL file reader or SAP data reader, you must use their specific parameters. |
|
You want to compare data from two CSV files. To do so, you use a custom CSV file reader (see our code sample). You perform the following steps:
-
To integrate the custom data source reader, you copy and paste the DLL file into the Custom Data Readers folder located at C:\Program Files (x86)\TRICENTIS\Tosca Testsuite\Data Integrity.
-
Open the Row by Row Comparison test step.
-
To specify the source data, you select Source->Custom Data Reader.
-
In the Value field of Class Attribute Name, you enter the name of your custom data source reader. In this example: CustomCSVReader.
-
You select Parameters->Key and change the name Key to FilePath.
-
In the Value field, you enter the file path of the CSV file that you want to use as the source. In this example: D:\TestFileSource.csv.
-
To specify the target data, you select Target->Custom Data Reader.
-
In the Value field of Class Attribute Name, you enter the name of your custom data source reader.
-
You go to Parameters->Key and change the name Key to FilePath.
-
In the Value field, you enter the file path of the CSV file that you want to use as the target. In this example: D:\TestFileTarget.csv.
-
Run your test case.
Configure Additional source and target options
There are additional parameters in the Source and Target test steps that let you define how to handle rows, columns, and cells during the reconciliation test.
|
Value |
Description |
Optional |
|---|---|---|
|
Skip first #n rows |
Define the number of rows which should be ignored. Skipping starts at the top of the data source. |
X |
|
Value |
Description |
Optional |
|---|---|---|
|
1st Row Contains Column Names |
Specifies whether the first line of the data source contains the column names. The default value is True. |
X |
|
RemapColumn Names |
Remap the column names via file. Specify the full file path to a text or CSV file with the column mappings. The file has to start with the header row Current Column Name;Mapped Column Name followed by one line for each column that you want to rename. Example: Current Column Name;Mapped Column Name Name1;First Name Name2;Last Name |
X |
|
Remap Column Names->Current Name |
Remap the column names manually. In the Name column, specify the name of the column you want to rename. In the Value column, specify the new name. |
X |
|
Locale |
Choose a locale. Tosca Cloud uses this locale to determine the format of the numeric values, mainly decimal and thousand separators of the columns that are defined in Tolerances. |
X |
Cell settings contains two options:
-
All Columns - Option applies an action all columns.
-
Single Columns - <Name> applies an action to a specified column. To specify a column, replace <Name> with the column name.
You can apply the following values:
|
Value |
Description |
|---|---|
|
Trim |
Removes all leading and trailing white space characters. Default scope: HeaderAndData |
|
Trim[<character>] |
Removes all leading and trailing occurrences of the specified character. Default scope: HeaderAndData Exchange <character> with the character you want to remove. To remove a ", enter the " four times, e.g. Trim[""""]. |
|
TrimStart |
Removes all leading white space characters. Default scope: HeaderAndData |
|
TrimStart[<character>] |
Removes all leading occurrences of the specified character. Default scope: HeaderAndData Exchange <character> with the character you want to remove. To remove a ", enter the " four times, e.g. TrimStart[""""]. |
|
TrimEnd |
Removes all trailing white-space characters. Default scope: HeaderAndData |
|
TrimEnd[<character>] |
Removes all trailing occurrences of the specified character. Default scope: HeaderAndData Exchange <character> with the character you want to remove. To remove a ", enter the " four times, e.g. TrimEnd[""""]. |
|
Replace[<string>][<string>] |
Replaces all occurrences of the first string with the second string. Default scope: Data |
|
ReplaceRegex [<search regex>][<replace string>] |
Replaces strings with regular expressions. You can replace special characters and unicode symbols, or use capture groups. If you want to use curly braces {}, you must escape them with double quotes "". Default scope: Data |
|
Substring[<start index>] |
Extracts a part of a longer string. The extract starts at the defined start index position and runs until the end of the string. Default scope: Data For example: Substring[9] with input Project Manager returns Manager. |
|
Substring[<start index>][<length>] |
Extracts a part of a longer string. The extract starts at the defined start index position and contains the number of characters specified in length. Default scope: Data For example: Substring[9][3] with input Project Manager returns Man. |
|
Right[<length>] |
Extracts a part of a longer string. The extract runs from the end of the string towards the beginning and contains the number of characters specified in length. Default scope: Data For example: Right[7] with input Project Manager returns Manager. |
|
Lowercase |
Converts the string to lowercase using the currently active locale. Default scope: Data For example: Lowercase with input Project Manager returns project manager. |
|
Lowercase[Culture:<culture name>] |
Converts the string to all lowercase. Lowercase[Culture:<culture name>] uses the given culture name to create a new locale. Default scope: Data For example: Lowercase[Culture:zh-Hans] uses the culture information of "Chinese(simplified)" to convert uppercase to lowercase characters. |
|
Uppercase |
Converts the string to uppercase using the currently active locale. Default scope: Data For example: Uppercase with input Project Manager returns PROJECT MANAGER. |
|
Uppercase[Culture:<culture name>] |
Converts the string to all uppercase. Uppercase[Culture:<culture name>] uses the given culture name to create a new locale. Default scope: Data For example: Lowercase[Culture:en-us] uses the culture information of "English - United States" to convert lowercase to uppercase characters. |
|
Trim double quotes |
Removes leading and trailing double quotes. For example: Trim double quotes with input """Project Manager""" returns Project Manager. |
To change the default scope of an action, add a Scope parameter:
-
To apply the action to the header row only, add the parameter [Scope:Header].
-
To apply the action to all data rows but not the header, add the parameter [Scope:Data].
-
To apply the action to the header and all data rows, add the parameter [Scope:HeaderAndData].
You want to replace all instances of the string CustomerDataAustria with the string CustomerDataUSA.
Apply this change to the header and all data rows. To do so, define the following action:
Replace[<CustomerDataAustria>][<CustomerDataUSA>][Scope:HeaderAndData]
Define your Row Key
The Row by Row Comparison module uses the Row Key as a unique identifier to compare rows.
|
Value |
Description |
|---|---|
|
Row Key |
Specify the Row Key in one of the following ways:
The column name(s) that you specify in the Row Key must be exactly the same as in the table. This includes capitalization and blank spaces. |
Examples
The following examples illustrate how to specify a Row Key for your row by row comparison and how to interpret the result that you get.
In both examples, you want to match the following tables: source table LEFT and target table RIGHT. Each table has three columns: ID, Col 1, and Col 2.
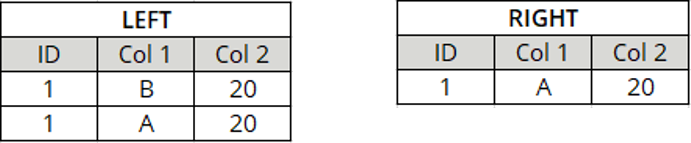
LEFT and RIGHT tables
Define one column as the Row Key.
You use the column ID as the Row Key.

You run your test and get the following result:

The result shows that the row by row comparison found a matching Row Key for row 1|B|20 in the target row 1|A|20, but the data doesn't match. It considers both rows as processed.
The source row 1|A|20 stays unmatched.
Define two rows as the Row Key.
In this example, you use the two columns ID and Col 1 as the Row Key.

You run your test and get the following result:

The result shows that the row by row comparison tried to find a matching Row Key for row 1|B|20 in the target, but didn't find one. It considers 1|B|20 processed.
Then the row by row comparison tried the next source row 1|A|20. It found a matching Row Key in the target row 1|A|20, and the data matches, too. It considers both rows as processed.
Define general options
Populate the General Options test steps to define general testing behavior.
|
Value |
Description |
Optional |
|---|---|---|
|
Max Errors |
Specify the maximum number of errors before Data Integrity cancels the execution. The default value is 100. |
X |
|
Columns to Exclude |
Semicolon-separated list of columns to exclude from comparison. |
X |
|
Case Sensitive Column Names |
If set to True, column matching from source to target is case-sensitive. For example: ID is not the same as id. |
X |
|
Skip Rowcount |
By default, Data Integrity performs a row count before it calculates how long the comparison will take. You can skip the row count to save time. To do so, set this attribute to True. Default value: False |
X |
|
Allow Empty Data Sources |
Allows the comparison of an empty source and/or target without throwing an error. This means that the test runs through and creates a report. This is useful if you expect the source or target to be empty and the test should pass. To do so, set this attribute to True. Default value: False Note: consider whether you want to Export Unmatched Target Rows or not. See the tables below for more information. |
X |
Run an empty comparison
The table below shows how the comparison of an empty data source, if you set Allow Empty Comparison to True.
|
Source |
Target |
Export Unmatched Target Rows |
Expected test result |
|---|---|---|---|
|
Empty |
Empty |
True |
Pass: test runs through. |
|
Empty |
Empty |
False |
Pass: test runs through. |
|
Empty |
NOT Empty |
True |
Fail: test runs through, shows differences. |
|
Empty |
NOT Empty |
False |
Pass: test runs through, shows that no differences were found. |
|
NOT Empty |
Empty |
True |
Fail: test runs through, shows differences. |
|
NOT Empty |
Empty |
False |
Fail: test runs through, shows differences. |
The table below shows how the comparison of an empty data source works, if you set Allow Empty Comparison to False.
|
Source |
Target |
Export Unmatched Target Rows |
Expected test result |
|---|---|---|---|
|
Empty |
Empty |
True |
Throws an error, doesn't create a report. |
|
Empty |
Empty |
False |
Throws an error, doesn't create a report. |
|
Empty |
NOT Empty |
True |
Fail: test runs through, shows differences. |
|
Empty |
NOT Empty |
False |
Throws an error, doesn't create a report. |
|
NOT Empty |
Empty |
True |
Fail: test runs through, shows differences. |
|
NOT Empty |
Empty |
False |
Fail: test runs through, shows differences. |
Comparison reports allow you to save detailed reports. Tosca Cloud saves the data to a local database file that you can view with the Data Integrity Report Viewer.
|
Value |
Description |
Optional |
|---|---|---|
|
Report Path |
Specify the full path and file name for your comparison report or only a file path. If you provide only a file path, Tosca Cloud generates a default file name in the following format: TestResultReport_yyyyMMdd-HHmmss. For example, if you specify the file path C:\temp or C:\temp\, Tosca Cloud generates the report file C:\temp\TestResultReport_yyyyMMdd-HHmmss. You can use our Report Viewer to display this report in an accessible format. |
X |
|
Export Unmatched Target Rows |
Select one of the following export options:
If your target contains many unmatched rows, this might affect performance because all rows have to be exported. |
X |
|
Export Matched Data |
Select one of the following export options:
We don't recommend logging all matched data because it has a negative effect on performance. |
X |
The goal of row by row comparison is to confirm that the data of source row and target row match. If the rows don't match on all columns, Tosca Cloud considers them a mismatch.
You can, however, use tolerances to define range of acceptable differences between compared values. This allows Tosca to still consider source and target value a match even if there is a slight difference between them.
|
Value |
Description |
Optional |
|---|---|---|
|
Tolerances |
Enter the absolute path to the JSON file that defines your tolerances and the columns for which they apply. This way you can set tolerances for the following value types:
|
X |
|
Tolerances-><Column Name> |
Set numeric only tolerances for the column you specify in <Column Name>. You can enter positive and negative numeric values, or percentages. You can set a tolerance range by entering two numbers separated with a semi-colon. Valid characters are: +, -, ;, % and numbers such as: 5, 6.8. |
X |
Understand how numeric tolerances apply
A numeric tolerance is a calculation that applies to the value in the source cell before the comparison with the target cell. You can set a numeric tolerance in the following ways:
-
Using a single number or percentage with a sign: + or -. This sets the tolerance a specific value. For example, the tolerance +3 makes target cell values that are greater by exactly 3 acceptable.
-
Using two numbers or percentages with signs, separated with a semi-colon. This sets an acceptable range of tolerances. For example, the tolerance -2;+3 makes target cell values acceptable if they are within that range from the source cell value.
-
Using a single number or percentage with no sign sets a tolerance range with that value. For example, the tolerance 2% set a -2%;+2% tolerance range for your target.
The column Price has the value 10 in a source cell and the value 11 in the corresponding target cell.
-
If you run a comparison without a tolerance, causes this test to fail.
-
If you run a comparison with the numeric tolerance -1;+1, Tosca Cloud considers the 2 cells matched.
-
If you run a comparison with the numeric tolerance -1, causes this test to fail because the calculation applies to the source cell. This makes only values 9 and 10 acceptable in the target cell.
Set tolerances using a JSON file
You can set DateTime or numeric and DateTime tolerances with a JSON string. Use custom date and time format strings (opens in new tab) to define your date and time values, along with the following valid characters:
-
Numbers, such as: 5, 42, 3.6.
-
Signs: +,-.
-
Time units: y = year, M = month, d = day, h = hour, m = minute, s = second, ms = millisecond.
-
Ignore sign: i, for example: ims to ignore milliseconds.
You can define tolerances for multiple columns in a single JSON file. Make sure to define the corresponding column name for each tolerance you set with your JSON file, as in the following example:
You have a table that lists the orders you received for your products. You want to verify that is accurate by comparing it to the same table saved in a different format. Yet, you don't want minor differences in price or the time of order to fail your tests. To do so, you can use the following JSON file:
{
    "Columns":
    [
        {
        "Name" : "OrderRecievedAt",
        "Type" : "DateTime",
        "SourceDateTimeFormat" : "MM/dd/yyyy HH:mm:ss.ffff",
        "TargetDateTimeFormat" : "MM/dd/yyyy HH:mm:ss.ffff",
        "Tolerance" : "ims"
        },
        {
        "Name" : "TotalPrice",
        "Type" : "Numeric",
        "SourceDateTimeFormat" : "",
        "TargetDateTimeFormat" : "",
        "Tolerance" : "-1%;+1%"
        }
    ]
}
After you create your JSON file, enter its absolute file path in the Tolerances value field.
Verify the result
The test step Result allows you to verify the outcome of the comparison. To do so, enter one of following values into the Value column:
-
To verify against a successful comparison, enter the value OK*.
-
To verify against an expected result, use the result text from the Log info column of your test results once you have executed your test case and customized it. For example, enter the value: *1 row(s) with differences.* if you are expecting to have 1 row that is different between your source and target.