Build test sheets
Test sheets are a core component of all test case design solutions. In test case design, a test sheet represents the basic test framework for a particular user journey or process through your application. It defines the elements you want to test and all their possible values.
This topic explains how to work with both types of test sheets:
-
Test sheets that belong to business flows, which you use in process-based test case design.
-
Standalone test sheets, which you use in template-based test case design.
Before you start
To work with test sheets, you must be an administrator or contributor.
Open a test sheet
The location of your test sheets depends on your chosen test case design solution:
-
To open a test sheet that's the result of a business flow, select the corresponding path in the
 Paths panel of your business flow. Then, select Edit test sheet.
 -
To open a standalone test sheet, go to
 Prepare > Test sheets and select it from the list.
Understand your test sheet
Your test sheet consists of the following objects:
-
To define the elements you want to test, add attributes. For example, if your test case template steers two textboxes and a button, then you need three attributes.
You can also nest attributes. For example, to group them by requirements.
-
To define which input values you'll allow for an attribute, add attribute instances. For example, if one of the textboxes is a Name input field, your attribute instances are different names that you want to use in test cases.
. Name has 3 instances with different names, Email has 3 instances with different emails, Register has one instance with the value {Click}.")
Test sheet with attributes and instances
The test sheet also has a column called Straight through, where you define the most important value for each attribute. Together, these values form the most frequently used way that users complete a path.Your chosen test case design solution determines the contents of your test sheet. There are differences between the two.
Please choose your use case:
In process-based test case design, Tosca Cloud automatically creates one test sheet for each path in your business flow.
Let's say your path consists of the following activities:
My first activity, which you've linked to a reusable test step called Reusable test step A.
My second activity, which you've linked to Reusable test step B.
My third activity, which you've linked to a reusable test step called Reusable test step C.

Activities in a path
Each reusable test step has business parameters. For example, Reusable test step A has the business parameters Business parameter 1 in reusable test step A and Business parameter 2 in reusable test step A.
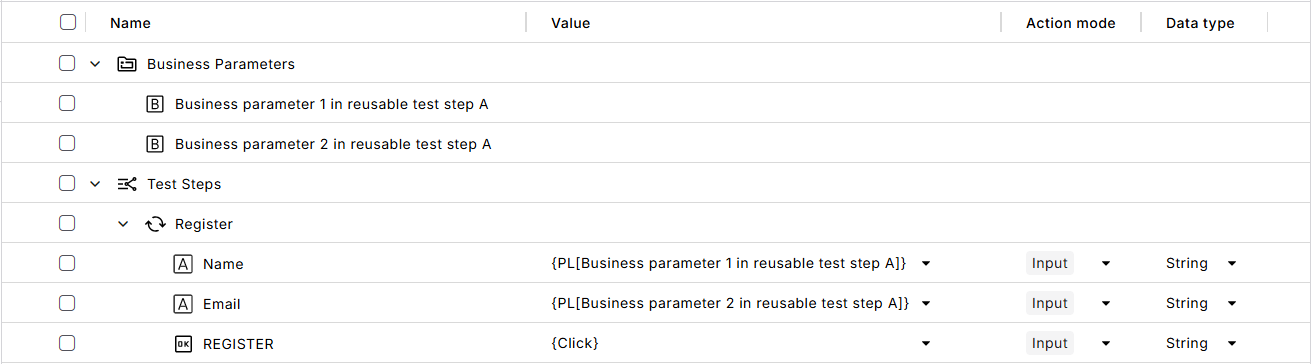
Reusable test step with business parameters
In this case, Tosca Cloud creates a basic test sheet that contains one folder per activity.
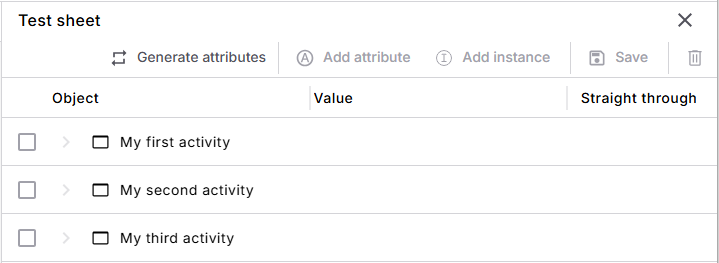
Newly created test sheet
Now, it's your turn to build this test sheet:
To define the elements you want to test, add attributes. The quickest and easiest way to do this is to generate attributes. In this case, Tosca Cloud automatically creates one attribute per business parameter.
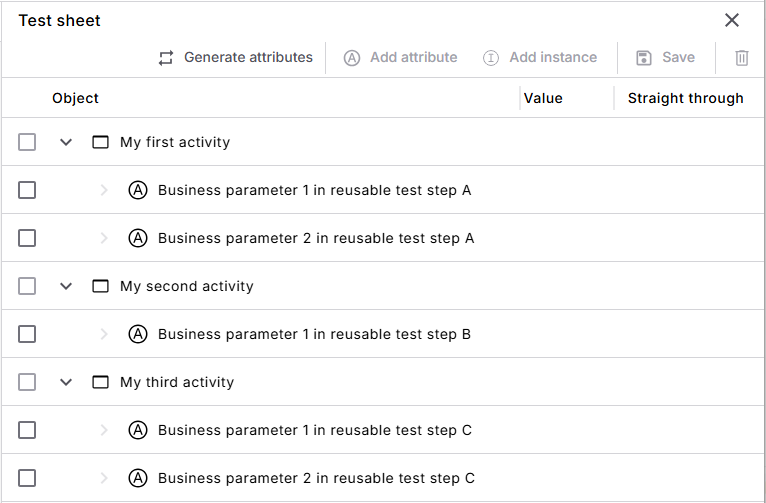
Test sheet with attributes
To define which input values you'll allow for an attribute, add attribute instances. Let's say that Business parameter 1 in reusable test step A is linked to a field where users enter their name. In this case, your attribute instances are different names that you want to use in your test cases.
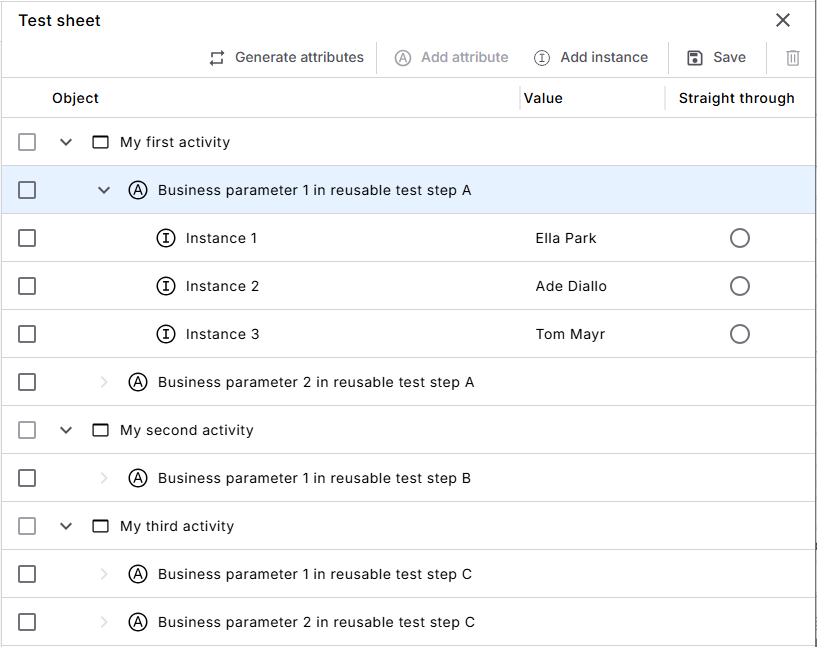
Attribute Business parameter 1 in reusable test step A with attribute instances
The test sheet also has a column called Straight through, where you define the most important value for each attribute. Together, these values form the most frequently used way that users complete a path.
In template-based test case design, you create your own test sheet from scratch. You'll later link this test sheet to a test case template.
In your test sheet, you need to create the following objects:
To define the elements you want to test, add attributes. For example, if your test case template steers two textboxes and a button, then you need three attributes.
You can also nest attributes. For example, to group them by requirements.
To define which input values you'll allow for an attribute, add attribute instances. For example, if one of the textboxes is a Name input field, your attribute instances are different names that you want to use in test cases.
Test sheet with attributes and instances
The test sheet also has a column called Straight through, where you define the most important value for each attribute. Together, these values form the most frequently used way that users complete a path.
Build a test sheet
Your chosen test case design solution determines how you build your test sheets.
Please choose your use case:
In process-based test case design, Tosca Cloud creates a basic test sheet for each path in your business flow.
To build your test sheet from this basic version, follow these steps:
To define the elements you want to test, add attributes. Choose one of the following options:
To auto-generate attributes from the automation you've linked to the activities in the path, select Generate attributes. In this case, Tosca Cloud creates one attribute per business parameter and maps the two.
To create attributes manually, select Add attribute. For example, if you want to nest attributes.
For attributes you created manually, map the attributes to business parameters. That way, Tosca Cloud knows which controls in a reusable test step belong to which attribute. To map, go back to the business flow and open the activity's details pane. In the Link automation tab, perform the mapping.
To define which input values you'll allow for an attribute, add attribute instances:
Select an attribute. Then, select Add instance.
In the Value column of the new instance, enter a possible value for this attribute.
Add as many instances as you need. For example, if your attribute is an input field, add one instance for each input you want to test.
In template-based test case design, you build your own test sheet:
Go to
Prepare > Test sheets and select Create test sheet. To define the elements you want to test, add attributes. You can also nest attributes.
To define which input values you'll allow for an attribute, add attribute instances:
Select an attribute. Then, select Add instance.
In the Value column of the new instance, enter a possible value for this attribute.
Add as many instances as you need. For example, if your attribute is an input field, add one instance for each input you want to test.
Nest attributes
You can nest attributes, for example, if you want to group attributes by requirements or other criteria.
To add a child attribute to an existing attribute in your test sheet, select the respective attribute. Then, select Add attribute.
Please note that an attribute can only have child attributes OR instances. Here's what this means for you:
You can't add instances to an attribute that already has child attributes.
You can't add child attributes to an attribute that already has instances.
Mapping for process-based test case design
If you use process-based test case design and you nest attributes, then you have to do some manual mapping. When you nest attributes, you'll have the following:
One or more attributes that are merely structural. These are the parent attributes that contain child attributes.
One child attribute with instances. That's the attribute where you define all allowed input values.
You need to map the child attribute with instances to a business parameter. This tells Tosca Cloud which control in the respective reusable test step belongs to this attribute. To map, go back to the business flow and open the activity's details pane. In the Link automation tab, perform the mapping.
Define the straight through
The straight through is the most frequently used way that users complete a path. As a result, it's also the one with the highest risk.
To define the straight through, use the radio buttons in the Straight through column to select the most important instance for each attribute. This ensures that Tosca Cloud includes this critical combination in your test case instances.
What's next
Once you've built your test sheet, you can move on to the next step:
If you use process-based test case design, generate your test case instances.
If you use template-based test case design, link your test sheet to a test case template.