FAQ
This section lists the most commonly asked questions on how to use NeoLoad.
Information: The listed questions are applicable at the time of publication of this documentation. For further information, it is highly recommended to consult the NeoLoad Community website. This online tool makes it possible for NeoLoad users to share their knowledge, advice, and resources. The content is moderated by NeoLoad Support experts.
General
Although NeoLoad is not a tool for functional testing, it can carry out checks on content returned by the server. Validations using regular expression-based content assertions allow you to perform basic functional tests.
No, NeoLoad is a commercial software.
This will depend on the application tested, the scenario and its parameters, particularly the think time between pages: a Load Generator can generate approximately twice as heavy a load with a think time of two seconds than with a think time of one second.
Likewise, generating a load using HTTPS (SSL) and using modules such as Flex, GWT, Oracle Forms, Java Serialization, RTMP and Siebel use up more machine resources than with HTTP.
As an example, a Pentium IV 2.4GHz can generate up to 1500 Hits/sec. A Load Generator typically can generate between 500 and 1500 users on a standard application.
It should be noted that the NeoLoad Controller can use as many Load Generators as is required to generate the number of users specified in the license, at no additional cost.
Yes. For more information, see Using a Firewall Between the Controller and Load Generator.
It does not matter which web or application server is used. NeoLoad lets you test any HTTP application: ASP, .Net, J2EE, PHP, and so on.
Yes. NeoLoad records all HTTP requests.
Applications using Ajax send HTTP requests to the web servers; NeoLoad will create an HTTP page containing the request for each action.
You will then be able to vary this request just like any other request and to verify the server response.
NeoLoad supports Basic, Digest, NTLM, Kerberos and form-based authentication.
Yes. NeoLoad can record HTTPS requests and play them back. For more information, see Record an HTTPS application.
What is more, NeoLoad also supports client certificate authentication. For more information, see Certificate manager.
NeoLoad records and plays back all HTTP traffic between the browser and web server.
NeoLoad therefore can simulate client-side component activity, such as an ActiveX component, as long as communication with the server is through the HTTP protocol.
If the component sends binary data, NeoLoad will only be able to play back what has been recorded, unmodified. If this data contains session ID data or other parameters requiring dynamic replacement, the test will not work.
NeoLoad can connect to a server or to Internet through a proxy. To configure a proxy, follow these steps:
-
Select the Edit > Preferences menu.
-
Go to the Proxy section.
-
Select:
-
the Internet Proxy configuration option to update the Controller, to access the NeoLoad Cloud platform, and to export a project for NeoLoad Support,
-
the Applications Proxy configuration option to record and replay,
-
Do not confuse this proxy with NeoLoad internal recording proxy. During the recording, the browser sends the requests to the NeoLoad recording proxy; NeoLoad then redirects these requests to the server, either directly or through a proxy, depending on the settings.
For more information, see Record a test scenario.
NeoLoad scripts can only be designed through the GUI, which provides conditions, loops and other programming structures. JavaScript may be inserted for more advanced uses, such as password encryption.
Flex is an open source Framework for building web applications. The underlying protocol used to communicate between the browser and the server is AMF (Action Message Format). The Flex version is not related to the AMF version used. There are AMF0 and AMF3. NeoLoad supports both versions even if the most common one is AMF3.
Flex enhancements involve the UI but not the underlying protocol. The different Flex versions do not modify the protocol implementation. That is why NeoLoad is compatible with the latest Flex versions.
For more information, see Adobe Flex/AMF requests.
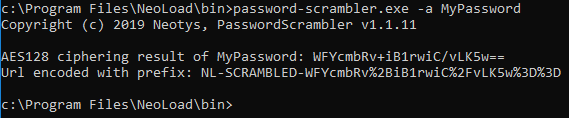
For security reasons, it is strongly advised to avoid having passwords in clear in the security file. The Password Scrambler tool is recommended to make any attempt to find such strategic information worthless.
Note: Password Scrambler can only be executed in its installation folder.
To use Password Scrambler on Windows, follow these steps:
-
Open a console window.
-
Enter
cd <NeoLoad>/bin. -
To encrypt a NeoLoad user password (
-NTSLoginor-CollabLogin), enter:Copypassword-scrambler -a <passwordinclear>
-
Password Scrambler generates the encrypted password and the process to use it.
To use Password Scrambler on Linux, follow these steps:
-
Open a Linux terminal.
-
Enter
cd <NeoLoad>/bin. -
To encrypt a NeoLoad user password (
-NTSLoginor-CollabLogin), enter:Copy./password-scrambler -a <passwordinclear>
-
Password Scrambler generates the encrypted password and the process to use it.

Installation and licensing
To install a license key, follow these steps:
-
Open the license management panel with the Help > License Management command.
-
In the License section, select the Use a license key option.
-
Click Enter a license key.
There are different types of NeoLoad software licenses to suit customers' specific usage requirements. Each license key gives access to the Controller and defines the number of simulated users and monitors allowed. Load Generators are not covered by licenses, so you can install as many of these as you wish.
Tricentis supports several types of pricing fitted to every use of NeoLoad:
-
Regular (per seat) license: Either permanent or temporary, a regular (per seat) license is linked to one machine. The NeoLoad Controller is used on this machine.
Neotys proposes two regular (per seat) licences that are the Standard and Professional editions. For more information, see NeoLoad pricing. -
Shared license: A shared license allows making the best of the authorized Virtual Users capacity between several machines. When distributing the Virtual Users capacity, the NeoLoad Controller can be used on several machines simultaneously.
The Tricentis Edition allows you to take full advantage of a shared license features. For more information, see NeoLoad pricing. -
VUH: The VUH (Virtual User Hours) mode can be used in 2 different ways:
-
To perform Cloud testing with NeoLoad for the duration of your testing campaigns without having to purchase a license. In this case, VUH are used independently, within a Cloud session and any hour started is due in full. For more information, see Test from the Cloud.
-
To complete license VUs in case these are not enough to start a test. In this case, VUH are stacked upon the license VUs and they are calculated with an accuracy to the second.
-
Contact Tricentis for more details on available licenses.
Whether permanent or temporary, the standard license is linked to a single workstation. However it may be transferred onto another machine after a controlled process by Neotys.
The Tricentis Edition is based on a shared license which includes a defined capacity of Virtual Users to share among NeoLoad users. When the capacity is distributed, a shared license allows using the product on several machines simultaneously. As long as some of its Virtual Users capacity is free, the license is available to other NeoLoad users.
A standard license may be transferred from one workstation to another. This operation de-activates the key on the first machine, making NeoLoad inoperative with that key on that machine.
To transfer the license key, follow these steps:
-
Click Help > License Management.
-
Select License.
-
Choose Use a License file.
-
Click Transfer to another machine.
-
In the deactivation wizard, select the folder for the deactivation request file and click Next. The last wizard screen confirms that the
license-inactivation.reqfile is created. -
Send the file, now or later, in the Web form on the Deactivate a license page.
-
Click Finish to close the wizard.
-
Wait for the reply from the Neotys central license server saying that the license file can be used on the new machine.
The NeoLoad installation file is an auto-extracting file that contains its own JRE version. This JRE is used to launch the installation UI itself.
It looks like NeoLoad is unable to launch the installer using its own JRE. Most of the time, this issue is due to some variable that has been set in your environment that disturbs the installer.
To check that, please open a DOS (command line) console and type set to see all the variables. If you have one of the following variables set, please rename or unset it:
-
JAVA_TOOL_OPTIONS
-
_JAVA_OPTIONS
-
_classload_hook
-
IBM_JAVA_OPTIONS
For example, rename JAVA_TOOL_OPTIONS to JAVA_TOOL_OPTIONS_TMP.
By default, the NeoLoad installer will launch a UI in order to proceed with the installation steps. A wizard will guide you with some questions to be answered like the installation path.
On some environments, you may not have a UI or you may simply want to avoid that wizard. In that case, there is a way to perform a silent installation even without any UI. Here are some examples for NeoLoad and Load Generator on Windows and Linux.
Windows
loadGenerator_windows_4_2_0.exe -q -dir "C:\Program Files\NeoLoad\"The service is installed by default.
If you need to manually re-install the service:
sc create "NeoLoad Agent" binPath= "C:\Program Files\NeoLoad\Agent 4.2\bin\AgentService.exe" start= autoLinux
./neoload_linux_4_2_0_.sh -q "/opt/neoload"where "/opt/neoload" is the target installation folder.
To carry out tests using heavy loads, it may be necessary to install a Load Generator on another machine.
The license does not limit in the number of Load Generators which can be installed. As many Load Generators can be used as required. The installation may be carried out using the special Load Generator installation option.
For more information, see Install a Load Generator Agent.
Design
When recording one of your application features, NeoLoad creates a Virtual User containing all the recorded actions.
You may change the Virtual User behavior by adding, editing or deleting actions.
You may also build up your Virtual User by adding requests from various other recordings. NeoLoad allows you to easily add actions, such as loops, delays, condition sets, and so on.
Once your Virtual Users have been created, you need to create a Population of Virtual Users. You may have several types of Virtual User in a same Population.
Next, in the Runtime tab, you need to define a test scenario, which will include the Populations to use, the load policy (constant, ramp-up, or peaks) and other options such as the think time.
It only remains to run the test.
For more information, see Design process.
If, during playback, the Virtual User behaves in an unexpected manner (no record created in the database) or contains errors, it is more than likely that some requests are being replayed with faulty parameters.
-
Find the faulty request.
-
NeoLoad detects an error when the response contains an HTTP error code. If the page returned by the server contains the code 200, NeoLoad will not detect the error. To be able to detect it, you must add assertions or manually check which pages are returned during the Virtual User validation process (use the Open in browser button). For more information about using assertions, see Validate a server response.
-
Find the parameter that needs changing.
-
Usually, the parameters to be changed are IDs. You can repeat the recording, for example, and compare the requests to see which IDs differ.
-
Replace the appropriate value.
-
To retrieve a variable, use a Variable Extractor. Next, replace the parameter with the variable created.
Failure to handle a dynamic parameter causes errors. For more information, see Handle an application dynamic parameter.
Generally speaking, you may need to extract and replace some data. For more information, see Create a variable extractor.
NeoLoad automatically manages any cookies returned by the server during the test.
Cookies may also be defined when configuring the request settings.
Cookies generated by the browser using script must be managed manually (extraction/replacement of variables or JavaScript code).
NeoLoad allows you to design complex Scenarios in which different users simulate different actions (for example, one user will browse a website, while another carries out on-line purchases on the same site).
All you need to do this is to create several types of Virtual User and to group them within a Population, specifying the percentage of each type of user.
You will find a more detailed explanation in the documentation.
NeoLoad uses variables to simulate this type of behavior. To use a .csv file containing different login accounts, see Log in with multiple accounts using a CSV file.
See also the flash demo on the NeoLoad website.
NeoLoad automatically detects requests containing errors using the HTTP return code notably.
For example, a request that returns '500 Internal Error' will be marked as an error by NeoLoad.
However, many web applications do not return an appropriate HTTP error code when managing their errors, which means that NeoLoad cannot automatically detect the problem . Consequently, management is on a case by case basis, verifying the validity of the content returned by the server at key points in the application. For example, you might want to check for the presence of an expected text "The operation was successfully completed" or check that the response does not contain the word "Error".
To validate the content of a server response, follow these steps:
-
In the Virtual Users tab, click on the request whose response needs to be validated.
-
Click on the Validation button bottom right.
-
Add a validation for the content.
-
Select a validation mode: search for presence or absence of a simple text, or use a regular expression.
At the end of the test, select the requests containing errors or for which the validation failed in the Errors panel, then analyze the content of the corresponding server response to work out the reason for the problem. You can add other validation types, such as size of the response or its duration.
For more information, see Validate a server response.
Certain applications use dynamic parameters to manage sessions.
The parameter is created by the server and it changes each time the scenario is run. To be able to simulate this behavior perfectly, the dynamic parameter returned by the server needs to be extracted (usually within a hidden form field or a link) and replaced in the following requests.
The extraction is done using a variable extractor. Select the request, click on the Advanced button, then select Variable extractor.
For more information about defining variable extractors, see Advanced parameters.
For more information, see Create a variable extractor.
Create a random variable that corresponds to the variable part of the string to be generated. Then use the following string structure: product_${productID}
Just change the project directory (<NeoLoad projects>/<Your Project>).
You need to change a key in the Controller configuration file. The recorder.screenshot.enabled key in the GUI section of the Controller.properties file may have the value true or false. This feature is only available if the Controller is installed under Windows.
In the Design tab, change server by selecting it in the Servers section in Virtual User profiles. You need to edit the Machine name and, if need be, the Port fields for all the requests to be redirected to the new address at the next runtime. You may also use the search/replace function. For more information, see Search for a server in request definitions.
For IP spoofing (using multiple IP addresses), you need to access an Agent configuration in Runtime > Scenarios and select the IP addresses to use during the test.
You must define the IP addresses on that Load Generator network interface.
For more information, see Configure IP spoofing.
This pop-up window appears whenever the server uses NTLM authentication.
When navigating in the application normally (outside NeoLoad), the browser sends the encrypted authentication information to the server transparently. The account used is the Windows account of the logged-on user. When recording, NeoLoad asks for an account name so that it can record and play back the authentication.
In this case, you still need to decide how many users you want to simulate. Then, you can set the pace at which the transactions are executed by using the pacing function.
For example, you may want to generate 3000 Purchase transactions per hour using 1000 simultaneous Virtual Users. This means that each Virtual User must carry out 3 Purchase every hour. That is to say, each Virtual User must execute a Purchase transaction every 20 minutes. To do this, just set a pacing of 20 minutes for the Purchase Container.
For more information about pacing, see Transaction.
The query string of requests contains only ASCII characters. Other characters are encoded using the %XX notation, where XX is the character code for a given character encoding. For example, the character LATIN CAPITAL LETTER A WITH GRAVE 'À' would be represented as %C3%80 using the utf-8 encoding or %C0 using iso-8859-1.
NeoLoad uses 'UTF-8 by default as specified by the RFC 3986. Nevertheless, the server may expect a different encoding, typically iso-8859-1. The encoding used by NeoLoad may be changed in the <NeoLoad>/conf/Controller.properties file by editing (or creating) the [Runtime]http.querystring.encoding=UTF-8 key.
The underlying protocol used for Flex application is AMF (Action Message Format). It is a binary protocol.
When recording a Flex application NeoLoad deserializes the binary stream between the browser and the server. It will convert the binary data to XML content. These IDs are used by the AMF protocol. In fact, there is no need to handle them with Variable Extractors as it is automatically handled by NeoLoad.
You can let the hardcoded values remain, during replay they will be replaced automatically.
For more information, see Identifiers handled by NeoLoad.
NeoLoad stores the logs in a separate folder for each NeoLoad version. The log files are stored in a directory in the user profile. The user profile used is the one who launched the program.
You may quickly access the logs directory in NeoLoad with the Help > Open log directory menu item, or with the Open log directory item in the menu accessed through the Agent icon in the notification area.
Examples of log file locations are:
-
Under Windows Vista:
%AppData%\Neotys\NeoLoad\v2023.4\logs -
Under Unix/Linux it is:
$HOME/.neotys/neoload/v2023.4/logs
For more information, see NeoLoad installation files.
NeoLoad uses its own HTTP proxy to record the traffic between your browser and your web application. During the record, NeoLoad changes the browser proxy parameters for the duration of the record. The proxy server is localhost and the port is 8090.
If a problem occurs at the end of the record, it is possible that the initial browser settings are not restored. If this is the case, restore the proxy parameters in the browser options.
For more information, see Record an HTTP application in proxy mode.
In NeoLoad 2023.4, designing complex test cases is quick and easy. All User Paths contain now the Init/Actions/End immutable Containers allowing easy design for long scenarios. All elements inserted in the Actions Container are repeated until the User Path stops at which point End container actions are executed before finishing the scenario.
With this User Path structure, the former Stop Virtual User logical action has been replaced by the logical action Go to next iteration. This action interrupts the Virtual User runtime and makes it go to the next iteration which is almost similar to the former Stop Virtual User logical action. The way the Go to next iteration action behaves depends on where it is placed within the User Path:
-
In an Init Container, the User Path interrupts its initialization and starts its first iteration by running the Actions Container.
-
In an Actions Container, the User Path interrupts its current iteration and runs (depending on the load policy):
-
a new iteration by running the Actions Container,
-
its End Container.
-
-
In an End Container, there is no interruption. The User Path continues to run its End Container and an error message is written to the log files.
The Go to next iteration logical action can be particularly useful in combination with an If ... Then ... Else or Try...Catch action. For example, this makes it possible to:
-
avoid running the Init Container for a Virtual User that is already logged on to the application
-
restart a User Path iteration if an error occurs
As a result, the Go to next iteration logical action is almost similar to the former Stop Virtual User one. The only difference is that when the User Path restarts an iteration, the container Init is not executed. When in the User Path, with the Go to next iteration, to have the Virtual User log out and log in again, it is necessary to:
-
insert the login process at the beginning of the Actions container to have the same behavior as until version 3.2, or
-
insert the logout/login process before going to next iteration (using a shared Container to avoid duplicating action).
Many web applications use Epoch/UNIX timestamp values for validation and session info. When NeoLoad records a User Path, it marks the current value and timestamp. When replayed, these values and timestamp could be out of date and invalid, causing the script to fail in different ways: 401 Unauthorized, 403 Forbidden, or even 500 Internal Error, etc.
There is no automatic way to handle this today inside of NeoLoad, nor is it difficult to execute manually. All you have to do is create a variable using the "Search and Replace" function. The value might be in the form of "1514813730000", which would convert to "Monday, January 1, 2018, 8:35:30 AM Eastern US time zone (EST)". If you are keeping score, this is the amount of time in milliseconds since January 1, 1970. Many Unix systems store epoch/UNIX dates as a signed 32-bit integer, which might cause problems on January 19, 2038 (known as the year 2038 issue or Y2038).
Here are some easy steps to manage the dynamic timestamps in your NeoLoad script:
-
Create a NeoLoad variable based on "Current Date" type and use the pattern "CurrentTimeMillis" for the Epoch/UNIX time. Save with an easy to reference name.
-
Perform a "Search and Replace" (Control-F) for all values that might match (search globally), using "Regular Expression" (check the box within Search and Replace window). In the Search field, use the following expression (value is from the above example, your value might differ): "15148[0-9]{8}".
Alternatively, this syntax works as well "15148\d{8}." [0-9] is a wildcard, and "\d" represents any numerical value in its place. "{x}" suggests that you repeat this pattern x times.
-
In the replace box, put the name of the "Current Date" variable you created from Step #1. Click Next, and Finish. Use "Replace ALL" when searching – you should find all the occurrences at once.
Runtime
During a test under a constant load using n Virtual Users, NeoLoad starts n Virtual Users. The n number stands for the total number of Users launched.
Every Virtual User initializes on executing the Init Container, iterates its Actions Container during the whole test to replay the pages and the requests defined in the scenario, then executes the End Container before stopping. The number of executed iterations stands for the number of times when the Action Container is executed by every Virtual User.
For example, for a 5-minute test with a constant load of 10 Virtual Users, executing every Init/Actions/End Container may last for 1 minute. The total number of Users launched is 10. The total number of iterations executed is 40—every Virtual User executes the Init Container once, then iterates the Actions Container four times. After 5 minutes, every Virtual User executes the End Container, for a total duration of 6 minutes.
NeoLoad stores its log files in a directory in the user profile. The user profile used is that of the user who launched the program.
For more information, see NeoLoad log files.
The requests/ sec indicator shows the number of requests per second sent to the server. This indicator allows you to find a system limits. Usually, it should increase with the number of users. If this indicator stops increasing, or decreases even though the number of users is increasing, it probably means that the tested application limits have been reached.
The main cause of communication problems between the Controller and a Load Generator is the firewall. Do not forget to configure your Windows built-in firewall. For more information about opening the appropriate ports, see Use a firewall between the Controller and a Load Generator.
If you cannot resolve the problem, contact NeoLoad Support and include both the Controller and Load Generator log files. For more information, see NeoLoad log files.
This error means that the Load Generator could not start because the TCP/IP communication port is already in use. Another Agent, or another instance of NeoLoad, is probably in the course of being launched. If this is not the case, it means that another program is using the communication ports. You must therefore change the NeoLoad ports by editing the following configuration files (in the <install-dir>/conf directory):
-
Controller.properties:[Network]agent.port -
agent.properties:[Network]agent.server.port
To stop the Agent, use the <NeoLoad>/bin/Agent -stop command. You may also use the Start menu Shut down Agent item.
If you are unable to connect a new Load Generator, either using auto-detect or by defining it manually, the problem is usually a firewall.
For more information about configuring NeoLoad to pass through firewalls, see Use a firewall between the Controller and a Load Generator.
If you are unable to connect a new Monitoring Agent, either using auto-detect or by defining it manually, the problem is usually a firewall.
For more information about configuring NeoLoad to pass through firewalls, see Use a firewall between the Controller and a Monitoring Agent.
If the Load Generator frequently uses more than 90% of the available memory during a test, it can lead to errors such as NL-RUNTIME-XX in the test results. The details of these errors are shown as java.lang.OutOfMemoryError: Java heap space. The Load Generator is a Java program which, by default, is configured to use a maximum of 384 Mb of memory. For extreme load tests, this limit may be raised to 512 Mb or even 1024 Mb.
For more information, see Increase available memory for Load Generators.
If you notice a very high CPU usage even though the number of Virtual Users remains small, it may be that one of the regular expressions used in a Variable Extractor is too demanding. To find out which regular expression is causing the problem, you can replay the scenario several times, taking out a different regexp on each run until a normal CPU usage is restored. A very simple, downloadable freeware program exists that can help you construct your regular expressions (http://www.weitz.de/regex-coach).
You can define 2 types of timeout in NeoLoad :
-
Connection Timeout: waiting time when establishing a connection
-
Socket Timeout: waiting time when receiving data
These settings may be edited in the <NeoLoad>/conf/Controller.properties, file in the Runtime section.
You simply need to change the values for the runtime.connection.timeout and runtime.so.timeout keys. The values are expressed in milliseconds (for example, 30000 for 30 sec.). Settings these key values to 0 will create infinite timeouts (default behavior if no values inserted).
NeoLoad plays a request that causes an error on the server.
The error message will probably give the main cause of the problem (bad argument for example).
For security reasons, the ASP.NET default settings do not allow errors to be displayed.
To change the settings, you have to disable the customErrors mode, by editing the Web.config configuration file thus:
<configuration> <system.web> <customErrors mode="Off"/> </system.web> </configuration>Then re-start the application server.
When recording a Flex application, NeoLoad deserializes the binary stream between the browser and the server. It will convert the binary data to an XML content and do the reverse operation so you are sure that NeoLoad can correctly handle it.
If a request or response was not converted, you will have in your scenario some broken requests that will appear with a specific yellow icon.
After the recording, you have to follow the Post recording Wizard. This wizard will show you the names of the jar or classes which need to be uploaded to the Controller. Once this is complete, you will not receive this error and all your requests and responses will be decoded to the xml format.
For more information, see Adobe Flex/AMF requests.
During the load test, the Load Generator may use many resources on your machine.
One of these resources is the number of sockets that needs to be opened at the same time on the computer. On Linux, sockets, files, directories...are file descriptors. By default, the number of file descriptors that can be opened at the same time is 1024.
Since the Load Generator will open many sockets, the default value is too low. In that case, the system will raise that error of "Too many open files".
The command ulimit -n provides you the current configured value.
To avoid the "Too many open files" message, you have to increase the default value. You are advised to increase it up to 65534 using that command ulimit -n 65534 (or consult your Systems Administrator).
To persist that modification, you have to modify that file: /etc/security/limits.conf
Here is an example of configuration:
neoload soft nofile 4092
neoload hard nofile 65534
Here neoload is the user used to start your NeoLoad Agent. A reboot is needed to apply the modification.
The new ulimit value is available on the Load Generator logs available on the NeoLoad interface.
For more information about that error, see Troubleshooting.
With that new configuration, your Load Generator will fully use your machine resources.
For performance reasons, the default WebSocket message size cannot exceed 65 536 bytes (64 kB).
When a WebSocket response exceeds this size, the system returns a org.eclipse.jetty.websocket.api.MessageTooLargeExceptionOverview exception.
If you get an error like the one below:
2015/03/19 09:54:56 ERROR - neoload.Engine: WebSocket channel connection encountered an error org.eclipse.jetty.websocket.api.MessageTooLargeException: Text message size [73525] exceeds maximum size [65536]The workaround is to add a new property key in the controller.properties configuration file located in the \conf sub-folder of the NeoLoad installation root folder to configure a message size.
Create a [WebSocket] section or edit the existing one and add the following property key with the desired value for example here 100 000: websocket.max.text.message.size=100000.
Results
NeoLoad allows you to measure your web application performance levels. To check the application proper behavior under load, you might want to begin by:
Checking the response times for all pages and making sure they meet your performance requirements
Checking that the number of errors is acceptable at the target loading
For more information about test performance results, see Produce informative results, Execute a realistic test, and Define objectives.
Right-click on the curve to be exported, then select Save as image to save the curve in PNG format.
NeoLoad can export the raw test results in CSV format. In the Values tab, the Export button makes it possible to export the statistics of the Containers. For more information, see x.
Monitoring
NeoLoad can monitor system information servers. The protocols used are: JMX for Java application servers, Telnet/SSH for Unix systems, Perfmon for Windows servers, and so on.
Here is a non-exhaustive list of available monitors:
-
HTTP. Apache or other HTTP server.
-
Microsoft IIS. Supports all versions. Uses Windows Perfmon.
-
Microsoft. NET. Supports all .NET and ASP applications. Uses Windows Perfmon.
-
BEA WebLogic. Supports versions 8.x, 9.x, 10.x, 11.x and 12c.
-
IBM WebSphere. Supports versions 6.0, 6.1, and 7.0.
-
JBoss. Supports versions 4.0, 4.2, 5, 6, and 7.
-
Jonas. Supports all J2EE-certified versions.
-
Tomcat. Supports versions 5.5, 6.0, 7.0 and 8.0.
-
Oracle Application Server. Supports versions 9.x and 10.x.
-
GlassFish. Supports all versions. Certain counters may not be available for versions 2.x and earlier.
-
SAP NetWeaver. Supports versions 7.0.x and 7.1.x.
-
LiveCycle Data Services. Supports all versions from 2.6.
-
RSTAT. Allows monitoring of Unix and Linux systems.
-
Linux. Tested on Fedora, Mandriva, Suse, Ubuntu, CentOS, Red Hat, and Debian.
-
Solaris. Tested on Solaris 10.
-
HP-UX. Tested on HP-UX 11.
-
AIX. Tested on AIX 5 and AIX 6.1.
-
Microsoft Windows. Uses Windows Perfmon.
-
MySQL. Uses a JDBC connection. Supports versions: 4.0, 4.1, 5.x and 6.0.
-
Microsoft SQL Server. Uses Windows Perfmon. Supports all versions.
-
Oracle DB. Uses a JDBC connection. Supports versions 8i, 9i, 10g, and 11g.
-
DB2. Supports all versions from 8.2.
-
PostgreSQL. Uses a JDBC connection. Supports versions 6.x, 7.x, and 8.x.
-
VMWare. Uses the web services deployed on the VMWare servers.
NeoLoad allows you to monitor different types of remote machine or server during a test.
For more information about adding monitors, see Configure a monitored machine.
NeoLoad displays the number of errors detected during the test in real time and at a set interval.
An error is detected whenever the HTTP code of a request response indicates an error or when an assertion fails.
DB2 databases can be installed on IBM AS/400 machines or x86 compatible machines.
NeoLoad uses the JDBC protocol to monitor databases. DB2/400 uses a completely different monitoring system than the DB2 on x86 machines.
Because NeoLoad has been developed to work with a snapshot monitoring system, it is not able to monitor DB2/400 database servers.
For more information, see Create a DB2 monitor.
NeoLoad uses JMX (Java Management Extension) to monitor a Jboss server.
After the first connection using the IP address that you have set in the Monitor settings, Jboss might send back the loopback address 127.0.0.1. This address will be then used for the rest of the connection and it will fail since it is not the correct target address.
It mostly happens when Jboss is under Linux. You have to modify the /etc/resolv.conf file in the Jboss server in order to have something like that:
<your IP> hostname
127.0.0.1 localhost
For more information, see Create a JBoss monitor.
Cloud
The NeoLoad Cloud Platform is fully described in Test from the Cloud.
The Cloud allows you to test your application from different geographies.
Cloud Load Generators can be started, scheduled and managed from the Customer area of the Neotys website.
You can create an on-demand Cloud session in order to directly add Cloud Load Generators to your NeoLoad project. So, this feature is only available in NeoLoad.
To create an on-demand Cloud session and add it to a NeoLoad project, follow these steps:
-
Choose the Runtime section and the Scenarios tab.
-
In the Load Generators area, click on the Add a Cloud session button.
-
The NeoLoad Cloud platform connection window is displayed. Connect using your client account login details.
-
The wizard to add a Cloud session is displayed. For the first step, select Create a new on-demand cloud session. Click Next.
-
In the second step, you are prompted to select a workgroup and enter the Cloud session details: a name and email addresses (to send notifications). Click Next.
-
In the third step, you need to enter a planned end date and the number of Load Generators per zone. You must have enough credits for the selected numbers of Load Generators. Click Next.
-
Validate the information on the summary step and click Finish.
-
The Cloud Load Generators are automatically added to the NeoLoad project once the session starts, which takes a few minutes.
For more information, see Test from the Cloud.
In NeoLoad, you can easily get back a Cloud session reserved from your Customer area on the Neotys website as soon as it is available, or a Cloud session previously created.
To get back a Cloud session, follow these steps:
-
Choose the Runtime section and the Scenarios tab.
-
In the Load Generators area, click on the Add a Cloud session button.
-
The connection window is displayed. Connect using your client account login details.
-
The New Cloud Session Wizard is displayed. Select Use an already reserved cloud session. Click Next.
-
Select the workgroup and the session you want. Click Next.
-
Validate the information on the summary step and click Finish.
-
The Cloud Load Generators are automatically added to the NeoLoad project.
For more information, see Test from the Cloud.
When you start or reserve a Cloud session, you have to indicate a start and end date. This can be done through your Neotys Web portal or directly from NeoLoad
If your session has already started, you can extend it using NeoLoad or the web portal.
To extend the duration of a Cloud session, follow these steps:
-
Choose the Runtime section and the Scenarios tab.
-
In the Load Generators area, click on the button Open the Cloud Management Console, and select your Cloud session.
-
Click on the Change Session button.
-
In the dialog box displayed, change the date of the session planned end. Check that Load Generators are available during the extended period of time.
For more information, see Test from the Cloud.
The NeoLoad interface allows you to interact with your Load Generators.
To restart a Cloud Load Generator, follow these steps:
-
Choose the Runtime section, and the Scenarios tab.
-
In the Load Generators area, click on the Open the Cloud Management Console button.
-
Select your Cloud session and your Load Generator.
-
Click on the Reboot button.
For more information, see Test from the Cloud.
Errors
No, executing a Virtual User cannot be stopped when an error occurs or when an assertion fails. This prevents damaging the load policy defined in the scenario.
However, when an error occurs or when a assertion fails, executing the Actions Container can be stopped before triggering the next iteration.
The memory displayed in the Runtime panel refers to the Java heap, not to system memory.
To generate heavy loads, increase the memory available to the Load Generator. For more information, see Increase available memory for Load Generators.
The Virtual User activity has been recorded correctly and you get an NL-NETWORK-03 error with the message "Failed to connect to the server". This indicates that NeoLoad could not connect to the server when playing the scenario. If the error details are java.net.ConnectException: Connection timed out: connect, it probably means that the Load Generator is using an inappropriate network interface. Check the Load Generator settings in the Runtime > Scenario section to make sure that the selected network interface allows connection to the web server. The most common causes of other errors are:
-
The server has not been launched or is running on a different port.
-
A firewall or anti-spyware program is preventing NeoLoad accessing the server.
-
Wrong proxy settings in NeoLoad: check the proxy parameters used to connect to the web server in the NeoLoad preferences Proxy section.
If the error is not due to one of these points, please carry out a short recording on a public Internet website, such as www.google.com, create a Virtual User and check its validity with NeoLoad. Then send the log files to NeoLoad Support (all the files in the NeoLoad 2023.4/logs directory).
If, during the test, you get 404 errors on images or JavaScript or CSS files, it indicates that the files are referenced and used in the HTML page, but are missing on the server.
The end user usually does not notice that these files are missing because the browser ignores this type of error. Either make corrections to the application (add the missing files or delete the reference to them in the web page), delete the request from the Virtual User or set the option to smart-ignore 404 error codes. For more information, see Error handling.
This means that NeoLoad could not follow the redirect directive in the previous request (302 Moved Temporarily). The previous request did not issue a redirect (not 302 status).
The request is an HTTP Redirect type within NeoLoad. This indicates that the request must follow the redirect directive in the previous request.
The redirect is valid if the previous request contains HTTP return code 300, 301, 302, 303, 305, or 307, and also contains a response header named Location.
The NL-REDIRECT-03 error indicates that the previous request (the referrer) did not contain HTTP return code 300, 301, 302, 303, 305, or 307.
To begin with, check the validity of the request referrer: Click on the request Advanced button, then on the Advanced parameters tab.
Then investigate the reason(s) why the referrer didn't return the expected HTTP code.
Typically, the reason is that the request was played with an invalid parameter and generated an HTTP 200 error code or generated an unexpected HTML content. For more information, see Why does the Virtual User not behave as expected?
The java.net.NoRouteToHostException: No route to host:connect probably means that an inappropriate network interface is being used.
Check the Load Generator network parameters. For more information, see Zones and Load Generator hosts.
NeoLoad Link Extractor function allows you to extract a link from the last page played before the extraction definition.
The NL-LINKEXTRACTOR-02 error signifies that the link or form could not be extracted from the previous request. This generally indicates that there is a page inserted in your scenario between the link to be extracted and the link extraction request. This can be the case if, for example, your application includes frames.
To make the Link Extractor work properly, you must make sure that the request containing the link to be extracted is the one played immediately before the extraction request. If the requests do not follow each other, you can either move them within the Virtual User, or use the Variable Extractor to find the dynamic value and insert it in the request parameter. For more information about advanced request configuration, see Advanced parameters.
The Total Errors No. field in the report summary stands for the number of defective requests.
One request can be counted as a failed assertion and as an HTTP error code in the errors details.
For example, the situation can be met with a request generating a 500 error with a failed assertion. As a consequence, the Total Errors No. is lower than the total number of errors in the errors list.
Third-party integration
AppDynamics
The NeoLoad module for AppDynamics has been designed to work with all versions of AppDynamics. Among them, it has been specifically verified with:
-
AppDynamics 3.4
-
AppDynamics Lite 3.3.3.2GA
Note: For any compatibility issue with AppDynamics, contact Tricentis NeoLoad Support.
CA APM
NeoLoad supports the following versions of CA APM agents:
-
CA APM Java agent from version 7.0.0.0 up
-
CA APM .NET agent from version 7.2.2.0 up
The opening of an element in Workstation is conditioned by the header configuration carried out in the first tab in the CA APM preferences panel, as described in NeoLoad module for CA APM. The configuration used is the one defined at the start of the test. The header configuration cannot be modified either during a test or for a test that has already been done.
The CA APM server configuration is the one defined in the second tab in the CA APM preferences panel, regardless of the test. For more information, see CA APM workstation.
Note that when all Virtual User instances are traced (percentage of Virtual User instances to be traced equals 100%), CA APM Workstation selects the element that corresponds to the specific instance. Conversely, when some instances are not traced (percentage of Virtual User instances to be traced is less than or equal to 99%), or if no Virtual User instances are traced (tracing by virtual user disabled), CA APM Workstation selects the element in the Virtual User node containing the merged metrics for all instances. For more information, see NeoLoad Module for CA APM.
NeoLoad has no control over the open CA APM Workstation console. The NeoLoad user is responsible for overseeing the Workstation console shutdown. If applications are incorrectly configured in the monitored applications settings panel, the CA APM Workstation console may not open and may leave an active process on the system. In this case, it is important to shut down the processes manually in order to avoid any unnecessary drain on system resources.
Note: For more information, see Monitored Applications.
Jenkins
The -report <files> argument must be used on the command line to generate a test report at the end of the test. When the .pdf file extension is specified, NeoLoad publishes a report in PDF format. The NeoLoad reports are listed in the build artifacts.
Note: For more information about Jenkins artifacts, see Read NeoLoad reports.
A Jenkins project can include a number of NeoLoad jobs.
When one job runs a number of NeoLoad tests, Jenkins displays the results and graphs of the first test. Outputs of the other tests are available in the project artifacts.
Note: For more information about Jenkins artifacts, see Read NeoLoad reports.
The NeoLoad plugin for Jenkins is compatible with all versions of Jenkins after 1.609.1.
Because Jenkins and Hudson are forks of the same historical tool, the NeoLoad plugin for Jenkins can also work with Hudson 2.0.0 and later. The plugin has been tested by Neotys and approved for:
-
Jenkins 2.7
-
Jenkins 2.0
-
Jenkins 1.658
-
Jenkins 1.508
-
Jenkins 1.470
-
Jenkins 1.458
-
Jenkins 1.406
-
Hudson 3.0.0
-
Hudson 2.2.1
-
Hudson 2.0.0
Note: In case the NeoLoad plugin works inaccurately with a more recent version of Jenkins, contact Tricentis NeoLoad Support.
Jenkins records logs every time a build is launched with the NeoLoad job. Logs provide behavior and system information. They are available in <NeoLoad job> > <build> > Console Output.
Note: The NeoLoad plugin logs are available with NeoLoad 5.0 and above.
The NeoLoad plugin for Jenkins offers trend graphs and a direct link to NeoLoad HTML test results. The JUnit XML results are exported directly from NeoLoad. These JUnit test results can be integrated with any modern CIS that supports a basic XML test result format. For more information, see TeamCity and Bamboo.
Note: The XML test result format has been tested with Hudson version 2.2.1 and 3.0.0. For more information about Hudson, see Does my Jenkins version support the NeoLoad plugin?.
When a NeoLoad job fails, Jenkins cannot display anything from NeoLoad. It may prove useful to read the build log in <NeoLoad job> > <failed build> > Console Output before reading the NeoLoad logs.
Note: For more information about NeoLoad logs, see Log of the NeoLoad Controller.
Some results are generated by NeoLoad before the NeoLoad plugin publishes them into the CIS GUI. The language of the results is set in the NeoLoad settings.
To check or modify the language setting, it is necessary to display the General settings in the NeoLoad Controller with the Edit > Preferences command.
Note: For more information about NeoLoad preferences, see Appearance in the NeoLoad documentation.
Tip: The language of the CIS GUI is bound to the language set in the browser. To change the language, it is necessary to specify the corresponding language in your browser options.
When no JUnit results file is available, it may prove useful to check the following:
-
An SLA does exist.
-
The SLA has alerts specified.
-
The alerts are applicable to some part of the project.
-
The associated parts of the project are actually being reached and no errors are preventing those parts of the project from running. Creating an alert that applies to the entire project is an easy way to verify this.
-
The SLA is applicable to the scenario that is being run.
Note: For more information about JUnit results files, see Read NeoLoad reports.
TeamCity
A TeamCity project can include a number of NeoLoad jobs.
When one job runs a number of NeoLoad tests, TeamCity displays the results and graphs of the first test. Outputs of the other tests are available in the project artifacts.
Note: For more information about TeamCity artifacts, see Read NeoLoad reports.
To execute a NeoLoad job from the command line, it is necessary to have a valid license to run NeoLoad:
-
When no new license is specified in the NeoLoad command line, then the currently leased license is used.
-
When a new license is specified in the NeoLoad command line and NeoLoad already has a leased license, the currently leased license is released and the newly specified license overrides the NeoLoad settings. The new license is released after the test is over.
Tip: It is recommended not to have any license already leased in NeoLoad before specifying a new license in the NeoLoad command line.
Dedicated command line arguments for NeoLoad make it possible to:
-
Lease and release a license.
-
Specify the license server to use.
For more information about NeoLoad license settings, see Manage licenses in the NeoLoad documentation.
The NeoLoad plugin for TeamCity offers trend graphs and a direct link to NeoLoad HTML test results. The JUnit XML results are exported directly from NeoLoad. These JUnit test results can be integrated with any modern CIS that supports a basic XML test result format.
Note: In addition to the TeamCity plugin, there is a NeoLoad plugin for Jenkins and for Bamboo.
TeamCity records logs every time a build is launched with the NeoLoad job. Logs provide behavior and system information. They are available in <NeoLoad project><NeoLoad job> > <build> > Build Log.
Note: TheNeoLoad plugin logs are available with NeoLoad 5.0 and above.
When a NeoLoad job fails, TeamCity cannot display anything from NeoLoad. It may prove useful to read the build log in <NeoLoad project><NeoLoad job> > <failed build> > <Build Log> before reading the NeoLoad logs.
Note: For more information about NeoLoad logs, see Log of the NeoLoad Controller in the NeoLoad documentation.
Some results are generated by NeoLoad before the NeoLoad plugin publishes them into the CIS GUI. The language of the results is set in the NeoLoad settings.
To check or modify the language setting, it is necessary to display the General settings in the NeoLoad Controller with the Edit > Preferences command.
Note: For more information about NeoLoad preferences, see Appearance in the NeoLoad documentation.
Tip: The language of the CIS GUI is bound to the language set in the browser. To change the language, it is necessary to specify the corresponding language in your browser options.
NeoLoad cannot find a valid license.
Solutions
-
If you want to use a license file:
You must activate the NeoLoad license with the same user that runs the agent.
When logged in as a certain user; for example "Windows_User" and running NeoLoad manually, the Windows_User has a license in NeoLoad. When a CIS runs NeoLoad, it does not use the "Windows_User," it uses a different user, for example, "CIS_User." Therefore, the CIS_User does not have a license.
-
Start NeoLoad with the agent user that has a license.
-
Check that the license is activated.
-
-
If you want to use Neotys Team Server to manage your license, follow these steps:
-
Check the NTS configuration as explained in Configure a NTS server.
-
Use it in the License Parameters section of the Build step configuration as explained in Execute a NeoLoad scenario.
-
When no JUnit results file is available, it may prove useful to check the following:
-
An SLA does exist.
-
The SLA has alerts specified.
-
The alerts are applicable to some part of the project.
-
The associated parts of the project are actually being reached and no errors are preventing those parts of the project from running. Creating an alert that applies to the entire project is an easy way to verify this.
-
The SLA is applicable to the scenario that is being run.
Information: For more information about JUnit results files, see Read NeoLoad reports.
SAP GUI Testing
In the case NeoLoad does not detect the path of SAP GUI or does not pick the appropriate version, Modify the path to the SAP GUI client.
Scripting must be enabled on all SAP GUI installations. For more information, Enable SAP GUI scripting.
For more information, Use SAP actions.