Configuration
Configure a NTS server
If you are using collaborative projects or if you need to lease a license when using the NeoLoad plugin with TeamCity, you can configure Neotys Team Server as a third-party server.
Note: If you don't use Neotys Team Server as a third-party server, you need to use a SVN or GIT plugin to check out your projects.
To configure a collaboration server, follow these steps:
-
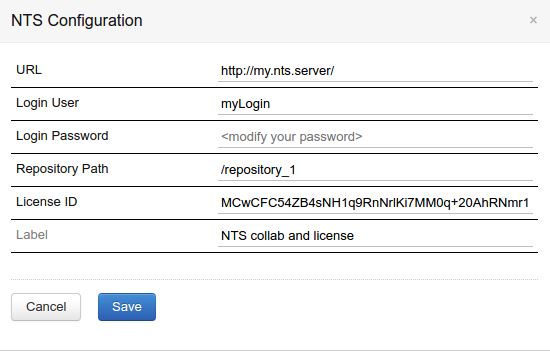
In TeamCity, go to Administration > Neotys Team Server.
-
In the Neotys Team Server section, click Create new NTS Configuration:
-
URL: Enter the URL of the server where your project is located.
-
Login User: Enter the username to log into the server.
-
Login Password: Enter the password to log into the server.
-
Repository Path: Enter the URL of the repository where your project is located. This is only required if the server will be used for shared projects.
-
License ID: Enter the license ID to use when leasing a license. This is only required if a shared license is used.
-
Label: Enter a description to easily identify the license when you configure a job, for example: "NeoLoad 5.5 (500 VU)".
-
-
Click the Save button to save your configuration.
The screenshot below shows the example of a configuration of Neotys Team Server for project collaboration and license purposes:
Configure a NeoLoad scenario
Execute a NeoLoad scenario
You can execute a NeoLoad scenario in an existing TeamCity job.
To execute a NeoLoad scenario, follow these steps:
-
Select the project where you want to execute a NeoLoad scenario.
-
Select the job where you want to execute a NeoLoad scenario.
-
Click Edit Configuration Settings.
-
Click Build Steps.
-
In the Build Steps section, click Add build step and select NeoLoad.
-
In the newly created step, enter the information required to execute the NeoLoad scenario.
Caution: If you have configured several NTS, make sure you use the same NTS configuration if you are using NTS to manage license and project collaboration within the same job.
NeoLoad Runner Parameters section
-
NeoLoad executable path:
-
If NeoLoad is deployed on the agents as a Tool, use the variable
teamcity.tool.<NeoLoad installed tool id>.For example, if NeoLoad has been installed as a zip archive named "neoload.zip" as explained in Recommendations, the variable to use is
%teamcity.tool.neoload%/bin/NeoLoadCmd. -
If NeoLoad is installed on an agent, use the absolute path of the NeoLoad installation.
For example,
on Unix:/home/myLogin/Neoload5.4.0/bin/NeoLoadCmd
on Windows:C:\Program Files\NeoLoad 5.4.0\bin\NeoLoadCmd.exe
-
-
Collaboration Server:
-
If the project is located on the hard drive, select "The project is on Hard Drive" and enter the absolute path of the NeoLoad project file in the NeoLoad project path field.
-
If the project is shared, select the NTS configuration and enter the name of the project in the NeoLoad project path field.
-
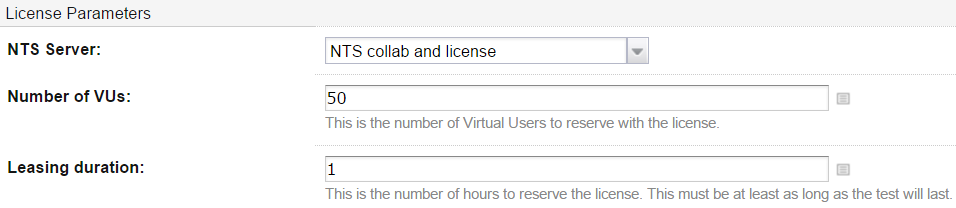
License Parameters section
-
NTS Server: select the NTS configuration you want to use to lease a license.
-
Number of VUs: enter the number of Virtual Users you want to use for your test.
-
Leasing duration: enter the duration required for your test
Override a NeoLoad project with a YAML or JSON file
A YAML or JSON file containing one or more scenarios to launch can be used to override the existing scenarios of your NeoLoad project. For more information, see www.neotys.com.
Caution: Only scenarios with the same name will be overridden.
To override a NeoLoad project with a YAML or JSON file
-
Follow the steps 1 to 5 from Execute a NeoLoad scenario.
-
In the Custom command line options field enter:
-
-project <path to the YAML or JSON file>or-project "<path to the YAML or JSON file>"if the path includes spaces. -
If you want to use a YAML or JSON file specifying the infrastructure to use, then add
-loadGenerators "<Path to the infrastructures definition YAML or JSON file>".Example:
-project "C:/Work/Demos/scenarios.yaml" -loadGenerators "C:/Work/Demos/infrastructures.yaml"
-
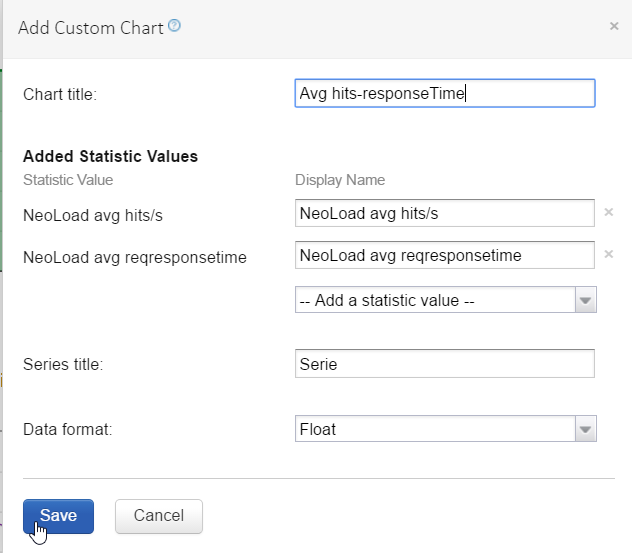
Define NeoLoad Trend Graphs
You can define as many customized graphs as you want from your NeoLoad project. Each graph can display several curves.
Note: You need to run a build before being able to add custom graphs.
To add a custom graph, follow these steps:
-
Select the job where you want to execute a NeoLoad scenario and select the Statistics tab.
-
Click Add new chart.
-
In the Add Custom Chart screen, enter the information required to define a custom graph:
-
Enter a name to identify the graph.
Tip: NeoLoad statistics names are prefixed with "NeoLoad".
-
In Add a statistic value, select a statistic value for each curve you want to trace in the graph.
-
-
Click Save.