Register Workflow as App Wizard
The Register Workflow as App Wizard allows a workflow to be registered as an app, or the workflow associated with an existing app to be replaced with a new workflow. Apps allow the input parameters for a workflow to be set using a form-based interface.
Before running the Wizard, note that the workflow to be registered as an app, or the workflow that will update an existing app must have uniquely named input parameters and uniquely named output (terminal) datasets. If the workflow to be registered as an app uses the Run Workflow action to call another workflow, only the calling workflow needs to be registered as an app.
Register a workflow as an app
If you have LiveCompare Editor permissions, start the Register Workflow as App Wizard by selecting a workflow in the LiveCompare hierarchy and choosing Register as App from its context menu. The following screens are displayed:
Choose Input Parameters
This screen allows you to specify the input parameters to be displayed in the app by selecting them from a list of the workflow’s parameter nodes. AAQ Select List, Boolean, External Data Source, Float, IMG Select List, Integer, Pair List, Pipeline, RFC Destination, Select List, ServiceNow, String, String List, String Multiline, Table and Test Repository parameters are supported by the Wizard.
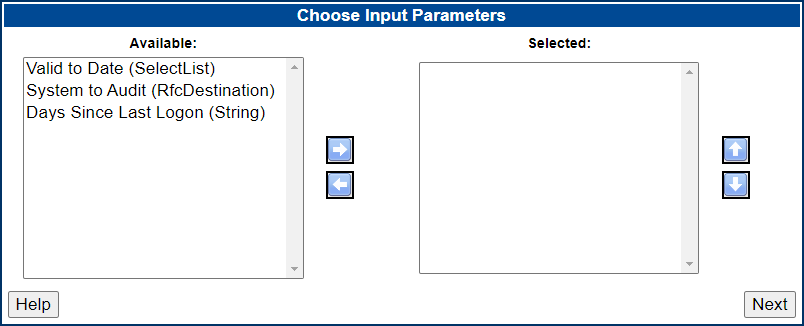
Note that if you use a String List as an input parameter for an app, each item in the String List should occupy a single line. The Wizard doesn’t support multi-line String List elements.
Select one or more parameters from the Available
list box, and click  to add then to the Selected list box. Use Ctrl+Left Click
to highlight multiple items, or Shift+Left Click to highlight a range of items.
Use the
to add then to the Selected list box. Use Ctrl+Left Click
to highlight multiple items, or Shift+Left Click to highlight a range of items.
Use the  and
and  buttons to change the position of highlighted parameters in
the Selected list box. The order of these parameters will be reflected
in variants that are created for the app. Use the
buttons to change the position of highlighted parameters in
the Selected list box. The order of these parameters will be reflected
in variants that are created for the app. Use the  button to remove highlighted items from the
Selected list box.
button to remove highlighted items from the
Selected list box.
If a Table parameter named Objects with a columns named TYPE and NAME (in that order) is added to an app, the TYPE field will allow LiveCompare object types to be selected from it when it is displayed in an app variant.
Click Next to continue.
Input Parameters
This screen allows you to specify the widgets to be used in the app’s user interface to enter values for Boolean, Float, Integer and String parameters.
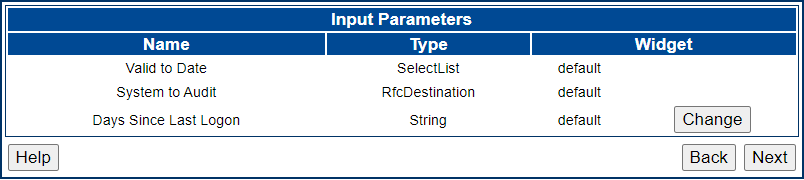
The following controls are available:
| Widget | Description |
|---|---|
| Default | The default control for each parameter type. For example, the default control for a String parameter is a simple entry field. |
| Date | This control includes a calendar control which allows a date to be set as the value for a String parameter. The settings for this control allow the date format to be specified. |
| Mask | This control allows a character mask to be used to specify the format of the input string set as the value for a Float, Integer or String parameter. The settings for this string allow a character mask and a default field value to be specified. |
| Slider | A slider control which allows the value for a Float or Integer parameter to be set. The settings for this control allow the maximum value, minimum value and increment to be specified. When an app run or saved, values entered manually into the control are updated appropriately if they don't confirm to the maximum value, minimum value and increment settings. |
| Switch | A switch control which may be turned on or off to set the value of a Boolean parameter. To toggle a switch, click the switch control itself, or its associated label. |
| Value List | A list box or dropdown list which allows the value for a Float, Integer or String parameter to be set by selecting an item from a list. The settings for this control allow a set of list values to be specified, as well as the length of the value list control. |
Click the Change button in the ‘Widget’ column for Boolean, Float, Integer and String parameters to modify the parameter’s rich user interface control. When you have made the required changes, click Next to continue.
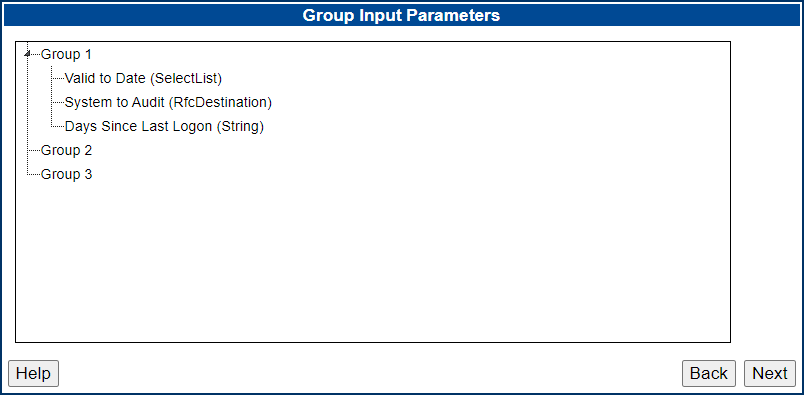
Group Input Parameters
This screen allows you to organize the app’s input parameters into up to three parameter groups. Each parameter group will be displayed as a separate named panel in the app’s Variant screen.
-
Use drag and drop to move each input parameter into the required group, or to reorder the input parameters within a group.
-
To rename a group, select the group’s title and choose Rename from the context menu.
-
Click
 to collapse a group, or
  to expand it.
Note that if an app uses a single parameter group that has not been renamed, the group’s panel in the app’s Variant screen will be named ‘Parameters’.
Click Next to continue.
Choose Output Parameter
This screen allows you to select an output parameter that will be used to display the workflow’s results in the app. A single terminal String dataset may be selected. In the workflow that is registered as an app, this would normally be set to the URL of a generated report.

Select the radio button next to the String dataset that will contain the workflow’s results, and click Next to continue.
App Properties
This screen allows you to select an app’s name and description, and to assign the app to one or more DevOps categories. These details are displayed for the app in the consumer interface’s Apps screen.
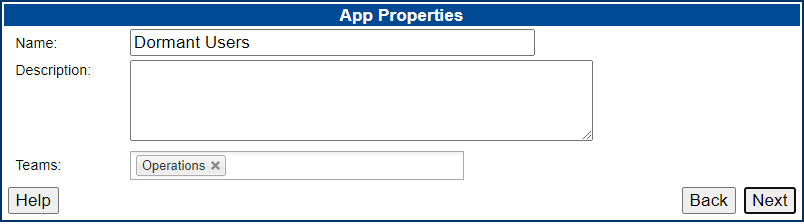
Complete the Name and Description fields. By default, the Name field is set to the name of the app’s associated workflow. The following characters may not be used in the Name field: / \ : * ? " < > | +.
Assign the app to one or more DevOps teams by selecting values from the Teams field. The Development, Testing, InfoSec and Operations DevOps teams are available. If required, click X to remove a category from your selections.
Click Next to continue.
Finish - Confirm Register App
This screen displays the app’s name and description, the teams to which the app has been assigned, and the app’s image. It also displays the app’s input parameters and output dataset.
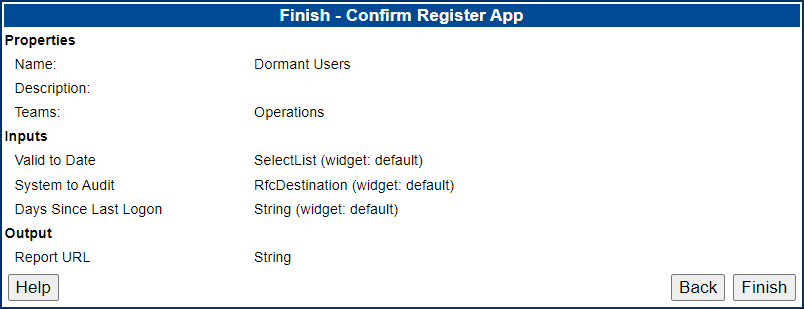
Click Finish to register the workflow as an app, or Back to make any changes.
When the Register Workflow as App Wizard has completed, the app will be displayed in the consumer interface’s Apps screen and in the App Store accessed from the studio interface.
Replace an app’s associated workflow
If you have LiveCompare Editor permissions, the workflow associated with an existing app may be replaced by carrying out the following steps:
- Select the App Store folder in the LiveCompare hierarchy to display the App Store screen.
- Click a link in the ‘App’ column to display the Edit App screen.
- Click Replace Workflow. The following screen is displayed.
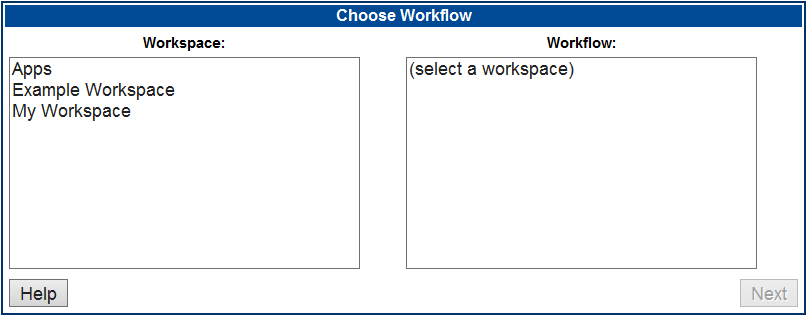
- Select a workspace, then select the replacement workflow. Note that if LiveCompare is Resource Group-controlled, only the workspaces in the currently selected Resource Group are displayed.
- Click Next to proceed to the screens described in the Register a workflow as an app section.