Edit, delete, or rescan modules
Modules are the main building blocks of automated test cases. You create modules by scanning your application.
As your application changes during development, so do your modules. For example, if you have new screen elements that you want to test. Or if your code has changed, and some of your identifiers no longer work. This topic guides you through modifying or deleting modules.
Open a module's details page
You can edit a module or trigger a rescan from the details page of a module. To open the page, go to ![]() Build > Modules and select the module.
Build > Modules and select the module.
On the details page, you can see the general properties or special parameters that help Tosca Cloud identify or steer a control.
Edit modules
You can edit the following module information:
-
Add or update a description or tag.
-
Change the value of the general properties or special parameters that help Tosca Cloud identify or steer a control. For example, replace session-based information with a wildcard to make the control's identification more stable.
-
Change the value of the general properties default value, default action mode, default data type and value range. For example, if there is a new drop-down value in a control that you want to add.
-
Change the order of the module's attributes by using drag and drop.
-
Organize controls of the type link, button, and radio button into groups. This helps you to structure your controls view more clearly in the test case.
-
Create module attributes manually. This can be an option for power users and is helpful when scanning or rescanning doesn't work as expected.
-
Add attachments such as screenshots, logs, or reports. This can be useful for debugging and reviewing failed test cases.
Delete modules
If you don't need a module at all anymore, go to ![]() Build > Modules and select Delete module from a module's
Build > Modules and select Delete module from a module's![]() options.
options.
As a general rule, don't just delete a module that you use in test cases and create a new one, as this will break references and require significant effort to rebuild the test cases with the new module.
Here's what you can do instead of just deleting a module and starting from scratch:
-
Try to rescan the module to add controls or update identifiers after code changes while keeping test case links intact.
-
Edit identification parameters on the module's details page to make small adjustments. This keeps all links intact, and there's no need to rework your test cases.
Select the View usages option to see which test cases use the module, before you delete it.
Delete module attributes
Select the module from the modules detail's page and select delete from a module attribute's![]() options.
options.
As a general rule, don't just delete a module attribute that you use in test cases and create a new one, as this will break references and require significant effort to rebuild the test cases with the new module attribute.
Select the View usages option to see which test cases use the module attribute, before you delete it.
Rescan modules
Tosca Cloud offers rescan functionality for modules you created with Tosca XScan
A rescan is a quick and easy way to update your modules, so they match the latest state of your application. It's especially helpful if a control has moved to a different location, or if property values have changed. The rescan keeps all references between the module and its connected test cases intact. This saves you time since you don't need to create a new module and test cases whenever the application changes.
To rescan a module you created with Tosca XScan, follow these steps:
-
Open your application and go to the page that contains the module's controls.
-
On the module's details page, select Rescan. This opens Tosca XScan in Advanced View. The list shows all controls that exist on the screen. Grayed-out entries with a check mark are already part of the module.
-
The Unmapped Controls section lists all controls that Tosca Cloud can't find anymore. You need to map these broken controls to working controls that aren't part of the module yet:
-
Select
 Map next to a broken control. Then choose the control you want to map it to and select Done. You can only map controls of the same type. For example, you can map a radio button to a radio button, but not to a text box.
 -
If the new control has different property values, Tosca XScan opens a new window, where you decide whether you want to stick with the current value (Module value) or the new value (Application value).
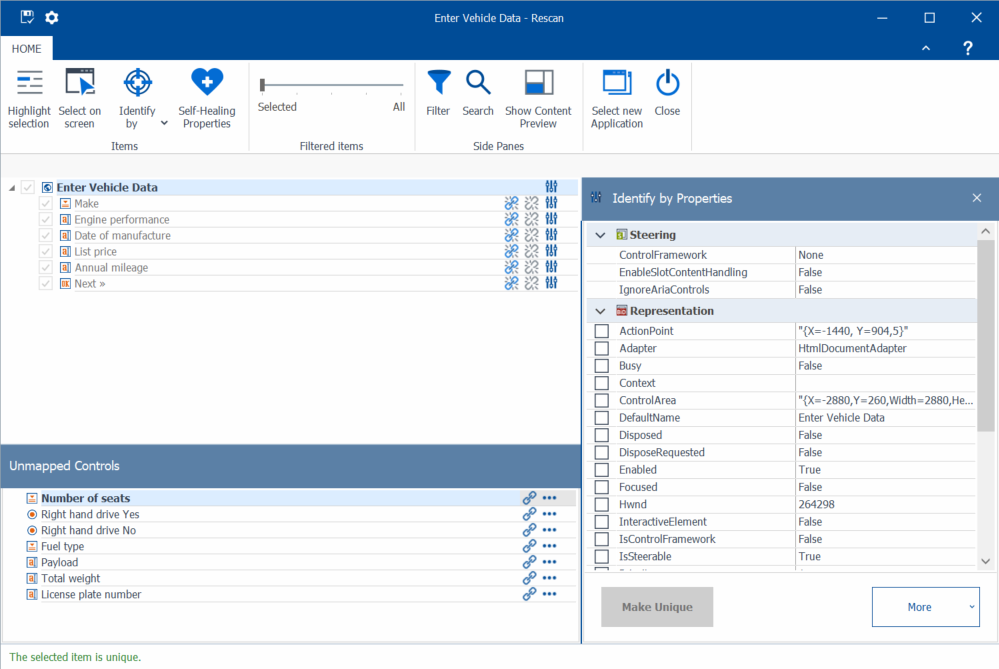
Rescan window with unmapped controls
-
-
You can also remap controls if the control itself still exists, but does something different than when you first scanned it. For example, if the architecture of your application has changed.
-
To remap a control that's part of the module to a control that's not yet part of the module, select
 Remap next to the relevant control and then map it.
 -
To replace the mapping between two controls that are already part of the module, select
 Unmap and then remap them.
-
-
To add an entirely new control to your module, select it just like you would during a regular scan.
-
To save your changes to the module and return to Tosca Cloud, select Save and Close.
Create module attributes manually
Once you've created a module by scanning, you can manually add module attributes to it. This can be an option for power users and is helpful when scanning or rescanning doesn't work as expected.
To do so, follow these steps:
-
Go to
 Build > Modules.
 -
Select the module to which you want to add a module attribute.
-
Select Create attribute from the table header.
-
Give the new module attribute a meaningful name.
-
Optionally , you can edit the default properties for the module attribute.
You can duplicate a module attribute. Simply select ![]() and then Duplicate. Tosca Cloud creates new attribute with the same name, default value, action mode, data type, and value range.
and then Duplicate. Tosca Cloud creates new attribute with the same name, default value, action mode, data type, and value range.
Add attachments to modules
Use attachments to provide test data, validate file uploads, and store reference materials. They help improve debugging with logs, screenshots, or reports.
You add attachments as follows:
-
Go to the module's details page.
-
In the properties pane, go to the General tab.
-
In the Attachments section, select Upload.
-
Select a file on your machine and save it to Tosca Cloud. The maximum file size is 5 MB.
Edit, delete, or rescan modules in the old test case editor
Modules are the main building blocks of automated test cases. You create modules by scanning your application.
As your application changes during development, so do your modules. For example, if you have new screen elements that you want to test. Or if your code has changed, and some of your identifiers no longer work. This topic walks you through modifying or deleting modules.
Open a module's details page
You can edit, delete, or trigger a rescan from the details page of a module. To open the page, go to ![]() Build > Modules and select the module.
Build > Modules and select the module.
Alternatively, you can access the details page directly from the test case editor. Choose one of the following options:
-
Expand the Modules in the left pane and select Edit from a module's
 options.
 -
In your test case, select Properties from a test step's
options. Then select Edit.
Edit modules
You can edit the following module information:
-
Add or change a description.
-
Change the value of the general properties or special parameters that help Tosca Cloud identify or steer a control. For example, replace session-based information with a wildcard to make the control's identification more stable.
-
Change the index, if you've identified a control by index.
-
Change the order of the module's attributes by using drag and drop.
Delete modules
If you don't need a module at all anymore, select Delete module.
As a general rule, don't just delete a module that you use in your test cases and then create a new one. Once you delete the original module, you lose all references to the module in the linked test cases, which breaks them. And you'll need to invest a lot of time and effort into recreating your test cases with the new module.
Here's what you can do instead of just deleting a module and starting from scratch:
-
Rescan the module to add more controls, to change identifiers, or to update identifiers after a property change in the code. This keeps the links between your module and its connected test cases intact. All you need to do is update your tests if you've added controls.
-
Edit identification parameters on the module's details page to make small adjustments. This keeps all links intact, and there's no need to rework your test cases.
Rescan modules
Tosca Cloud offers a rescan functionality with Tosca XScan. Please note that there's no rescan functionality for Cloud Scanner.
A rescan is a quick and easy way to update your modules, so they match the latest state of your application under test. It's especially helpful if a control has moved to a different location, or if property values have changed. The rescan keeps all references between the module and its connected test cases intact. This saves you time since you don't need to create a new module and test cases whenever the application changes.
To rescan the module, follow these steps:
-
Open your application and go to the page that contains the module's controls.
-
On the module's details page, select Rescan module. This opens Tosca XScan in Advanced View. The list shows all controls that exist on the screen. Grayed-out entries with a check mark are already part of the module.
-
The Unmapped Controls section lists all controls that Tosca Cloud can't find anymore. You need to map these broken controls to working controls that aren't part of the module yet:
-
Select
Map next to a broken control. Then choose the control you want to map it to and select Done. You can only map controls of the same type. For example, you can map a radio button to a radio button, but not to a text box. -
If the new control has different property values, Tosca XScan opens a new window, where you decide whether you want to stick with the current value Module value or the new value Application value.
Rescan window with unmapped controls
-
-
You can also remap controls if the control itself still exists, but does something different than when you first scanned it. For example, if the architecture of your application has changed.
-
To remap a control that's part of the module to a control that's not yet part of the module, select
Remap next to the relevant control and then map it. -
To replace the mapping between two controls that are already part of the module, select
Unmap and then remap them.
-
-
To add an entirely new control to your module, select it just like you would during a regular scan.
-
To save your changes to the module and return to Tosca Cloud, select Save and Close.