Steer remote browser
You can create XBrowser WebDriver Modules with XScan.
To do so, right-click on a Module folder or use the dynamic menu Modules in Tosca Commander and select ![]() Scan->More->WebDriver. For further details on how to proceed, please see chapter "Scan via WebDriver".
Scan->More->WebDriver. For further details on how to proceed, please see chapter "Scan via WebDriver".
You can steer XBrowser WebDriver controls as described in chapter "Steer XBrowser controls", however there are some restrictions. To view a list of restrictions, see this Tricentis Knowledge Base article.
Execute TestCases on a remote machine
To execute an XBrowser TestCase on a remote machine, you have to set test configuration parameters on the level of the TestCase. Depending whether you want to execute a TestCase via WebDriver or on BrowserStack, different configurations are necessary.
-
For further information on how to execute XBrowser TestCases via WebDriver, see "Execute TestCases via WebDriver".
-
For further information on how to execute XBrowser TestCases on BrowserStack, see "Execute TestCases on BrowserStack".
-
For general information on how to execute TestCases in sequence , refer to chapter "Create an ExecutionList".
Before you can execute a TestCase on a remote machine, you have to open the website in your browser first.

|
You can only use Standard Modules which are machine independent (e.g. TBox Wait, TBox Set Buffer) in a remote execution. Machine dependent Standard Modules (e.g. TBox Start Program) are executed on the local machine. |
Execute TestCases on BrowserStack
To execute an XBrowser TestCase on BrowserStack you have to create test configuration parameters on the level of the TestCase you want to execute.
To execute an XBrowser TestCase on BrowserStack, follow the steps below:
-
Create the test configuration parameters Browser, BrowserVersion, HubAddress and OperatingSystem on the level of the TestCase you want to execute.
-
In the Value column of the test configuration parameters, enter the according information:
-
HubAddress: enter BrowserStack to execute your TestCase on BrowserStack.
-
Browser: enter the browser on which you want to execute the TestCase.
-
BrowserVersion: enter the version of the browser on which you want to execute the TestCase.
-
OperatingSystem: enter the operating system on which you want to execute the TestCase.
-
You can create additional test configuration parameters for Browserstack capabilities using the test configuration parameter WebDriverJson according to Cloud provider capability syntax. Alternatively, you can use the test configuration parameter Browserstack_<CapabilityName>, replacing <CapabilityName> with a Browserstack capability. If the name of the capability contains a dot (.), replace this character with double underscore (__). If the name of the capability contains a colon (:), replace this character with triple underscore (___).
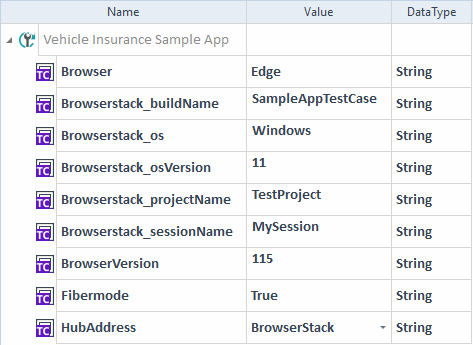
Specifying test configuration parameters for execution on BrowserStack
Tricentis recommends to close the browser after executing your TestCase on BrowserStack.
For further details on how to continue with the execution of a TestCase, refer to chapter "Run ExecutionLists".
|
|
Ensure that you specified the Access Key and the Username of the BrowserStack account and the Hub Address, which should be used for BrowserStack in the Settings dialog. |
Execute TestCases via WebDriver
To execute an XBrowser TestCase via WebDriver, follow the steps below:
-
Create the test configuration parameter HubAddress on the level of the TestCase you want to execute.
-
In the Value column of the test configuration parameter HubAddress, enter the IP address of the grid hub where you want to execute the TestCase. For example, if the grid hub is on your local machine, enter localhost. For more information about the connected nodes, open the URL http://<IP:portnumber>/grid/console in your browser.
-
Optionally, create the following test configuration parameters to further specify your test configuration:
-
Browser: enter the browser on which you want to execute the TestCase.
-
BrowserVersion: enter the version of the browser on which you want to execute the TestCase.
-
OperatingSystem: enter the operating system on which you want to execute the TestCase.
-
-
Optionally, if you want to use a proxy server, create the following test configuration parameters:
-
WebDriverHubProxyAddress: enter the IP address of the proxy server on which you want to execute the TestCase.
-
WebDriverProxyUsername: enter the user name to authenticate with the proxy server.
-
WebDriverProxyPassword: enter the password to authenticate with the proxy server.
Note that you can only use these TCPs with the Module OpenUrl.
-
-
Optionally, if you encounter slow execution time, you can create the test configuration parameter Fibermode and set the Value to True to improve the execution time.
-
Optionally, if you want to run your tests with browser-specific user profile preferences, add the test configuration parameter WebDriverUserProfilePreference_<PreferenceName>. To set it, note the following:
-
You need to replace <PreferenceName> with the name of the preference. If the name of the preference contains a dot (.), replace this character with double underscore (__). If the name of the preference contains a colon (:), replace this character with triple underscore (___).
-
You can set only user profile preferences that take a string as their value.
-
You can use this TCP with Google Chrome, Microsoft Edge, or Mozilla Firefox browsers only and with the OpenUrl and Open embedded Chrome/Chromium application Modules.
-
-
If you want to set a custom browser window size when the test runs, you can set the Maximize Window setting to False and use browser arguments to specify the size.
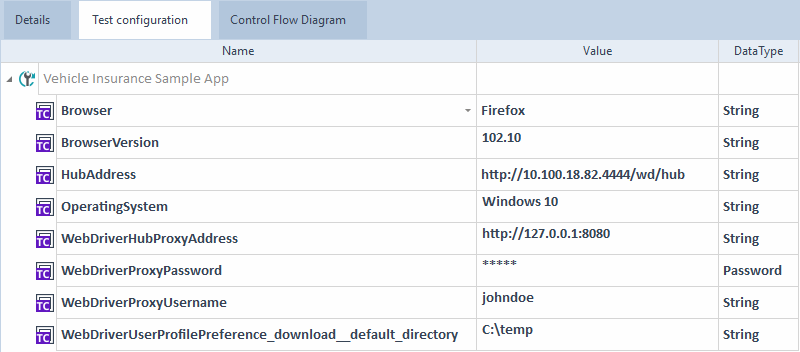
Specifying test configuration parameters for execution via WebDriver
Switch TestCases execution from WebDriver to XBrowser
If you need to switch from WebDriver to XBrowser for your test execution, follow the appropriate method depending on whether the test is running:
-
Before or after the test, remove the HubAddress TCP. This deactivates WebDriver and activates the default execution type, which is XBrowser.
-
During the test, set the HubAddress TCP to WebDriver execution off. This also allows you to switch between WebDriver and XBrowser while the test is running, which is especially useful when working with embedded HTML controls in SAP.
For more details on how to continue with the execution of a TestCase, check out "Run ExecutionLists".
Use WebDriver capabilities
You can use WebDriver capabilities to specify your test configuration. For the list of WebDriver capabilities, see the WebDriver documentation and the BrowserStack documentation.
To use a WebDriver capability, follow the steps below:
-
Create a test configuration parameter in your TestCase.
-
Name the test configuration parameter Webdriver_<capability>. Replace <capability> with the name of the capability. If the name of the capability contains a dot (.), replace this character with double underscore (__). If the name of the capability contains a colon (:), replace this character with triple underscore (___).
-
Define the value of the capability and its data type. Note that the supported data types are:
-
String, for a single string, a list of strings, or a JSON string
-
Boolean
To specify a list of strings, separate the strings with semicolons (;).
To define a JSON string, use our special character syntax as in the cloud provider example.
-
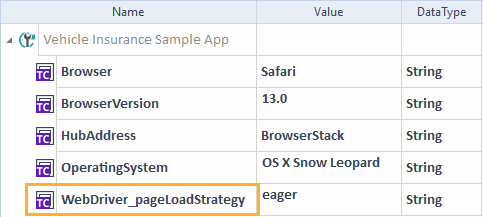
Specify a WebDriver capability
Cloud Service Provider specific capabilities
Tosca supports the use of Cloud Service Provider capabilities to specify your test configuration. Your provider's documentation lists these capabilities.
To use a Cloud Service Provider capability, follow the steps below:
-
Create a test configuration parameter in your TestCase.
-
Name the test configuration parameter WebDriverJson_<ProviderOptionsTag>. Look for the options tag in your cloud provider's documentation, replace the colon (:) in the tag with three underscores (___), and use that instead of <ProviderOptionsTag>. If the tag contains a dot (.), too, replace it with two underscores (__).
For example: WebDriverJson_bstack___options for BrowserStack's bstack:options tag.
-
Use a JSON string to define the value of the capability, according to your cloud provider specifications. Use our special character syntax for the JSON string as in the following example:
"{""userName"": ""<UserName>"", ""accessKey"": ""<accessKey>"", ""browserVersion"": ""136"", os"": ""OS X"", ""osVersion"": ""Monterey"", ""acceptInsecureCerts"": true, ""timeouts"": {""implicit"": 10000, ""pageLoad"": 30000}}"
-
Define the data type as string.
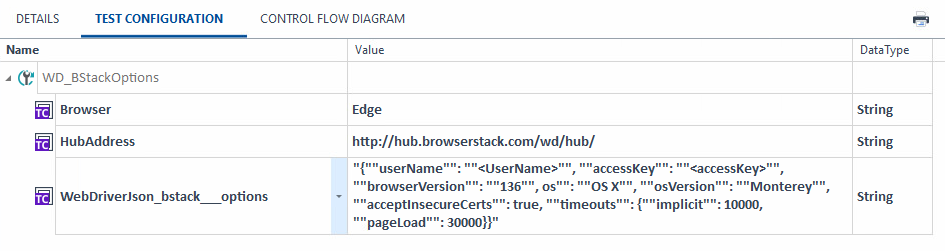
Specify Cloud Service Provider capabilities
Execute TestCases in headless browser
You can execute your TestCase in a headless Chrome, Chromium, or Firefox browser instance via WebDriver. The procedure depends on how you want to start the execution:
-
Execute in a new headless Chrome, Chromium, or Firefox browser instance.
-
Execute in an already running headless Chrome browser instance.

|
You cannot execute in an already running headless |
Execute in a new headless Chrome, Chromium, or Firefox browser instance
To execute in a new headless Chrome, Chromium, or Firefox browser instance, follow the steps below:
-
Open a website with the Module OpenUrl. In the BrowserArguments->Argument ModuleAttribute, specify the following:
-
the argument that starts the browser in headless mode, e.g. --headless
-
the argument that specifies a suitable window size, e.g. --window-size=1024x640
-
Execute in an already running headless Chrome browser instance
To execute in an already running headless Chrome browser instance, follow the steps below:
-
Connect to the already running headless Chrome browser instance with the Module Connect to Chrome/Chromium application. In the Debug Port ModuleAttribute, specify the debug port under which the application runs.
Open a website
To open a website on a remote machine, use the Module OpenUrl.
For further details on how to open a website, refer to see chapter "Open website".
Close a browser
To close a website on a remote machine, use the Module CloseBrowser.
For further details on how to close a website, refer to see chapter "Close browser".