Set Desired Capabilities
Desired Capabilities allow you to indicate important parameters. These parameters tell the Appium Server how you want your test sessions to behave. When you connect a mobile device, emulator, or simulator to your workstation, Tricentis Tosca uses a default collection of Desired Capabilities to communicate with the Appium Server.
If you need to use custom Desired Capabilities, you can specify them when you scan your mobile application with the Mobile Scan and when you execute your TestCases. This chapter describes how to:
For a list of all supported Desired Capabilities, see the Appium Documentation (opens in new tab) and WebDriverAgent Documentation (opens in new tab).
Set Desired Capabilities for a scan
You can set Desired Capabilities to specify connection parameters during the scan of a mobile device, emulator, or simulator.
To do so, follow these steps:
-
Select Set capabilities.
-
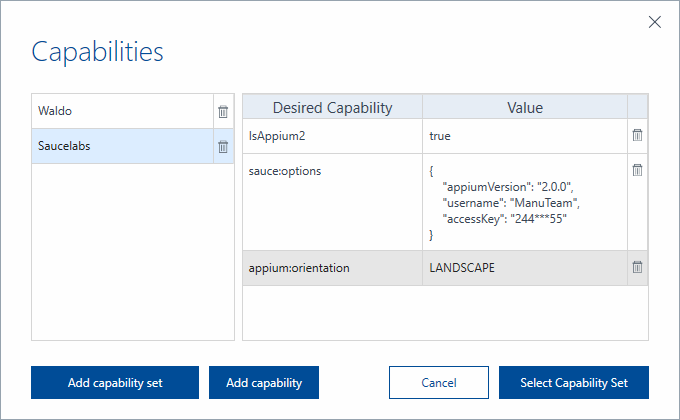
In the Capabilities window, select Add capabilities set. You can define one or more capabilities sets.
-
Define a name for the new capabilities set on the left side of the window.
-
Select Add capability for each Desired Capability that you want to add to the selected capabilities set.
-
Enter the name of each Desired Capability and the required value into the Value column.
-
Navigate to the capabilities set you want to select for your scan.
-
Select Select Capability Set and continue the scan.
Clear capability set selections
If you want to change the capabilities set, select Clear at the bottom of the Mobile Scan window. Then, select Set capabilities and choose a different set.
![]()
Clear in the Mobile Scan window to clear you capability set selections
Set Desired Capabilities for test execution
You can also apply Desired Capabilities to your test execution.
Use the Set Desired Capabilities Module to define which Desired Capabilities you want to use.
This Module is part of the Standard subset. You can find it under Standard modules->Engines->Mobile->Capabilities.
To apply Desired Capabilities to your test execution, follow the steps below:
-
Specify the test configuration parameters to establish a connection with the device.
-
Drag and drop the Set Desired Capabilities Module onto your TestCase. It must be the first TestStep of your TestCase.
-
Enter the name of a Desired Capability into the Name column.
-
Enter the required value of the Desired Capability into the Value Column.
If you want to add Desired Capabilities with JSON objects, enter the value in the following format and select Escape value from the context menu:
{ "appiumVersion": "<your Appium version>", "username": "<user name of your cloud service provider account>", "accessKey" : "<your access key for the cloud service provider>" }
For example: { "appiumVersion": "2.0.0", "username": "MyTeam", "accessKey" : "12345" }
-
Set the ActionMode to Select.
-
If you create Desired Capabilities to fetch key vaults, set the DataType to Secret.
-
Add either the Open Mobile App TestStep or the OpenUrl TestStep as a first TestStep in the execution.

|
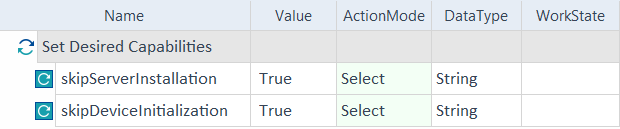
In this example, you apply the Desired Capabilities skipServerInstallation and skipDeviceInitialization to reduce the startup time of Android test execution.
Set Desired Capabilities Module in a TestCase |
Add Desired Capabilities for test execution
Once you've set your Desired Capabilites, you may need to add more without replacing the ones you've already defined. You can use this function to build your capabilities in stages. Just add new capabilities as you need them for specific testing scenarios.
Use the Add Desired Capabilities Module to include additional capabilities without affecting your existing ones. This Module is part of the Standard subset. You can find it under Standard modules->Engines->Mobile->Capabilities.
To add new Desired Capabilities for test execution, follow these steps:
-
Make sure you've specified the test configuration parameters to establish a connection with the device.
-
Drag and drop the Add Desired Capabilities Module onto your TestCase.
-
Specify the Desired Capabilities to add the following:
-
In the Name column, enter the name of the Desired Capability.
-
Into the Value column, enter the required value.
-
If you want to add Desired Capabilities with JSON objects, enter the value in the following format and select Escape value from the context menu:
Copy{ "appiumVersion": "<your Appium version>", "username": "<user name of your cloud service provider account>", "accessKey" : "<your access key for the cloud service provider>" }For example:
Copy{ "appiumVersion": "2.0.0", "username": "MyTeam", "accessKey" : "12345" }
-
-
Set the ActionMode to Select.
-
If you add Desired Capabilities to fetch key vaults, set the DataType to Secret.
-
Add either the Open Mobile App TestStep or the OpenUrl TestStep as the next step in the execution. Make sure that the Set Desired Capabilities and Add Desired Capabilities TestSteps come before the Open Mobile App or OpenUrl TestSteps.
|
|
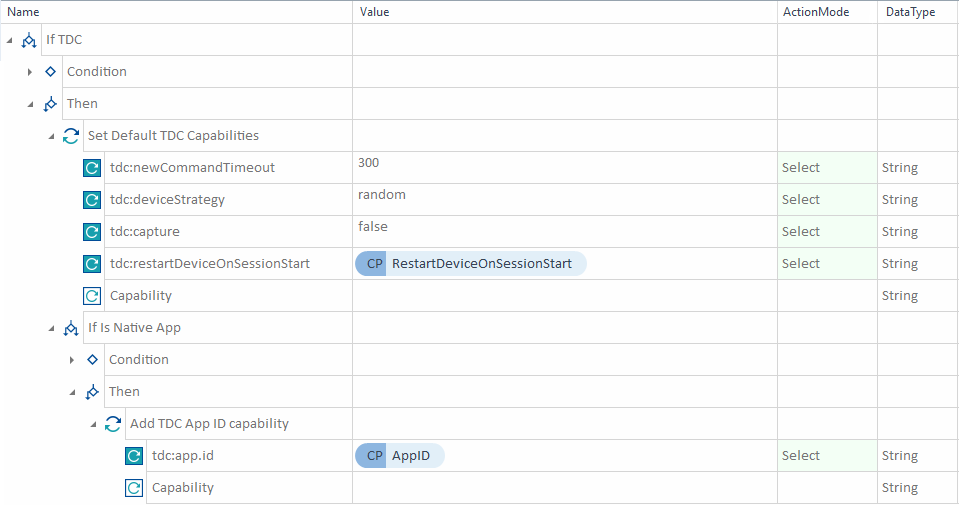
In this example, you run your TestCase on multiple cloud providers and dynamically modify the capabilities. At the same time, you keep a set of shared capabilities that apply across all providers. To do so, you use both the Set Desired Capabilities and Add Desired Capabilities Modules. When you run your tests on Tricentis Device Cloud (TDC), you set your Desired Capabilities to customize your tests as follows:
When testing on native apps, you add a Desired Capability to specify the app ID, which ensures the correct app launches on the device, while also applying the previously defined capabilities. Without the Add Desired Capabilities Module, you would need to use the Set Desired Capabilities Module. This would require you to manually reconfigure the previous capabilities to include the app ID. Building your capabilities piece-by-piece makes your test setups smoother, more flexible, and less prone to errors.
Set Desired Capabilities and Add Desired Capabilities Modules in a TestCase |
Use Desired Capabilities to reduce startup time
You can use Desired Capabilities to reduce the startup time of the Appium Server. The table below lists the Desired Capabilities that you can apply for a scan or for test execution on Android or iOS devices.
|
Desired Capability |
Android |
iOS |
Description |
|---|---|---|---|
|
noSign |
■ |
■ |
Responsible for checking and signing the app with debug keys. The default value is False. Set this Desired Capability to True to reduce startup time. Use it only with UiAutomator. |
|
skipDeviceInitialization |
■ |
■ |
Skips device initialization that includes, for example, installation and running the settings app or permission settings. The default value is False. If you have already used the mobile device for test automation and it is prepared for the next automation, set this Desired Capability to True to improve startup performance. Use this Desired Capability from Appium version 1.12.0. |
|
skipServerInstallation |
■ |
■ |
Skips the installation of UiAutomator2 and uses uiAutomator2 from the device. The default value is False. Set this Desired Capability to True to reduce startup time when an UiAutomator2 server in proper version is already installed on your device (i.e. a version compatible with the installed Appium Server). Use this Desired Capability from Appium version 1.12.0. |
|
skipUnlock |
■ |
■ |
Skips unlocking of the mobile screen. The default value is False. If you are sure that the screen of the mobile device is unlocked, you can set this Desired Capability to True to reduce the Appium startup time. |
|
useNewWDA |
■ |
■ |
Uninstalls an existing WebDriverAgent app from the device. If set to True, this Desired Capability enables you to apply different WebDriverAgent startup options at the beginning of each session. The default value is True. Set this Desired Capability to False to reduce startup time. |
|
usePrebuiltWDA |
■ |
■ |
Skips building the WebDriverAgent app when running the application. If enabled, you must build the app yourself. This Desired Capability works only with Xcode 8 or later. The default value is False. Set this Desired Capability to True to reduce startup time. |
For a list of all supported Desired Capabilities, see the Appium Documentation (opens in new tab) and WebDriverAgent Documentation (opens in new tab).
Use Desired Capabilities to fetch secrets from a key vault
When you scan mobile applications on a cloud, you can use a key vault provider to access confidential data. To fetch these secrets from a key vault, you must set Desired Capabilities. The table below lists the Desired Capabilities that you can apply for a scan or for test execution on Android and iOS devices.
|
Desired Capability |
Description |
|---|---|
|
securityToken |
Use the dynamic expression {SECRET} to fetch your security token from your key vault. |
|
KeyVaultPath |
Enter the path to the key vault provider executable file. |