Import requirements
In addition to creating requirements from scratch, you can also use the following methods to add requirements:
-
Import requirements from an external Application Lifecycle Management (ALM) tool, such as Jira, Rally, or VersionOne.
You can also use Microsoft Excel to update existing Requirements.
Create an Excel spreadsheet to import requirements
To create more than one requirement at a time, you can import them from a Microsoft Excel spreadsheet with our sample import template.
You can also modify an existing spreadsheet to match the sample import template. For example, if you have an Excel sheet exported from an external ALM tool. Note that requirements imported from a revised Excel spreadsheet won't be integrated with your external ALM tool.
Download the sample import template
To download the sample import template, follow these instructions:
-
Go to the Requirements tab, and then select your project in the tree panel.
-
Select the
 Import Excel icon in the tree toolbar.
 -
In the Import Requirement Wizard window, select either the XLS Template or XLSX Template link to download the template in your preferred format.
Fill out the import template
In Microsoft Excel, enter the Requirement Name, Description, Status, Priority, and Type for each requirement. If you're editing an existing requirement, add the Requirement ID. If this is a new requirement, leave this value blank so the system can generate you a new Requirement ID.
Optionally, you can add more columns to the spreadsheet to include custom fields.
If you have any information you want to add to the spreadsheet that doesn't apply to an existing field in qTest, you can create a custom field in your project to contain this unique information. Please note, if you use qTest Insights, these reports can't include custom fields at the project level. If you want to include custom fields in your Insights reports, you need to make custom fields in Site Fields.

You can edit the base template to fit your needs, as long as the contents still align with your qTest fields and values.
Verify that all cells match an available value in qTest Manager. If you're uploading data to a combo box or a checkbox field, you can include multiple values in a cell, separated by commas with no spaces. For example, if you want to include values of 1, 2, 3, and 4, you would enter 1,2,3,4 in the cell. To learn more about the contents for each cell, refer to Manage Requirements.
Let's take a look at an example of correct and incorrect values. Your Status field currently has four values in qTest Manager: New, In Progress, Ready for Baseline, and Baselined, and you want to import two requirements.

Ensure the cells in your import template match the available values in qTest.
In Requirement 003, the value In Progress for the Status field matches an existing value for this field in qTest Manager. However, in Requirement 004, the value New value for the Status field doesn't match an existing value for this field in qTest Manager. In this case, you need to change this cell to match an available value for the Status field in qTest Manager or add more values as needed. Learn how to customize the available values for each field in Field Settings.
Choose the module
Your requirements are imported to a module based on the Excel sheet name.
You can choose to import to an existing module or create a new module:
-
To import requirements to an existing module, update the Excel sheet name with the existing module number and name. Use MD-# followed by the folder name. For example, to import Requirements to the Homepage module, which is module 2, rename the Excel sheet tab to MD-2 Homepage.
-
To import requirements to a new module, give the Excel sheet name the desired name for the new module. During the import, we'll create a new module in qTest using your sheet name.
Note that if you don't rename the sheet tab, the new folder module will have the default tab name. Don't worry, you can change this in qTest at a later time.
Import the Excel file
When you're ready to import your Excel file, follow the instructions below:
-
Go to the Requirements tab, then select your project in the tree panel.
-
Select the
Import Excel icon in the tree toolbar to open the Import Requirement Wizard window. -
Drag and drop or open the file explorer to select the Excel file you want to import. When the upload finishes, the file appears at the bottom of the window.
-
Select Next to start mapping fields.
-
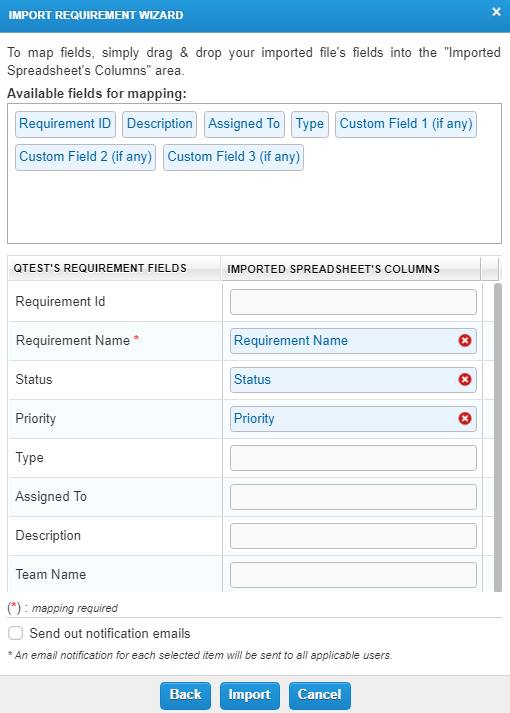
Drag and drop each field in the Available fields for mapping section to the field in the Imported Spreadsheet's Columns that corresponds with the requirement field. The Excel column name and the mapped qTest field name don't have to match.
If you are importing a new requirement, do not map the Requirement Id field, as we'll auto-generate this value.
-
Optionally, select the Send out notification emails checkbox to send out a notification email to all applicable users for each imported requirement.
-
Click Import. When the file is successfully imported, a message displays to confirm the import.
-
Select OK & Refresh to close the modal and refresh the Requirements tab to display the imported requirements.
Modify existing Requirements using Excel
If you want to update requirements in bulk, you can use Microsoft Excel spreadsheets to edit existing requirements.
To modify existing requirements with Excel, follow these steps:
-
Download the Requirement Details report Excel file.
-
In this Excel file, edit the requirement details as needed.
Note that the Excel sheet name needs to match the existing module before you import. Use MD-# followed by the folder name. For example, to import Requirements to the Homepage module, which is module 2, rename the Excel sheet tab to MD-2 Homepage.
-
Import this Excel file to qTest Manager.
Note that when you update existing requirements with an Excel spreadsheet, you must map the exact Requirement Id.
Import Requirements from an external ALM tool
If you already created requirements or user stories in an external ALM tool, such as Jira, Rally, or VersionOne, you can import them directly from there. You can also manage these requirements separately from any requirements that aren't integrated with an external tool.
For information about importing requirements from an external ALM tool, refer to:
What's next
Already working with test cases? You can also use Excel to import test cases and link them to requirements. For more information about importing test cases with Microsoft Excel, refer to Import or Modify Test Cases Using Microsoft Excel.