Integrate Cucumber with Universal Agent
In this article, you will learn how to integrate Cucumber with the Universal Agent.
The sample source code of Cucumber project is located at https://github.com/Tricentis-qTest/launch-samples
Prerequisites
-
Your machine needs to have Git installed.
-
You machine needs to have Java installed. The Java version should be the one compatible with what you use to run your Cucumber project.
-
This example uses Maven to execute the tests. Make sure you install Maven to the Automation Host machine.
-
Along with Maven, this example also uses maven-compiler-plug-in and maven-surefire-plug-in to execute tests and generate report. Refer to the Important notes section to configure the pom.xml file when you integrate your actual Cucumber project with Universal Agent.
-
This article uses Selenium that opens Chrome browser, so make sure you also install Google Chrome to the machine where Automation Host is running.
Create Cucumber Universal Agent
-
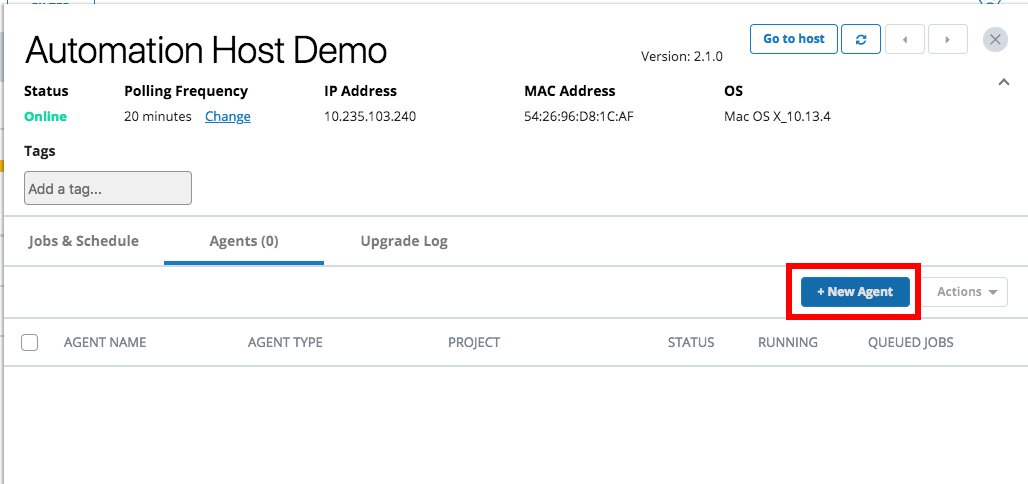
From Launch, open the host machine where you want to create the new agent.
-
Select the + New Agent button.
-
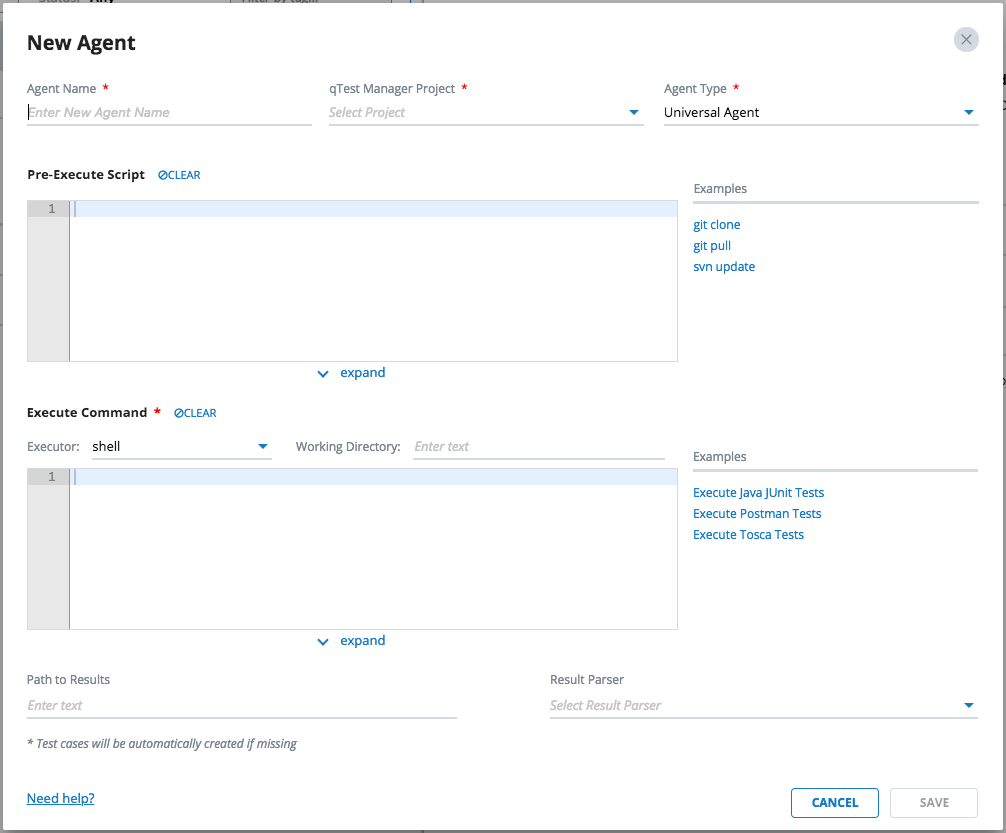
The New Agent dialog will display.
-
Enter the information below for the new agent.
General Agent Information

-
Agent Name: Name of the agent, such as Cucumber Universal Agent
-
qTest Manager Project: Select a qTest Manager project from which the agent is going to execute scheduled tests, such as qConnect Sample Project
-
Agent Type: Select Universal Agent
Pre-Execute Script
Enter the script below in the Pre-Execute Script editor, which is specific to the Operating System that the host is running.
Linux/Mac
#!/bin/bash
if [ ! -d "/usr/local/var/cucumber-sample" ]
then
cd "/usr/local/var"
git clone https://github.com/QASymphony/cucumber-sample
else
cd /usr/local/var/cucumber-sample
git pull --all
fi
Windows
if not exist "D:\cucumber-sample" (
cd /d D:\
git clone https://github.com/QASymphony/cucumber-sample
) else (
cd /d "D:\cucumber-sample"
git pull --all
)Execute Command
Executor
-
Select node as the executor
Working Directory
-
If your host machine is running on Linux or Mac, enter /usr/local/var/cucumber-sample
-
If your host machine is running on Windows, enter D:\cucumber-sample
Execute Command
We are going to create a script written in Node.js to:
-
Obtain the automation content(s) of scheduled test runs by resolving the value of magic variable TESTCASES_AC. Refer to Using Magic Variables in Universal Agent to learn more about magic variables in Universal Agent.
-
If the value of TESTCASES_AC variable is empty, which means there is no test runs being scheduled to be executed (such as when this Universal Agent is executed in the first time), we will let the agent execute the all scenarios in our Cucumber project then create test run logs to qTest Manager as the execution result.
-
If TESTCASES_AC variable has value, which are the automation contents of scheduled test runs, we will instruct Universal Agentto only execute scenarios that match those automation contents.
Notes
-
Make sure you install maven to your host machine for the command to be executed successfully by Universal Agent.
-
The execute command will need to specify full path to maven executable. You can execute the following command to find the Maven executable path from either Terminal (Linux/Mac) or Command Prompt (Windows), in bold.
Copy$ mvn -v
Apache Maven 3.6.3 (cecedd343002696d0abb50b32b541b8a6ba2883f)
Maven home: /usr/local/Cellar/maven/3.6.3_1/libexec
Java version: 13.0.2, vendor: N/A, runtime: /usr/local/Cellar/openjdk/13.0.2+8_2/libexec/openjdk.jdk/Contents/Home
Default locale: en_US, platform encoding: UTF-8
OS name: "mac os x", version: "10.15.4", arch: "x86_64", family: "mac"
Enter the code snippet below to the Execute Command editor dependent on the OS that the Automation Host is running.
Windows
const { execSync } = require("child_process");

// NOTE: change the value to reflect the actual path to maven executable in your host machine
let mavenExePath = 'C:\\apache-maven-3.5.4\\bin\\mvn';

// Automation content is the identifier of an automated Test Run in qTest Manager.
// We will try to get all automation content(s) of all the test run(s) stored in magic variable TESTCASES_AC,
// The value of TESTCASES_AC is under comma separated string, or empty if there is no test runs scheduled to be executed.
let testcases_AC = $TESTCASES_AC;

// resolve the value of testcases_AC and build command to run scheduled tests, if any
let cucumberOptions = "--junit,--step-notifications";
if (testcases_AC && 0 < testcases_AC.length) {
    cucumberOptions += " -n '" + testcases_AC.replace(/,/g, '|') + "'";
}
// build command line
let command = `"${mavenExePath}" -Dcucumber.options="${cucumberOptions}" clean test`;

console.log(`=== executing command ===`);
console.log(command)
execSync(command, {stdio: "inherit"});
console.log(`=== command completed ===`)
Linux or Mac
const { execSync } = require("child_process");
// NOTE: change the value to reflect the actual path to maven executable in your host machine
let mavenExePath = '/usr/local/opt/apache-maven-3.5.4/bin/mvn';
// Automation content is the identifier of an automated Test Run in qTest Manager.
// We will try to get all automation content(s) of all the test run(s) stored in magic variable TESTCASES_AC,
// The value of TESTCASES_AC is under comma separated string, or empty if there is no test runs scheduled to be executed.
let testcases_AC = $TESTCASES_AC;
// resolve the value of testcases_AC and build command to run scheduled tests, if any
let cucumberOptions = "--junit,--step-notifications";
if (testcases_AC && 0 < testcases_AC.length) {
cucumberOptions += " -n '" + testcases_AC.replace(/,/g, '|') + "'";
}
// build command line
let command = `"${mavenExePath}" -Dcucumber.options="${cucumberOptions}" clean test`;
console.log(`=== executing command ===`);
console.log(command)
execSync(command, {stdio: "inherit"});
console.log(`=== command completed ===`)Path to Results
(Optional) Enter the value below to specify the path to the test result generated by the Cucumber project.
-
If your host machine is running on Linux or Mac: /usr/local/var/cucumber-sample/target/surefire-reports
-
If your host machine is running on Windows: D:\cucumber-sample\target\surefire-reports
Result Parser
(Optional). Select Cucumber JUnit as the Result Parser.
If you want the Universal Agent to submit test results to qTest Manager, you must specify values for both Path to Results and Result Parser. Otherwise, you must do that yourself via Execute Command.
The screenshot below shows how the new Cucumber Universal Agent is configured, on Mac.
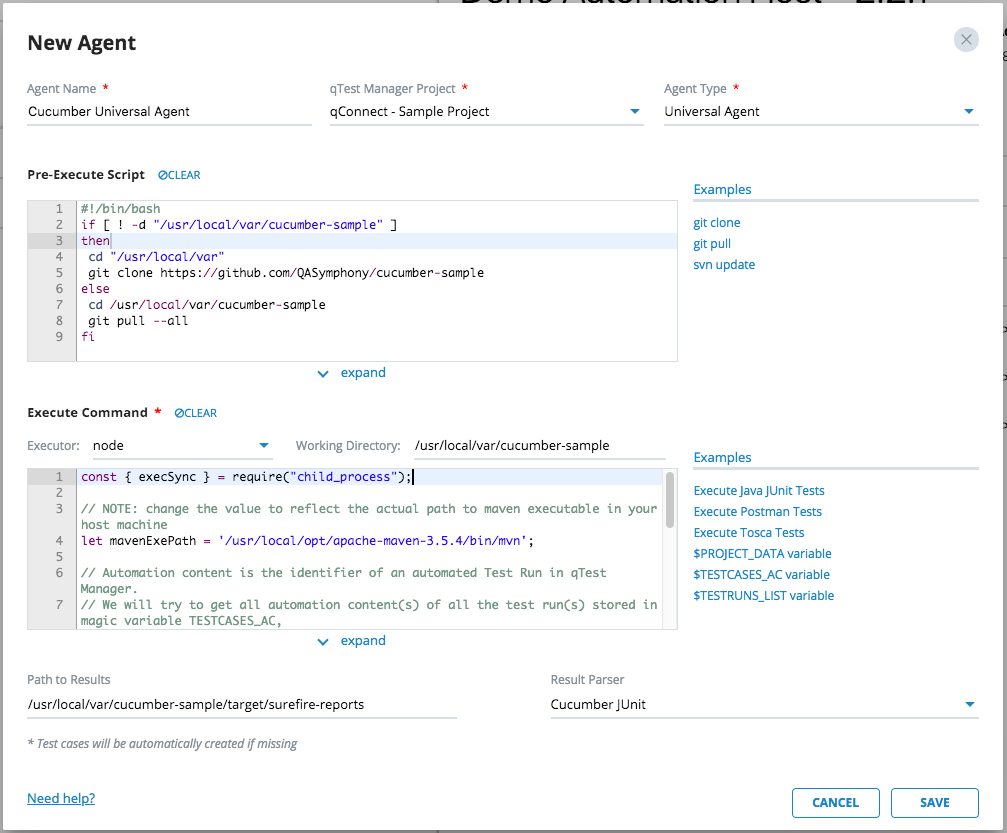
Select Save to finish creating the agent. The agent will be available the next time the host machine polls to qTest Launch.
Execute Cucumber Universal Agent
-
Access the host machine where the Cucumber Universal Agentwas created.
-
Locate the agent in the Agents list. Then click the Action icon
 for an Agent. Then select Run now.
 -
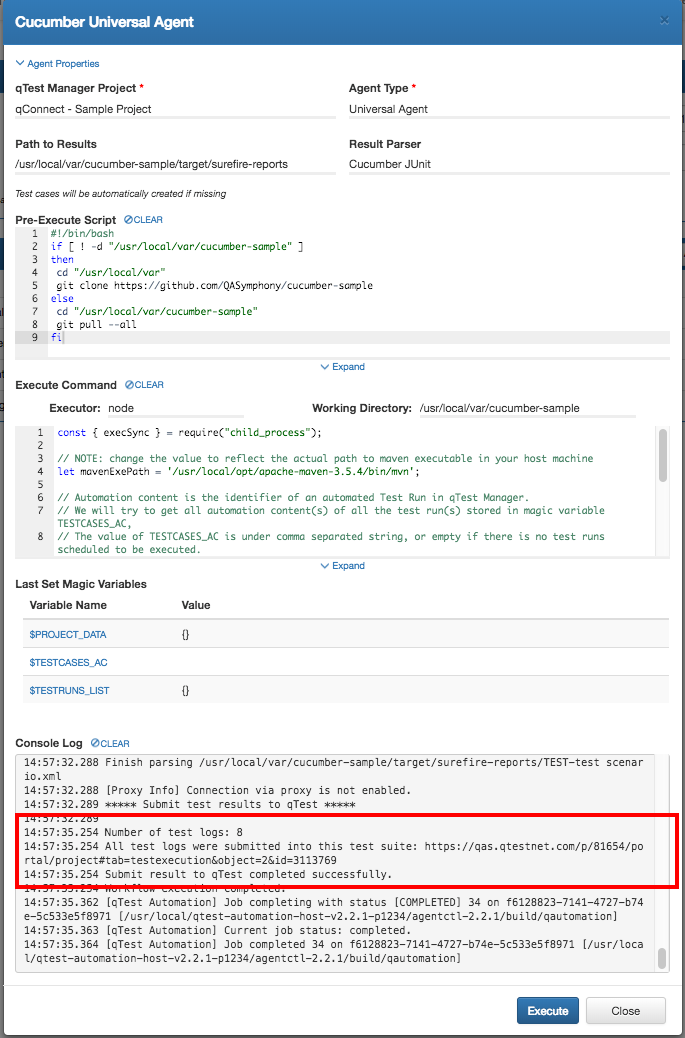
The Universal Agent execution dialog will display.
-
Select the Execute button to kick off the agent execution and you will see the logs shown in the Console Log section. If the execution is successful, you'll see the test run logs being submitted to qTest Manager.
-
Next, access qTest Manager. Select qConnect Sample Project, and then go to the Test Execution module. You'll see the test results submitted to qTest Manager as Test Runs under a Test Suite named Automation YYYY-MM-DD, as shown below.

Now we are going to schedule Test Execution for some specific test runs with the Cucumber agent and verify it only executes tests that match the scheduled test runs.
Schedule Test Execution for specific Test Runs
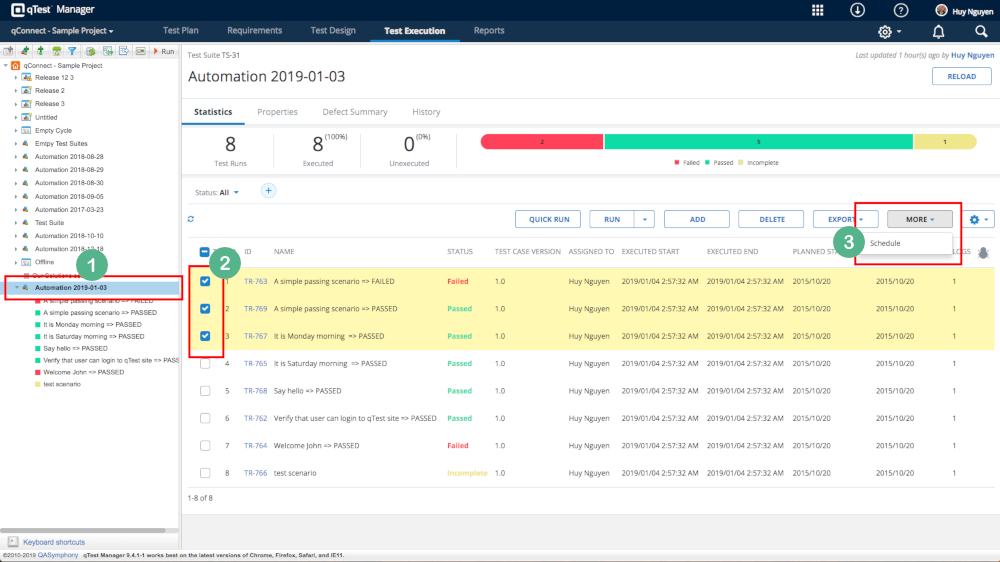
From qTest Manager, select the project qConnect Sample Project, and then click the Test Execution tab. Do the following:
-
Select the newly created test suite. In our example, it is Automation 2019-01-03.
-
From the test run list on the right, select the first three test runs.
-
Click the More button, and then select Schedule.
-
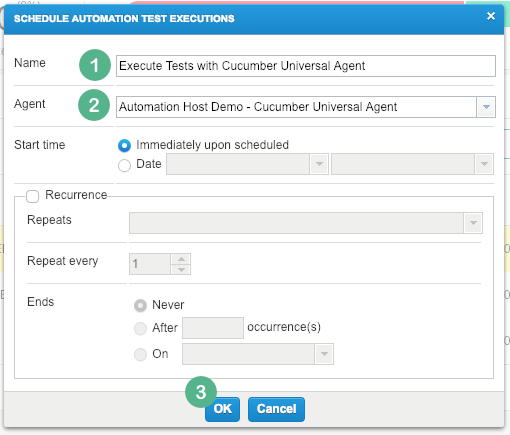
On the Schedule Automation Test Execution dialog, enter the following:
-
Name: Name of the schedule, such as Execute Tests with Cucumber Universal Agent
-
Agent: Select the Cucumber agent we created previously
-
Click the OK button to complete Test Execution scheduling for the selected three test runs.
-
-
Now go back to Automation Host UI. Click the Poll Now button.
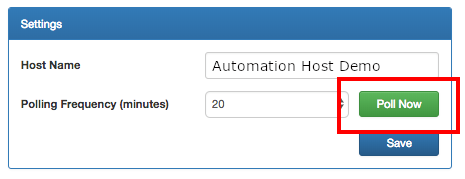
At this stage, the Automation Host does the followings:
-
Immediately polls to qTest Manager to load schedule jobs
-
Executes the job execution for the three tests/scenarios in Cucumber project that match the automation content of the three scheduled test runs
-
-
When the execution completes, click the Action icon
for an Agent. Then select View Log.A log screen will display that shows the last execution logs. Verify that the log reported only three tests have been executed.
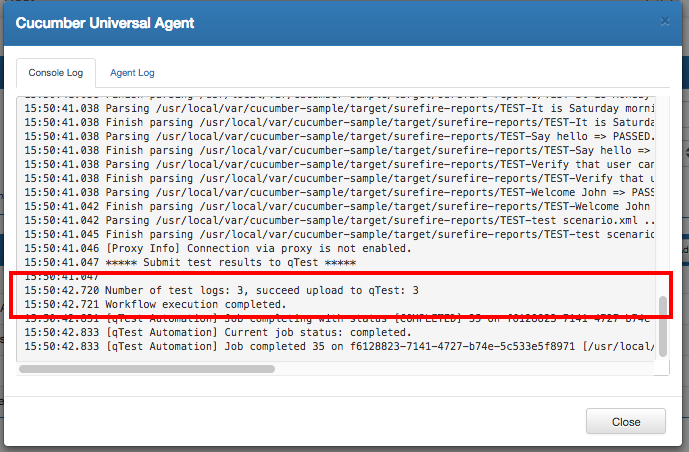
You have successfully scheduled Test Execution for specific tests in your Cucumber project using Universal Agent and have it report the Test Execution to qTest Manager.
Important notes
When integrating your actual Cucumber project with Universal Agentand you choose to execute it with Maven (highly recommended), make sure to add the plug-in maven-sure-fire-plug-ins and maven-compiler-plug-in to your pom.xml file, as shown below.
<?xml version = "1.0" encoding = "UTF-8"?>
<project xmlns="http://maven.apache.org/POM/4.0.0"
xmlns: xsi="http://www.w3.org/2001/XMLSchema-instance"
xsi: schemaLocation="http://maven.apache.org/POM/4.0.0 http://maven.apache.org/xsd/maven-4.0.0.xsd">
...
<build>
<plug-ins>
<plug-in>
<groupId>org.apache.maven.plug-ins</groupId>
<artifactId>maven-surefire-plug-in</artifactId>
<version>2.16</version>
<configuration>
<parallel>classes</parallel>
<threadCount>10</threadCount>
<testFailureIgnore>true</testFailureIgnore>
</configuration>
</plug-in>
<plug-in>
<groupId>org.apache.maven.plug-ins</groupId>
<artifactId>maven-compiler-plug-in</artifactId>
<version>3.1</version>
<configuration>
<encoding>iso-8859-1</encoding>
<source>1.7</source>
<target>1.7</target>
</configuration>
</plug-in>
</plug-ins>
</build>
<!-- End configuration -->
</project>
You can also refer to the pom.xml file used in our sample here: https://github.com/QASymphony/cucumber-sample/blob/master/pom.xml