Automation Host Docker Setup Instructions
In this article, we will walk you through how to set up the Automation Host in a Docker environment on an Ubuntu machine.
Before you start to integrate qTest Automation Host with Launch, make sure you turn on automation integration.
Setup the Automation Host
-
Create a Docker file at /path/to/agentctl/dockerfile.
Enter this code snippet:
CopyFROM ubuntu:24.04
RUN apt-get update \
&& apt-get install -y git curl wget \
&& rm -rf /var/lib/apt/lists/*
ENV AGENT_VERSION <<___AUTOMATION_HOST_VERSION____>>
ENV PACKAGE_NAME agentctl-${AGENT_VERSION}-linux-x64-full.tgz
ENV PACKAGE_URL https://qasymphony.jfrog.io/qasymphony/launch-release-local/automation-hosts/agentctl/${AGENT_VERSION}/agentctl-${AGENT_VERSION}-linux-x64-full.tgz
ENV AGENT_HOME /usr/local
# configure Automation Host parameters
ENV PORT <<___AUTOMATION_HOST_PORT___>>
ENV HOSTNAME <<___AUTOMATION_HOST_HOSTNAME___>>
ENV QTEST_MANAGER <<___QTEST_MANAGER_URL___>>
ENV QTEST_TOKEN <<___QTEST_MANAGER_TOKEN___>>
WORKDIR $AGENT_HOME
#COPY ./${PACKAGE_NAME} $AGENT_HOME/${PACKAGE_NAME}
RUN set -x \
&& wget --no-check-certificate "$PACKAGE_URL"
RUN tar xvf $PACKAGE_NAME -C $AGENT_HOME \
&& rm $PACKAGE_NAME \
&& mv agentctl-${AGENT_VERSION} agentctl
# install a junit sample
# COPY ./junit-sample ${AGENT_HOME}/junit-sample/
# configure Automation Host
RUN ./agentctl/agentctl config -Phostname=${HOSTNAME} -Pport=${PORT} -PqTest.url=${QTEST_MANAGER} -PqTest.token=${QTEST_TOKEN}
EXPOSE $PORT
COPY ./entrypoint.sh /entrypoint.sh
RUN chmod u+wrx /entrypoint.sh
ENTRYPOINT ["/entrypoint.sh"] -
Update the following configurations in your Docker file:
Parameter Name Description ENV AGENT_VERSION Enter version of Automation Host that you want to install, such as 2023.6.6. ENV HOSTNAME Enter a name for this Automation Host instance.
After your Automation Host has been successfully installed and started at least once, you won't be able to change your Automation Host name with the ./agentctl config -Phostname="Your new host name" command. However, you can change your Automation Host name in qTest Launch as an Elite user.ENV PORT Specify the port that your Automation Host will run on. If this parameter is omitted, Automation Host uses port 6789. ENV QTEST_MANAGER Enter the URL for your qTest Manager instance. ENV QTEST_TOKEN Enter the qTest API token generated for your qTest Manager account. You can copy it from the API & SDK section in qTest Manager's Resource page.
-
Create a file called entrypoint.sh and make it executable.
-
Open entrypoint.sh in your preferred text editor and enter the following command:
#!/usr/bin/env bash
./agentctl/agentctl start-
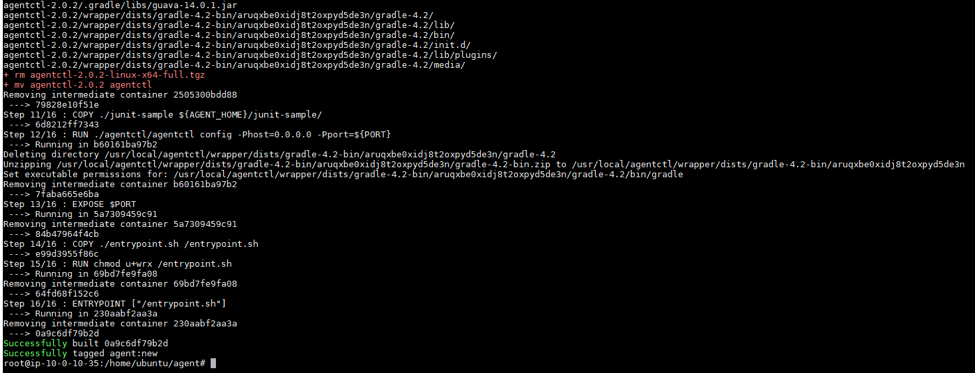
Build the image with the Docker Build -t agent: new . command.

When Docker successfully builds the image, you'll see the following output:
-
Run the container with the desired port, such as $ Docker run -d -p 8080:6789 agent:new.

After this command finishes, wait a few minutes for the Automation Host to start.
Register the Automation Host with qTest Manager
As of 2023.6.6, the Automation Host UI is automatically disabled, as we've moved all of your regular functions to Launch for a more secure experience.
While you can manually turn on the UI to install and configure the Automation Host via the web interface, we recommend that you perform these actions via command line.
-
When you set up the Docker file at /path/to/agentctl/dockerfile, enter the parameter -Pui.enabled=true to enable the UI.
-
To enable the UI for the local host only, enter the parameter -Pui.ip=127.0.0.1 .
If you want to enable the UI for your local network, enter your local IP address as the parameter.
-
Open a web browser and access the host using the following URL: http://[host-ip-address]:8080. You will be presented with host UI.
-
Enter the following on the host UI to register the Automation Host with the qTest Manager:Host.
-
Name: Name of the automation host
-
qTest URL: URL of your qTest Manager instance
-
Full Name: Your full name
-
qTest Token: The API token for the host to access the qTest Manager. Refer to Acquire your qTest API Token to get the API token.
If your environment is behind a proxy, select the Configure Proxy link and specify the proxy configuration.
-
-
Select Register.
When the registration is successful, you'll be presented with the Automation Host home page.
What's next
Now that you've set up Automation Host on Docker, learn how to integrate JUnit for Java with a Universal Agent.