Connect to Jira Server
Connecting qTest Manager and Jira Server gives testers access to Jira information in real-time for requirements and defects and provides developers access to information about Defects, including the steps leading to the error so that developers can reproduce the Defect.
To use the integration, connect qTest Manager and Jira Server at the project level. For information about the permissions needed to set up and configure a Server connection, refer to Which Jira Permissions Are Required to Set Up a Connection?
Rate-limiting was introduced by Atlassian with Jira 8.6. If you are using Jira Server/Data Center 8.6 or above, refer to Jira Rate Limiting for information on how rate-limiting may affect your qTest environment.
Prerequisites for qTest SaaS + Jira Server
The following is required to establish a connection between qTest SaaS and Jira Server. If you are using qTest OnPremises and Jira Server, you will skip this section. You may need to incorporate your IT infrastructure team to help with the connection.
qTest does not support SSO authentication when integrating to Jira.
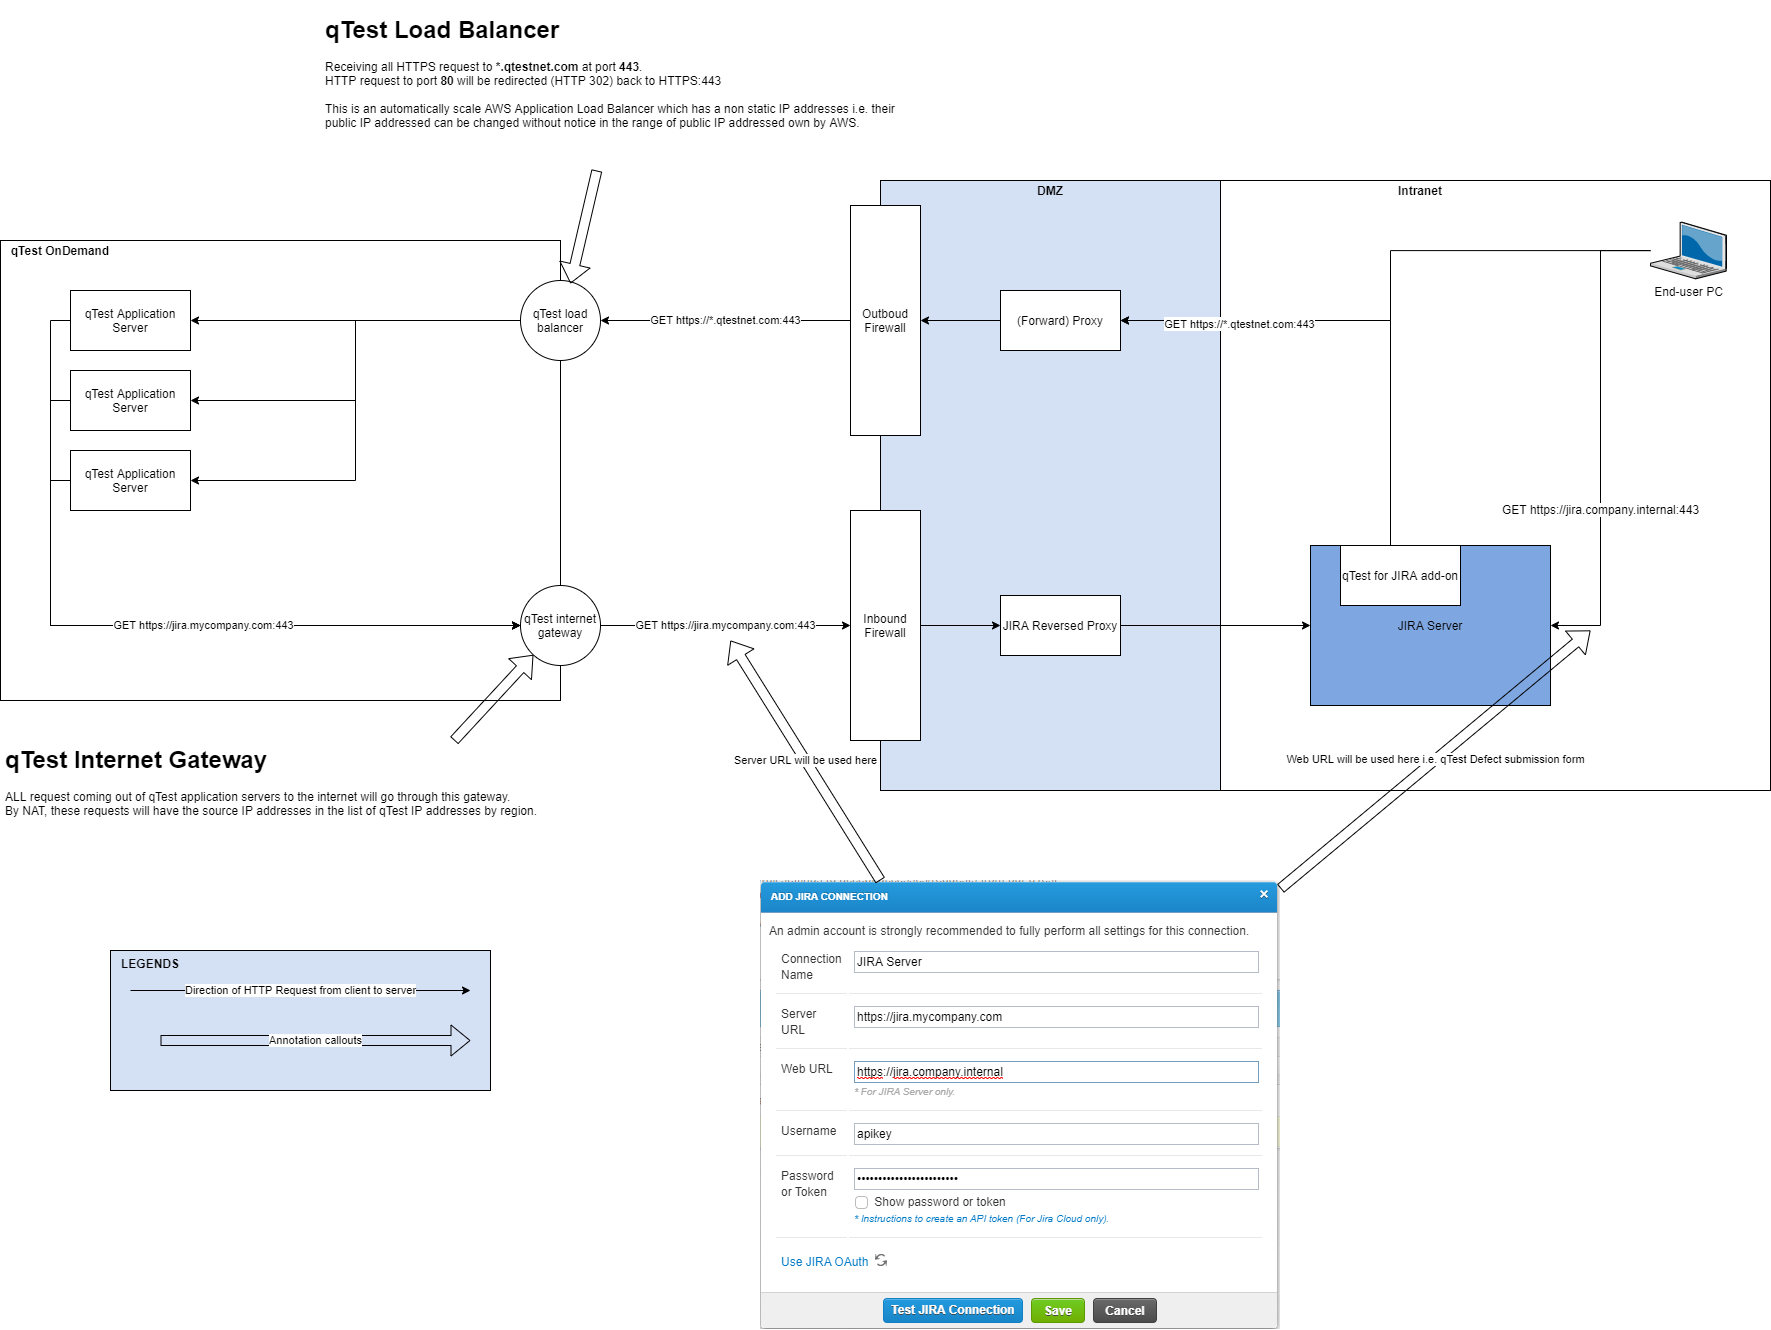
IP Address and Firewall Configuration
-
Verify your Jira Server's IP address is configured to be a public IP address, so your Jira instance is accessible publicly.
If your company wants to have 1 Jira URL for public communication with qTest and another URL for local access only, you will need to set up a reverse proxy.
-
Ask your IT department to configure your Jira Server and firewall's settings to accept accesses/requests to/from the following specific Amazon servers elastic IPs. This must be a bi-directional set up accepting inbound and outbound requests between the qTest Amazon Elastic IPs and your Jira Server.
The reason for doing this is that we have APIs to send to Jira to receive information and use other Jira APIs to be notified of changes in Jira for auto-sync of objects to qTest. Only when you allow the communication between two servers, the integration between qTest and Jira is successful.
Refer to Amazon Server Elastic IP Addresses Master List.
To establish the connection between Jira Server and qTest Manager SaaS, do the following:
-
If your Jira Server protocol is HTTP (80. 8080) or https (443), make sure you open the correct ports.
-
If you encounter an issue, refer to How do I troubleshoot my Jira connection?
-
Install the free Tricentis qTest Integration for Jira (opens in a new tab) add-on from the Atlassian Marketplace.
Locate Jira connection settings
Whether you want to add or edit a connection, you can find Jira connection settings in the following location:
-
Go to Settings
 and select Integration Settings from the dropdown.
 -
Select Jira in the External Systems panel to go to the Configure integration: Jira page.
-
From here, you can create a new connection or edit an existing one:
-
To create a new connection, select Add Jira Connection.
-
To edit an existing connection, select the blue hyperlink of the Jira Integration you want to edit in the Connection Name column.
-
Configure Jira Server with a username and password
Follow these steps to configure your Jira server connection with a username and password:
-
Select Add Jira Connection and enter a Connection Name.
-
Choose Jira on-premises as your deployment type.
- Enter the URL of the server that runs your Jira instance in Server URL field. The Server URL is the official address for traffic and API communication between qTest and Jira. The Server URL must match the Jira Base URL (opens in a new tab), and you must whitelist your Jira Base URL. This will likely contain the IP address and port information.
-
Enter the Jira URL your company uses in the Web URL field. This is the URL that leads to the user-facing Jira environment. For a reverse proxy, enter the Jira URL for local access here.
-
Select Username & password as your authentication method.
-
Enter the Username and Password for the Jira administration account you want to use to connect qTest to Jira.
-
Select the Authenticate Jira Connection button. If the connection is successful, you'll see the following message: "Connected to the server successfully."
-
Select Save and Configure to save your connection.
If the connection is not successful, here are some things you can try:
-
When you select Test Jira Connection, qTest sends a REST API call from its backend IPs to your Jira instance. Make sure your firewall accepts inbound connections from these IPs. This is different from allowing outbound traffic from your Jira server.
-
When it comes to outbound traffic from your Jira server, our webhook services do not have a static public IP address. We strongly advise that you allow outbound traffic to your qTest domain instead, which should be https://<domain>.qtestnet.com.
Configure Jira Server with OAuth 2.0
Set up OAuth 2.0 in Jira Server
Before you can start setting up your Jira integration in qTest, you need to set up a few things in Jira to get your Client ID and Client secret:
-
In Jira, you need to create an incoming link (opens in a new tab).
-
When you create this incoming link, you need to add the Callback URL in the following format: https://<qtest url>/portal/oauth2/callback/jira. For example, https://sampleurl.qtestnet.com/portal/oauth2/callback/jira.
-
Select Admin as the Permission for this incoming link.
After you create the incoming link, Jira provides the Client ID and Secret that you'll need to configure the connection in qTest.
Set up OAuth 2.0 in qTest
Once you've set up OAuth 2.0 in Jira, follow these steps to add it to new or existing Jira connections in qTest:
-
Select Add Jira Connection and enter a Connection Name.
-
Choose Jira on-premises as your deployment type
- Enter the URL of the server that runs your Jira instance in Server URL field. The Server URL must match the Jira Base URL (opens in a new tab), and you must whitelist your Jira Base URL. This will likely contain the IP address and port information.
-
Enter the Jira URL your company uses in the Web URL field. This is the URL that leads to the user-facing Jira environment. For a reverse proxy, enter the Jira URL for local access here.
-
Select OAuth 2.0, and enter the Client ID and Client secret. You can find these in the application link you created in Jira (opens in a new tab).
-
Select Authorize Jira connection.
-
When redirected, choose your Jira instance from the Use app on dropdown, select Accept, then select Save and Configure.
Configure Jira Server with OAuth 1.0
Atlassian has deprecated OAuth 1.0 and may remove it in future Jira updates, which may cause existing connections to stop working. You should create all new connections with OAuth 2.0, and plan to migrate existing connections to avoid service disruptions.
Configure your OAuth 1.0 connection in Jira Server
Before you can start setting up your Jira integration in qTest, you need to create an incoming link in Jira (opens in a new tab).
Here's the information you'll need about qTest during setup:
-
Enter your qTest URL as the Application URL. For example, https://sample.qtestnet.com.
-
Select Atlassian product as the Application Type.
After you create the application link in Jira, locate it on the Jira Application links page and select Edit from the three-dot menu. Go to the Incoming Authentication tab and replace the following values as listed:
- Consumer Key: qTest
-
Consumer Name: hardcoded-consumer
-
Public Key:
CopyMIIBIjANBgkqhkiG9w0BAQEFAAOCAQ8AMIIBCgKCAQEAxZDzGUGk6rElyPm0iOua0lWg84nOlhQN1gmTFTIu5WFyQFHZF6OA4HX7xATttQZ6N21yKMakuNdRvEudyN/coUqe89r3Ae+rkEIn4tCxGpJWX205xVF3Cgsn8ICj6dLUFQPiWXouoZ7HG0sPKhCLXXOvUXmekivtyx4bxVFD9Zy4SQ7IHTx0V0pZYGc6r1gF0LqRmGVQDaQSbivigH4mlVwoAO9Tfccf+V00hYuSvntU+B1ZygMw2rAFLezJmnftTxPuehqWu9xS5NVsPsWgBL7LOi3oY8lhzOYjbMKDWM6zUtpOmWJA52cVJW6zwxCxE28/592IARxlJcq14tjwYwIDAQAB
If you set up your own Private Key in qTest, enter that as the Public Key here instead.
Create a Jira Server connection with OAuth 1.0 in qTest
Once you've set up OAuth in Jira, you're ready to add it to new or existing Jira connections.
To set up a Jira connection with OAuth in qTest, follow these steps:
-
Select Add Jira Connection and enter a Connection Name.
-
Choose Jira on-premises as your deployment type.
- Enter the URL of the server that runs your Jira instance in Server URL field. The Server URL must match the Jira Base URL (opens in a new tab), and you must whitelist your Jira Base URL. This will likely contain the IP address and port information.
-
Enter the Jira URL your company uses in the Web URL field. This is the URL that leads to the user-facing Jira environment. For a reverse proxy, enter the Jira URL for local access here.
-
Select OAuth 1.0 as your authentication method.
-
Select Authorize Jira connection to generate an authorization URL, then select the Authorize URL hyperlink.
-
Select Allow to grant qTest access, copy the verification code, paste it in Verification code, and select Submit.
-
Select Test Connection to verify the setup, then select Save and Configure.
What's next
After you set up a Jira integration, you're ready to configure defects and import requirements from Jira.