Configure Jira fields for Insights
If you've set up a Jira integration, you can use the following tools to configure Jira fields in your Portfolio and certain Explore Data reports.
-
Requirement Fields: Determine what Jira fields you want to include in the Requirements report in Explore Data.
-
Jira Defect Custom Fields: Map the custom Jira defect fields you want to view in the Portfolio Details table of the Portfolio Overview report or the Defects (External) report in Explore Data.
- Jira Defect Status Mapping: Map your Jira defect statuses to equivalent Insights status values. You can also assign a color to the Insights status to color-code your Portfolio Report.
-
Map Jira Defect Severity Values: Map defect severity values from Jira to a set of standard severity values in Insights.
Before you start
To work with fields integrated from Jira, set up your set up a Jira integration first.
If you're working with defects, you also need to configure the defects for your Jira integration.
Requirement Fields
Use these settings to choose which Jira fields you want to include in the Explore Data > Requirements report. This has no correlation to Portfolio Reporting.
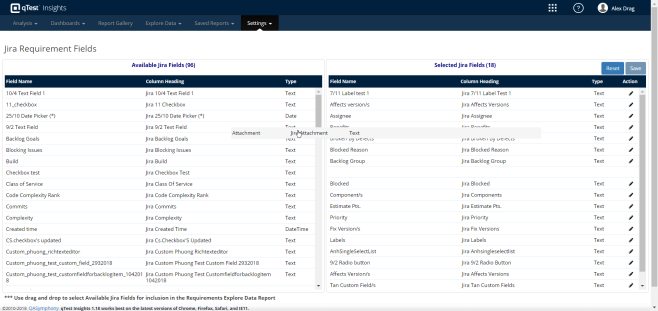
Drag and drop the Jira fields you want to include in the Requirement report.
To add a Jira Requirement field, select the ![]() Settings dropdown and go to Requirement Fields. Then, drag and drop the fields you want to include in the Requirements report from the Available Jira Fields column to the Selected Jira Fields column.
Settings dropdown and go to Requirement Fields. Then, drag and drop the fields you want to include in the Requirements report from the Available Jira Fields column to the Selected Jira Fields column.
Additionally, select the Edit icon next to a Jira requirement you've added to Selected Jira Fields to edit the column heading or type. What you enter here determines how the field displays in the Requirements report.
Select Save to save the fields and display them in the Requirements report.
Jira Defect Custom Fields
Use these settings to determine which Jira fields you want to include in the Explore Data > Defects (External) report and the Portfolio Report.
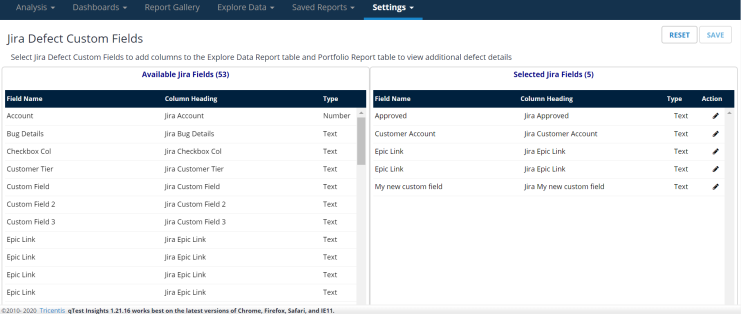
Drag and drop the Jira fields you want to include in your defect reporting.
To add a Jira Defect Custom Field, select the ![]() Settings dropdown and go to Jira Defect Custom Fields. Then, drag and drop the fields you want to include in your defect reporting from the Available Jira Fields column to the Selected Jira Fields column.
Settings dropdown and go to Jira Defect Custom Fields. Then, drag and drop the fields you want to include in your defect reporting from the Available Jira Fields column to the Selected Jira Fields column.
Select Save to populate your Defects (External) and portfolio reports with the selected Jira fields.
Map Jira defect values
To streamline your testing data, set a standard naming convention for Jira defect status and severity values in your Portfolio Overview.
This feature is useful for teams who work with multiple Jira projects simultaneously, as you can map Jira values that are equivalent but differently-named to a standardized set of equivalent values in qTest.
Map Jira defect status
To group Jira defect statuses by name and color in Portfolio Report, you can map them to a set of standardized statuses in Insights.
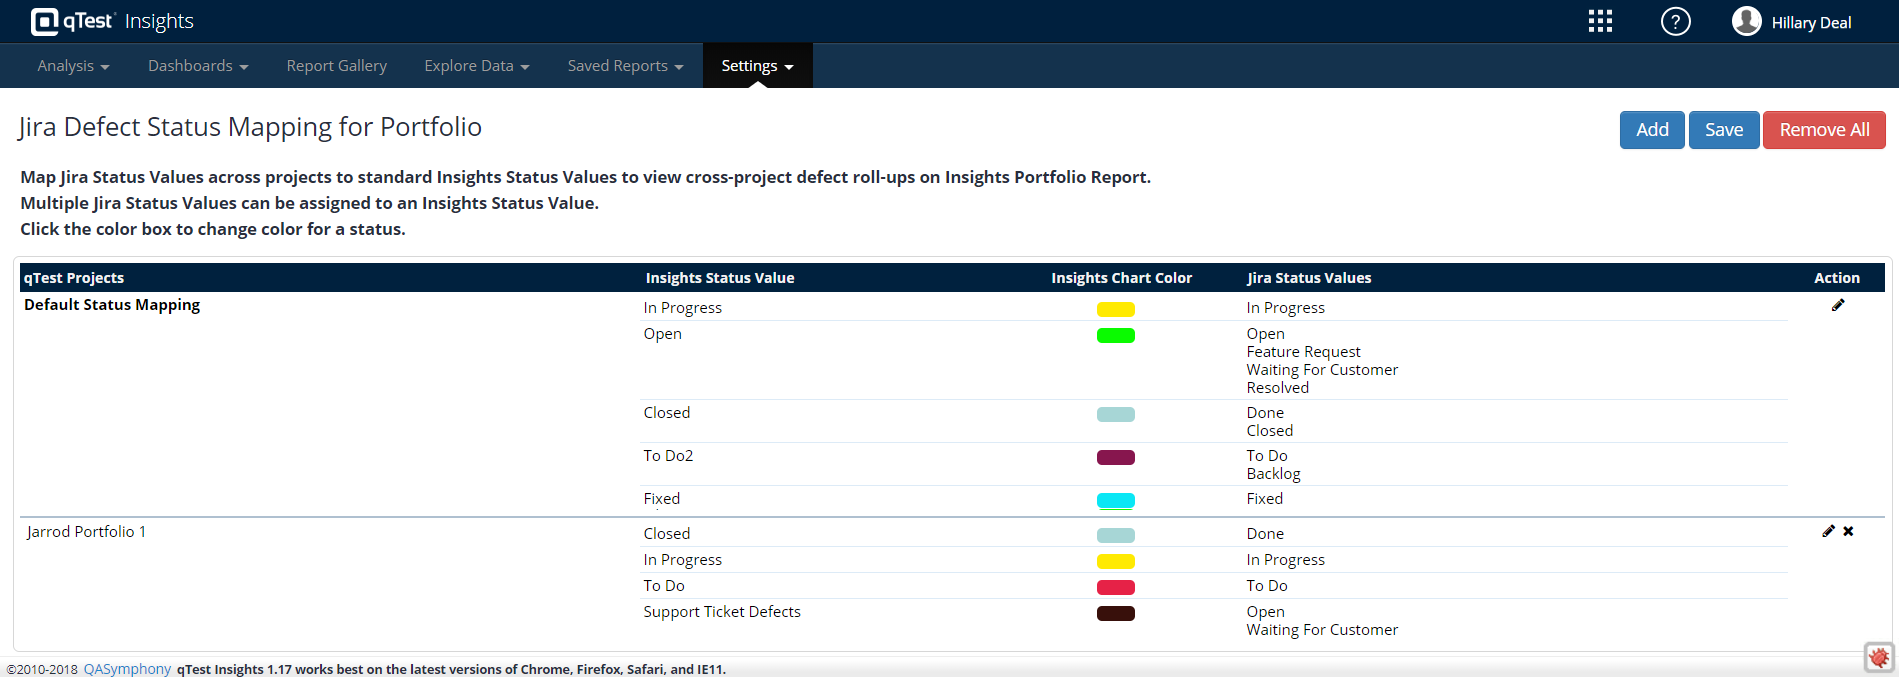
Organize your equivalent Jira Status Values under a single, color-coded Insights Status Value to make your data easier to understand.
Follow these steps to map Jira defect statuses to Insights:
-
Open the
 Settings dropdown and go to Jira Defect Status Mapping.
 -
Select Add to open the Projects for Defect Status Mapping window.
-
Drag and drop the Jira projects you want to map defect statuses for from the Available Projects field into the Selected Projects field.
-
Select OK to open the Defect Status Mapping window.
-
Select Add to create a new map in the Defect Status Mapping Entry window.
-
Enter the standardized status name you want to display in Insights in the Insights Status Name field.
-
Select the checkboxes next to each of the Jira Status Values that you want to include under your new standardized status name.
-
Select Update to view your selections in the Defect Status Mapping table.
-
Continue this process until you have mapped all of your desired Jira status values to a standard Insights status. The Add button is disabled once all of your Jira status values are assigned.
-
Once you have entered all of your status mappings, select Save.
To edit a mapped status, select the pencil icon in the Action column next to the status value you want to change.
To change the color of a status, select the chart color next to the status you want to change in the Insights Chart Color column. The color you pick for this status displays across all projects in the Portfolio Report. You can have the same chart color for multiple statuses.
Map Jira defect severity
Let's say you have a portfolio that contains four projects from Jira, and you want to prioritize these defects on a standardized graded scale in Insights to simplify the data you're reviewing. Each project has a different name for a defect's highest level of severity: Highest, High (P2), Major, and Test Priority 7.
To simplify your data, you map these differently-named values to a single defect severity value in Insights and name this new value Highest Priority. Now, you can view all your severe defects in the Highest Priority column in the Portfolio Overview table.
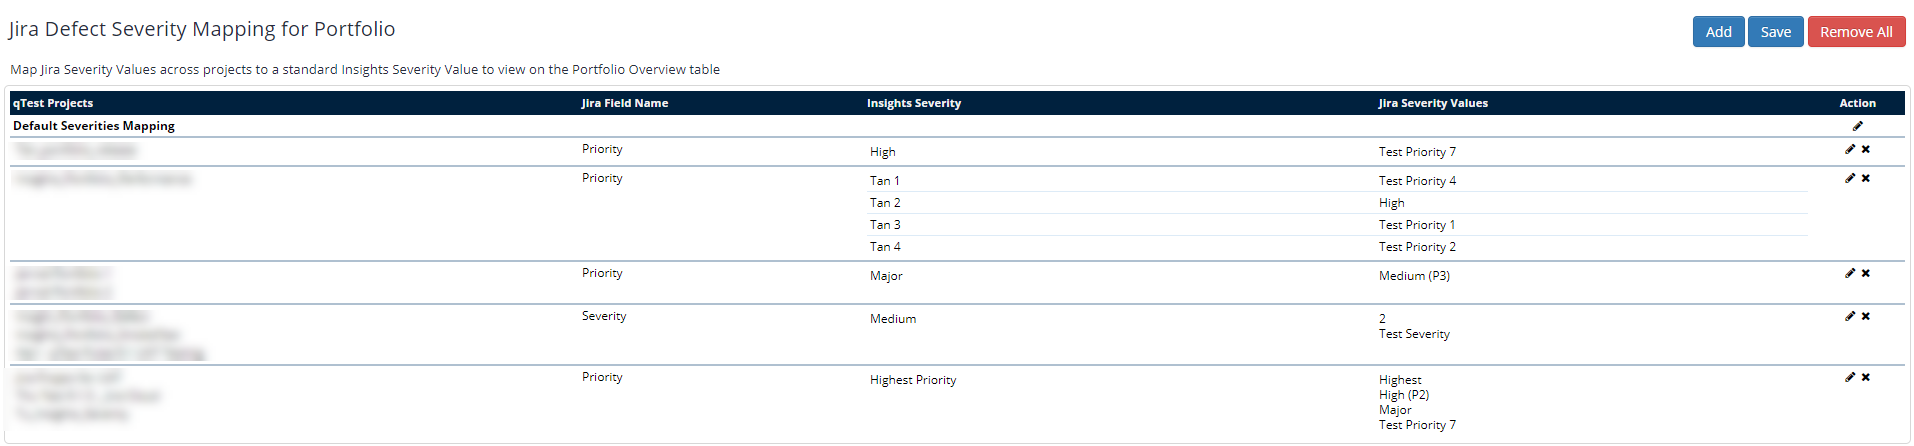
Organize your equivalent Jira Severity Values under a single Insights Severity name to make your data easier to understand.
Follow these steps to map Jira defect severities to Insights:
-
Open the
Settings dropdown and go to Jira Defect Severity Mapping. -
Select Add to open the Projects for Defect Status Mapping window.
-
Drag and drop the Jira projects you want to map defect severity for from the Available Projects field into the Selected Projects field.
-
Select OK to open the Jira Severity Field window.
-
Select the field you use to severity values in your Jira instance from the Field Name dropdown. For example, this is usually Priority.
-
Select Add to open the Defect Severity Mapping Entry window.
-
Enter the standardized severity name you want to display in Insights in the Insights Severity Name field.
-
Select the checkboxes next to each of the Jira Severity Values that you want to include under your new standardized severity name. Please note that these checkboxes only populate with values assigned to a defect in Jira. Insights does not include defect severity values that have not yet been assigned in Jira because it will not require mapping if it is not being used.
-
Select Update to view your selections in the Defect Severity Mapping table.
-
Continue this process until you have mapped all of your desired Jira severity values to a standard Insights severity value. The Add button is disabled once all of your Jira severity values are assigned.
-
Once you have entered all of your severity mappings, select Save.
To edit a mapped severity level, select the pencil icon in the Action column next to the severity level value you want to change.
Map unlinked Jira Defects
When you set up your portfolio reports, you can choose to include defects that aren't linked to any test runs from your projects integrated with Jira.
To do this, you can map unlinked Jira defects to release or test suite artifacts in your qTest projects. Then, you'll be able to view these unlinked defects in the Portfolio Overview and Portfolio Progress reports.
Follow these steps to map unlinked Jira defects:
-
Open the
Settings dropdown and go to Portfolio Configurations. -
In the Unlinked Defects Mapping section of the Portfolios page, select the qTest project you want to map to a Jira defect.
-
In the Jira Field dropdown, select the Jira field that represents the unlinked defect. This dropdown is populated from the selected qTest Projects, so the field names vary based on the Jira fields used in the integrated projects you selected.
-
Select Save at the top of the Portfolios page to save changes to your selected portfolio.