Lock Test Result against automatic deletion
As an Administrator and/or a Tester, you can configure automatic deletion of Test Results. Please refer to the page Manage Workspace deletion policies if you are an Administrator and Manage Workspace deletion policies if you are a Tester.
Still, you may want to protect some Test Results from the automatic deletion executed by the policies configured. To do so, follow the procedure below.
To lock a Test Result against automatic deletion, follow these steps:
-
Select a Workspace as described in Workspace selector.
-
Search for the Test Result you want to lock.
-
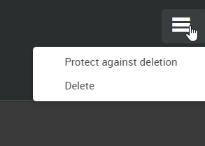
You are led to the Overview tab of the Test Result view. In the menu on the top right section of the screen, click on the Protect against deletion command.
A padlock icon appears next to the menu to indicate that the Test Result is protected against deletion. Whenever you need to unprotect a Test Result against automatic deletion, follow the procedure below to unlock it.
Tip: This padlock is also displayed when applicable in the Search and in the Home views.
Unlock a Test Result against automatic deletion
To unlock a Test Result against automatic deletion, follow these steps:
-
Select a Workspace as described in Workspace selector.
-
Search for the Test Result you want to unlock.
You are led to the Overview tab of the Test Result view.
-
In the menu on the top right section of the screen, click on the Remove protection against deletion command.

The padlock icon disappears.