Install and configure a Load Generator
For information on how to install and configure a Load Generator to connect to NeoLoad Web, see Platform set-up for runtime.
Once you've connected a Load Generator to NeoLoad Web, only NeoLoad Web can use it. If you want to disable this security measure, edit the [Network]agent.accept.only=ALL key in the <Load Generator>/conf/agent.properties file.
Configure a Load Generator Agent
The access parameters to NeoLoad Web can be configured by launching the Load Generator Agent ".exe" file from the NeoLoad "bin" folder. A right-click on the Agent allows selecting the NeoLoad Web settings option.
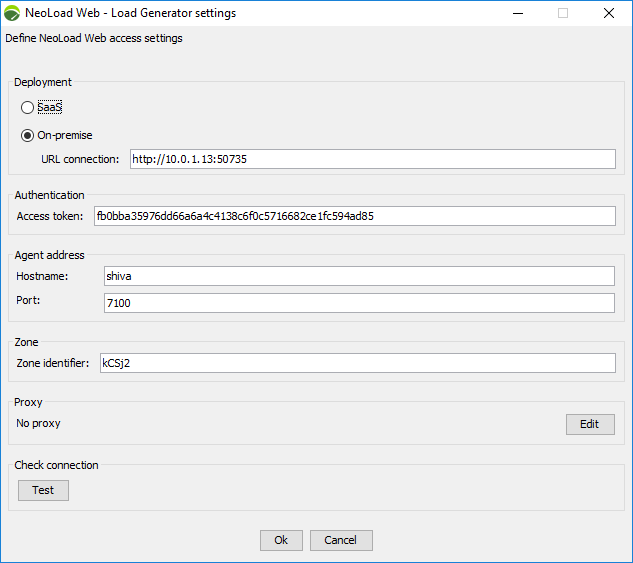
The Deployment section enables you to select how NeoLoad Web is deployed in your infrastructure. NeoLoad Web can be deployed either:
-
On SaaS, or,
-
On-premise
When NeoLoad Web is deployed on-premise, you need to enter the URL that will enable the Load Generator Agent to connect with NeoLoad Web. The port required is the NeoLoad connection port.
By default, the URL is "http://nlweb.<your company>.com:8080". To know the URL used in your deployment, contact your NeoLoad Web IT Administrator. For more information, see the Initial setup.
Please note:
-
In command line, the
-nlwebAPIURLargument specifies the URL of the NeoLoad API in order to connect with NeoLoad Web when it is deployed on-premise. This argument overrides any corresponding environment variable previously defined. For more information, see List of arguments. -
The
NLWEB_API_URLenvironment variable allows specifying the URL of the NeoLoad API in order to connect with NeoLoad Web when it is deployed on-premise. It can be used as follows:NLWEB_API_URL={nlweb-onpremise-apiurl:port}
The Authentication section enables you to authenticate to NeoLoad Web using a token.
Token-based authentication secures an application based on access tokens that you can generate to enable other users to log in to the application. This way, you can give access to partners without exposing your password. You can change your password without updating your access tokens and delete the tokens you do not need any longer without having to change your password.
Access token: The access token generated in NeoLoad Web can be pasted in this field.
In command line, the -nlwebToken argument activates the connection with NeoLoad Web and declares an access token. This argument overrides any corresponding environment variable previously defined. For more information, see List of arguments.
Hostname: The field must be populated with the name of the machine where the Load Generator Agent is located.
The LG_HOST environment variable allows overriding the IP address of the host where the Load Generator can be reached. It can be used as follows: LG_HOST={lg.mycompany}.
Port: The field must be populated with the port number to access the Load Generator Agent.
The LG_PORT environment variable allows overriding the port on the host where the Load Generator G can be reached. It can be used as follows: LG_PORT={7100}.
Zone identifier: To associate a Load Generator Agent with a Zone you have created, the Zone ID must be copied and pasted in this field. For more information, see Manage Zones. Please note:
-
In command line, the
-nlwebZoneIdargument allows overriding the Zone. This argument overrides any corresponding environment variable previously defined. For more information, see List of arguments. -
The
ZONEenvironment variable allows specifying the Load Generator Zone to use. It can be used as follows:ZONE={zone-id}.
The Proxy section enables to select the proxy you want to use to connect to NeoLoad Web in HTTP or HTTPS mode. For more information, see Add a proxy. Please note:
-
In In command line, the
-nlwebProxyargument allows connecting NeoLoad Web by using a proxy. This argument overrides any corresponding environment variable previously defined. For more information, see List of arguments. -
The
NLWEB_PROXYenvironment variable allows connecting NeoLoad Web by using a proxy. It can be used as follows:NLWEB_PROXY=http://{login:password}@{myproxy}.
In the Check connection section, use the Test button to check the connection (server configuration, authentication information, proxy settings if any, repository if any).
Tip: For more information about configuring a Load Generator Agent when using Docker, see the Dockerhub documentation.
Define a Load Generator Agent as a service
Both Controller and Load Generator Agents can either be installed as services or started in an ad hoc manner - running the executable when and as needed. The former approach (As an Administrator) is consistent with a long term and durable approach because Agents run as services are started once and for all and will automatically be restarted each time the machine reboots. The latter (For a specific user), although less intrusive and easier to accomplish, makes sense when targeting an occasional use only.
As an Administrator
The Load Generator Agent can be defined as a Windows service i.e. it can be launched and stopped each time Windows starts and stops. For more information, see the procedure below.
To define the Load Generator Agent as a service on Windows, follow these steps:
-
Run the "LoadGeneratorAgent.exe" file located in the "bin" folder of your NeoLoad installation folders.
-
Copy the "agent_user.properties" file located in C:\Users\<username>\AppData\Roaming\Neotys\NeoLoad\v7.11\conf.
-
Paste it in C:\Windows\System32\config\systemprofile\AppData\Roaming\ after creating the folders "Neotys", "NeoLoad", "v7.11" and "conf".
-
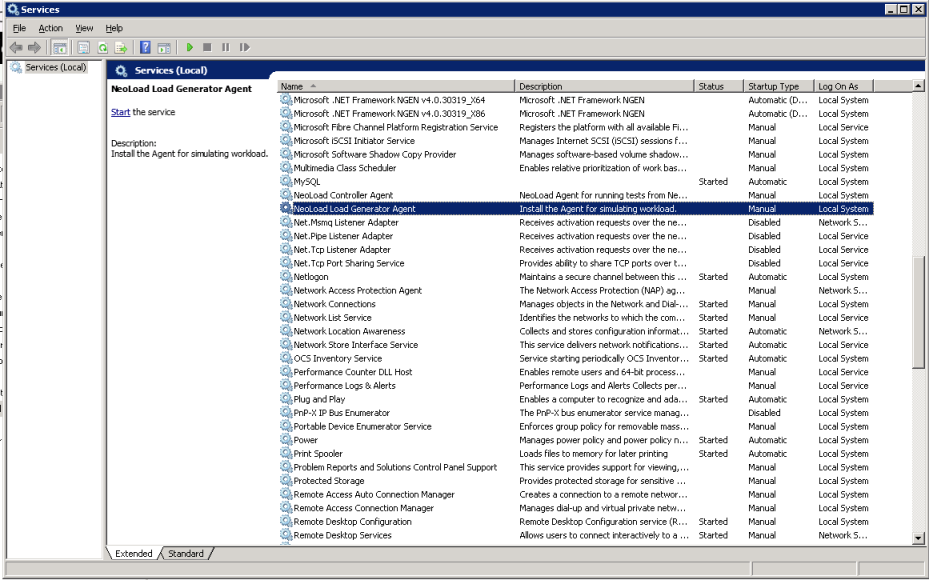
Right-click the task bar, select Task Manager then the Services tab.
-
In the list of services, right-click NeoLoad Load Generator Agent and select Open Services. Right-click NeoLoad Controller Agent and select Properties.
-
In the Startup type list box, select "Automatic".
-
Click OK.
To define the Load Generator Agent as a service on Linux, follow these steps:
-
Open the "agent_user.properties" file located at
/home/<USERNAME>/.neotys/neoload/v2024.3/conf/ -
-
When no proxy is used:
[Web]
neoload.web.onpremise.secretToken=mytoken
neoload.web.deployment.type=ONPREMISE
neoload.web.onpremise.url=http\://"myserver-nlw-onpremise.com"\:8080
neoload.web.resource.zone=myzone
#neoload.web.resource.address.host="My-LG-Agent-host-name"
#neoload.web.resource.address.port=7100 -
When using a proxy:
#Agent user properties
#Thu May 17 15:26:59 CEST 2018
[Proxy]
neoloadwebproxy.autoconfurl=
neoloadwebproxy.password=/WW/6DOGK7o\=
neoloadwebproxy.https.host=
neoloadwebproxy.mode=GLOBAL_CACHE_MODE
neoloadwebproxy.http.host=
neoloadwebproxy.ftp.host=
neoloadwebproxy.https.port=443
neoloadwebproxy.js.engine.class=
neoloadwebproxy.http.port=80
neoloadwebproxy.ftp.port=21
neoloadwebproxy.autodiscover=Disabled
neoloadwebproxy.manualconf=Disabled
neoloadwebproxy.id=neoload web proxy
neoloadwebproxy.exclusionlist=
neoloadwebproxy.login=
neoloadwebproxy.autoconf=Disabled
[Web]
neoload.web.onpremise.secretToken=mytoken
neoload.web.deployment.type=ONPREMISE
neoload.web.onpremise.url=http\://"myserver-nlw-onpremise.com"\:8080
neoload.web.resource.zone=myzone
#neoload.web.resource.address.host="My-LG-Agent-host-name"
#neoload.web.resource.address.port=7100
-
For a specific user
The Load Generator Agent can be defined as a service for a specific user.
To define a Load Generator Agent for a specific user on Windows, follow these steps:
-
Change the user used to start the service. In Windows, go to Run and enter "services.msc".
-
Right-click NeoLoad Load Generator Agent and select Properties.
-
In the LogOn tab, select the This account option. Enter the user name of the user who configured the Agent and the associated password.
-
In the General tab, click the Startup type list box and select Automatic.
The configuration file can be found in:
-
/home/<USERNAME>/.neotys/neoload/v7.11/conf/agent_user.properties
Caution: : The procedure below is only applicable for CentOS 7.
To define a Load Generator Agent for a specific user on Linux, follow these steps:
-
Install NeoLoad with the "root" user.
-
Grant the execute permissions to NeoLoad installation folder (/opt/NeoLoad7.11 by default):
“chmod -R +x /opt/NeoLoad7.11” -
If necessary, create a log folder in the installation folder.
-
After installation, the executable files can be found in /etc/init.d
-
Edit /opt/NeoLoad7.11/bin/LoadGeneratorAgentService.vmoptions:
Add the line:-Djava.awt.headless=true -
Edit /opt/NeoLoad7.11/bin/LoadGeneratorAgent.vmoptions:
Add the line:-Djava.awt.headless=true -
Create a "LoadGeneratorAgentService.service" file in /etc/systemd/system:
[Unit]Description=Load Generator Agent ServiceAfter=network.target[Service]User=<USERNAME>Type=forkingWorkingDirectory=/home/<USERNAME>ExecStart=/etc/init.d/LoadGeneratorAgentService startExecStop=/etc/init.d/LoadGeneratorAgentService stop[Install]WantedBy=multi-user.target -
Create a symbolic link in /etc/systemd/user:
ln -s LoadGeneratorAgentService.service /usr/lib/systemd/user/LoadGeneratorAgentService.service -
Reload the services configuration:
systemctl daemon-reload -
Enable the "LoadGeneratorAgentService" service at system startup:
systemctl enable LoadGeneratorAgentService.service -
Manually start the service:
systemctl start LoadGeneratorAgentService.service -
Get the service status:
systemctl status LoadGeneratorAgentService.service