Why does Component Testing matter?
A common term mentioned in testing circles over the last few years is the concept of ‘Shift Left’, more precisely it is the idea that testing should be done earlier in the software development life cycle. The ‘Shift left’ concept is nothing new, starting with iterative development and now with the rise in popularity of Agile, modern applications these days typically consist of more and more building blocks, small self-contained components developed, tested and delivered every few weeks.
Developing an application in small bite-size morsels means that testing is no longer waiting on development to finish, as each user story is developed, it can be tested, meaning that any issues can be uncovered early and are cheaper and easier to resolve.
So, how is it done?
A popular approach used with Agile development is the idea of Continuous Integration and/or Continuous Delivery. The terms are interchangeable but the approach typically consists of a source code repository and the ability to deploy code to its appropriate home. For example, a development team might check-in code changes during the day and an automated build process (based on a set of rules) checks-out the code, compiles it and deploys it within an application server.
Because of the frequency of deployment, successful component testing relies heavily on test automation. This is incorporated into the build process to ensure deployed code functions correctly by executing a series of tests against it and reporting the result.
It functions, but does it Scale?
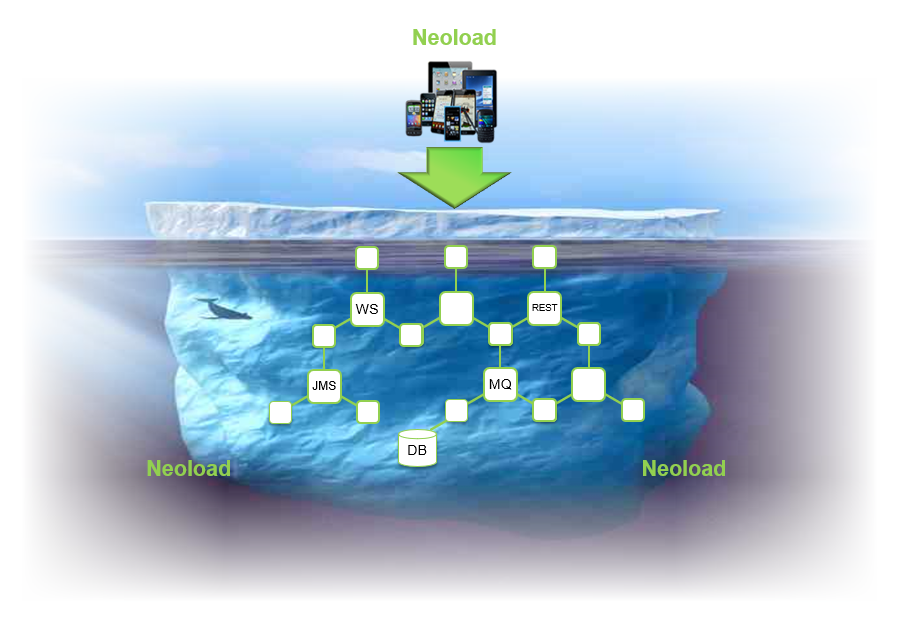
These self-contained, bite size pieces of code could be thought of as functions, that when provided with the appropriate parameters, could return the answer to a question. An everyday example could be searching for directions based on postcode, these types of functions provide a service to the thing that called them. A few years ago, functions or services similar to these were mostly used to integrate internal systems, they formed part of the Application Programmers Interface (or API).
Modern APIs often form the core of an organisation intellectual property and are usually available for consumption by external clients such as businesses, partners and end customers.
The growth of these public APIs is increasingly pervasive (http://nordicapis.com/tracking-the-growth-of-the-api-economy), a company could be doing something simple like using another companies Map API to show office locations to using a third-party API to authentic users and grant them access to services.
Performance of these shared services is becoming critical as it has a direct impact on end-user experience. The popularity of mobile applications has taken this further, exposing the public APIs of these companies to a huge number of users, meaning high visibility should they fail.
For this very reason, organisations adopting component-based architectures not only need to ensure the services they provide function but that they are capable of supporting the large volumes of consumers that will be accessing them. Having non-functional test strategies in place for component and integration testing reduces the risk of unexpected performance issues later in the development life cycle. Consider the analogy of an engine, if we tune each and every component, when we assemble (or integrate) the various parts of the engine together and turn it over, it should be running at maximum efficiency.
For Web technologies, Web services were one of the first examples of these shared services, while the current trend is to rely on REST APIs. These micro services are becoming mainstream for new application development.
Let’s test it and find out
Like traditional load testing, component testing still requires support for specific protocols. The key difference is the ability to test early and test often, no longer waiting for an application presentation layer to become available but testing those services below the waterline as soon as they are ready.
NeoLoad supports testing Web and mobile applications based on or around the HTTP protocol, these range from bespoke applications and COTS packages such as Siebel or SAP to advanced features such as databases and messaging queues (via our JMS support). Details of these and other supported technologies can be found here.
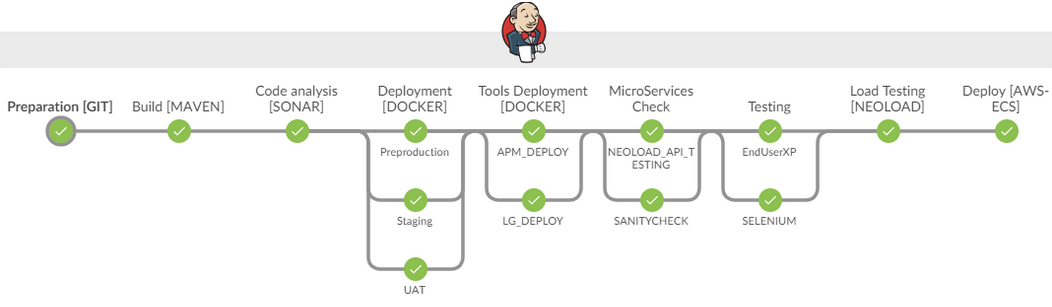
Below you will find a few examples of how NeoLoad can be used in a typical continuous delivery pipeline to component test different technologies.
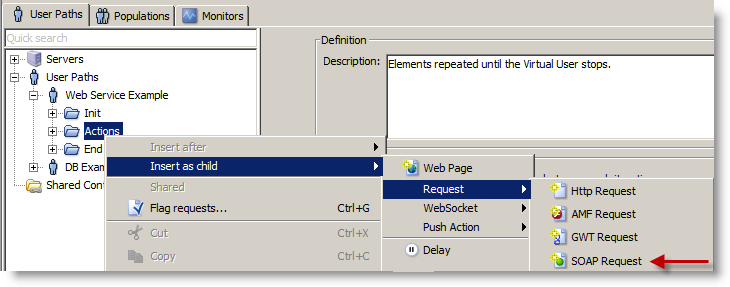
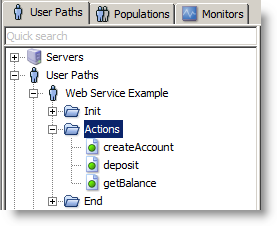
NeoLoad provides out of the box support for testing Web Services, the following example is a simple banking service. The first steps are to create a User Path and insert a SOAP request into the Actions section. For more information, see SOAP requests.
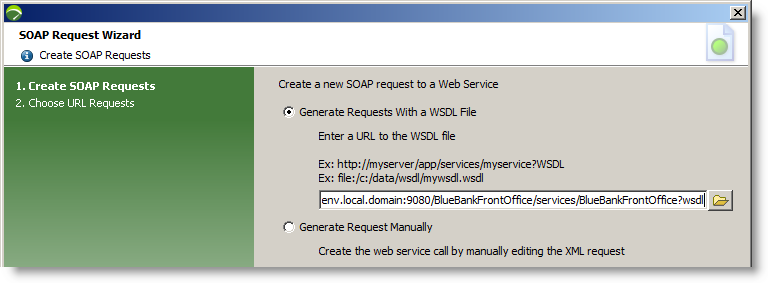
In the SOAP Request Wizard, we specify the path to the WSDL file of our banking service. This file contains the definition of the service including the available methods and required parameters.
Once the file is parsed, the available methods are displayed.
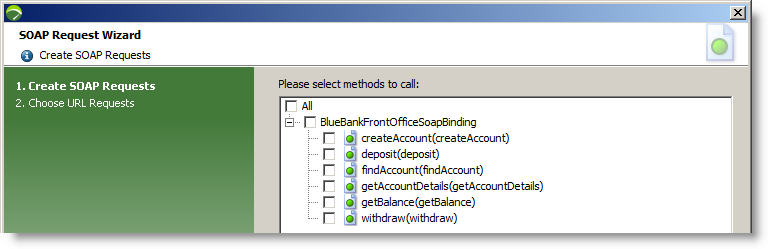
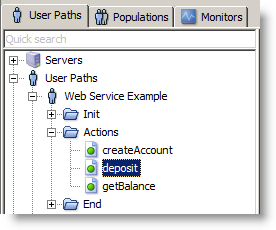
For the purpose of this example, we will pick a subset of the available methods. Namely creating the account, depositing some funds and checking the subsequent balance. The requests (or method calls) can either be added individually or added in bulk and the ones not being called, removed.
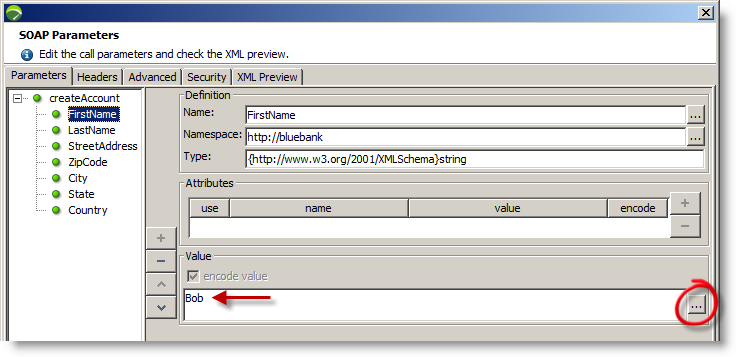
Selecting the first method, "createAccount", we can edit the call parameters to provide details of the account holder.

As this test was created by inspecting the banking services WSDL file, no data exists and needs to be entered manually, we provide the account holders details. These can be hard coded or read in from an external source such as a CSV file or database. The ellipse button (circled below) accesses NeoLoad Variable Manager.
Once the account holders data is added, we can exit these screens, clicking OK as needed. The next stage is to execute the "createAccount" method call. We can do this for each individual call or execute the User Path as a whole. We perform a "CheckVU" on the User Path by selecting the tool bar button shown below.
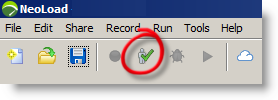
The Check User Path dialog appears, our User Path is selected automatically as it was where we last worked. Clicking the Start Checking button will connect to the embedded Load Generator installed as part of NeoLoad and execute our test.

Once execution has completed, we can see below that "createAccount" executed correctly, we received a 200 response code from the server indicating the request was OK. The deposit method returned a 500, this is expected as we have not provided any parameters to that method yet. We can see by looking at the "createAccount" response below, an account number was generated. This needs to be captured and passed to the deposit method. To do this, we select the Advanced button shown below.
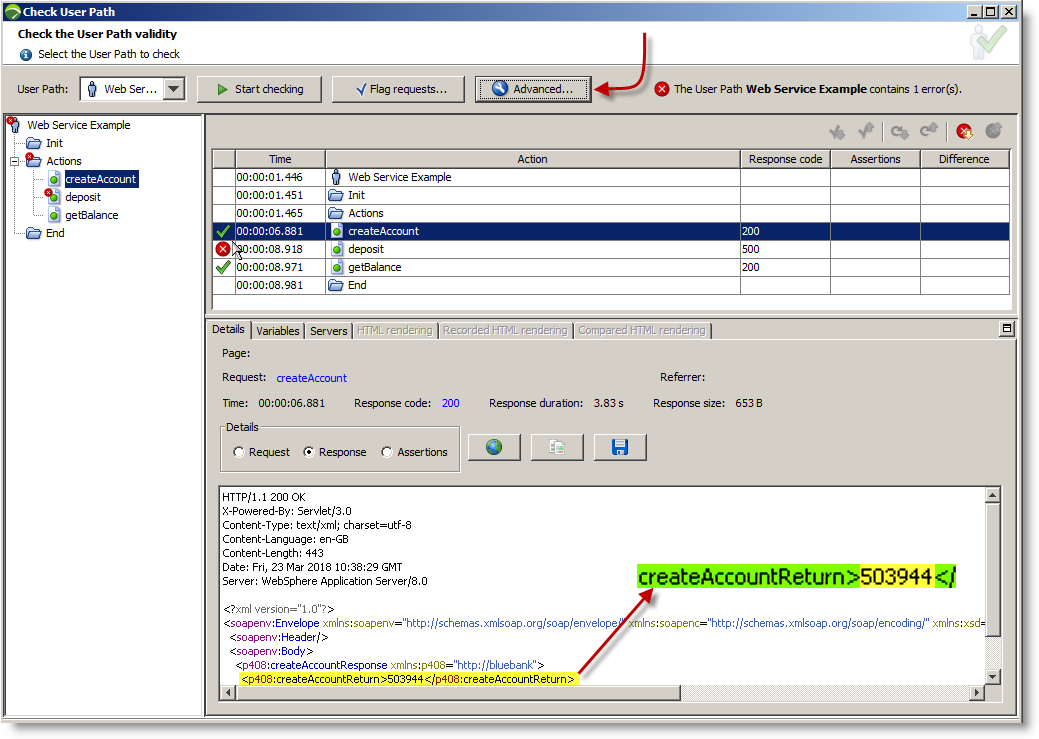
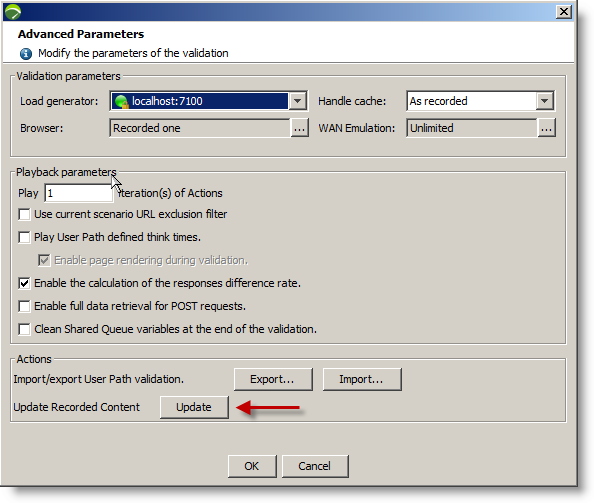
As the test was created based on the WSDL file, we do not have a recorded response in our test, we will use the response above and add it to our test by clicking the Update button on the Advanced dialog.
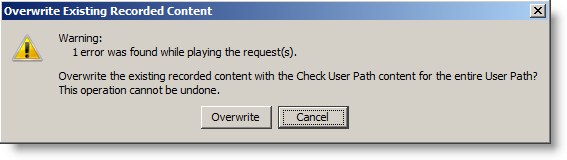
We confirm overwriting the empty response.
We can exit these screens, clicking OK as needed. Returning to the main NeoLoad screen, we select the "createAccount" method.

We select the Advanced button to look at the newly updated response.
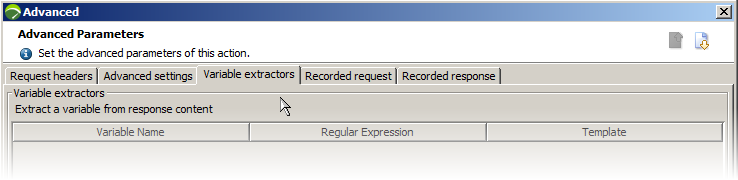
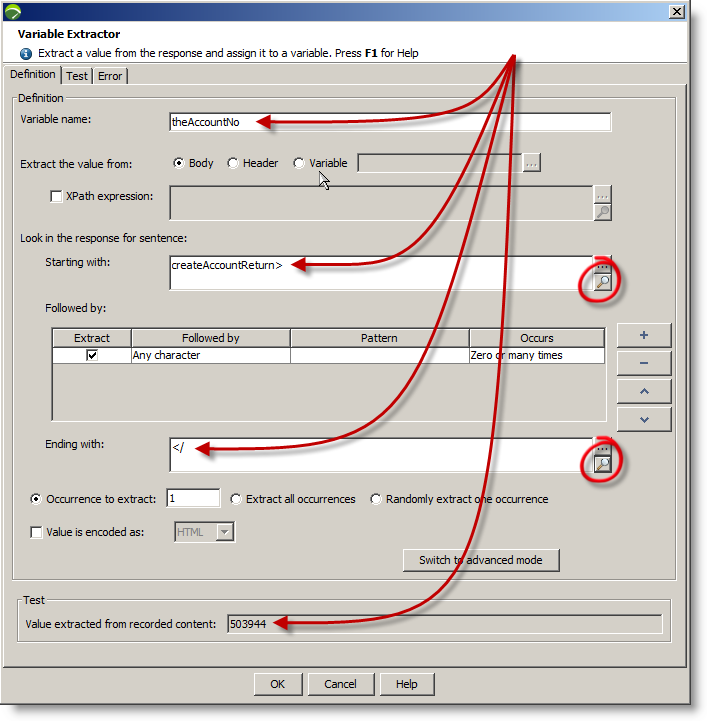
The response can be seen on the rightmost tab. We select the Variable extractors tab and click the + button as we need to extract the generated account number and save it to a variable.
Entering the text before and after the account number allows NeoLoad to create a regular expression to extract the number itself (createAccount>503944</). These values can be entered manually or selected using the magnifying glass buttons. We name the variable "theAccountNo".
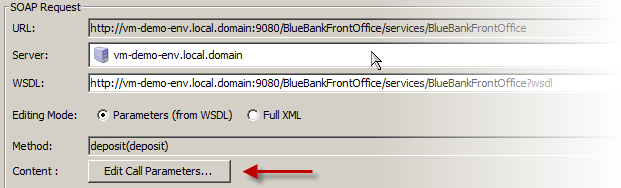
We are now ready to complete the deposit call so we exit the variable extractor screens, clicking OK as needed and selecting the "deposit" method.
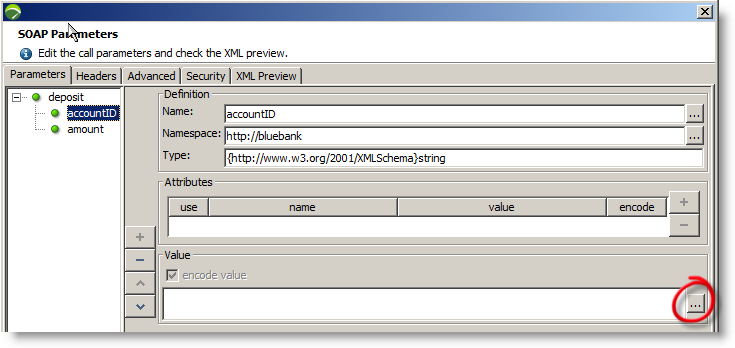
Edit the parameters like we did on the "createAccount" method call.
In this example, we use theAccountNo variable rather than a hard coded value. To do this, we select the ellipse button highlighted below.
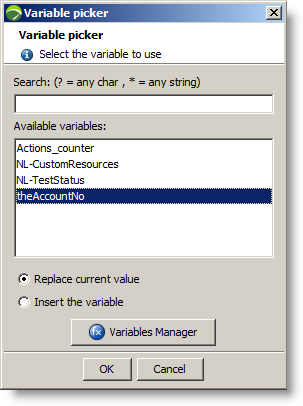
In the Variable picker list, we see "theAccountNo" variable we extracted from the "createAccount" response. We select it and click OK.
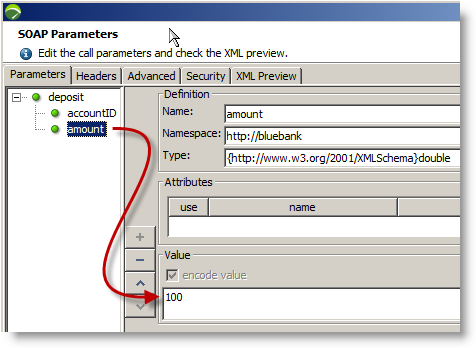
We could have easily typed it in instead of using the ${theVariableName} syntax.

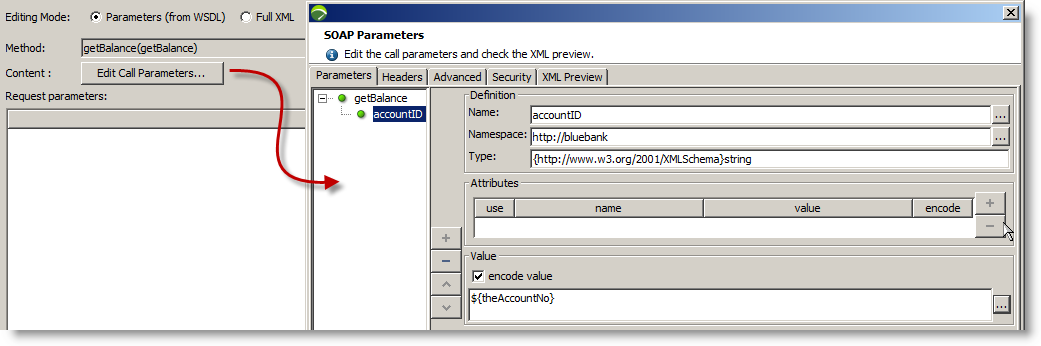
For the amount value, we choose "100". This could also have easily been a random number variable.
Exit the variable deposit method call, clicking OK as needed and select the "getBalance" request. Like the "deposit" request, we have to provide details of the account we need to access. We enter ${theAccountNo}.
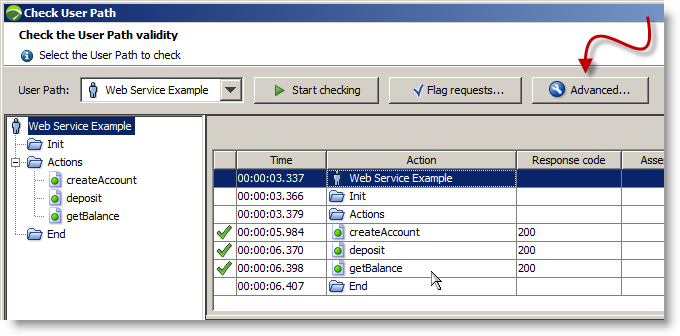
Exit the request, clicking OK as needed. We can now execute our test once more. Check the User Path by selecting the tool bar button shown below.
Clicking Start checking will connect to the embedded Load Generator installed as part of NeoLoad and execute our test.
Once execution has completed, we can see below that all 3 method calls are executing correctly, the account number extracted from the "createAccount" response has been passed to the deposit and "getBalance" method calls.
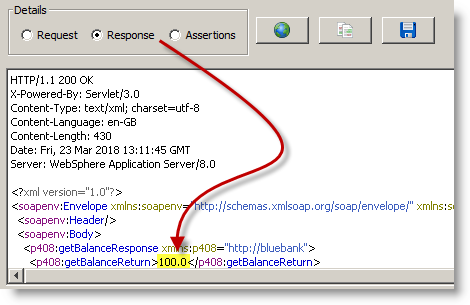
Selecting each method in turn, we see the responses from the Web service.
The final part of the exercise is to update our User Path with latest responses for the "deposit" and "getBalance" calls. We select the Advanced button in the Check User Path dialog and select Update.

REST stands for "Representational State Transfer", simply put, it is a way of accessing and manipulating web-based resources using a predefined set of stateless operations. A real-world example could be a web-based Test Management solution that allows the creation, updating and deleting (operations) of Test Cases (resources) via a REST interface. This API could be used as the basis to bulk import or migrate test resources from one solution to another. Because REST is based on HTTP/s, this is fully supported by NeoLoad. A simple example can be found below.
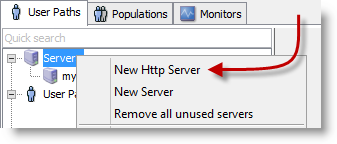
The first step is to create a server entry in NeoLoad for the target system. This is done by right-clicking on the server folder and selecting New HTTP Server.
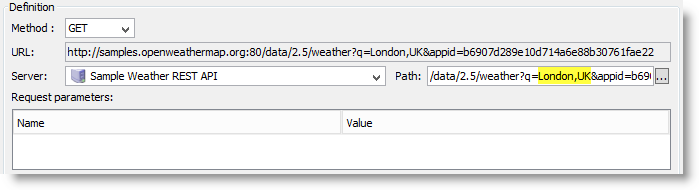
The API used in this example is a sample provided by "samples.openweathermap.org". Weather related information is returned based on the location we provide. We name the server entry and enter the host details.

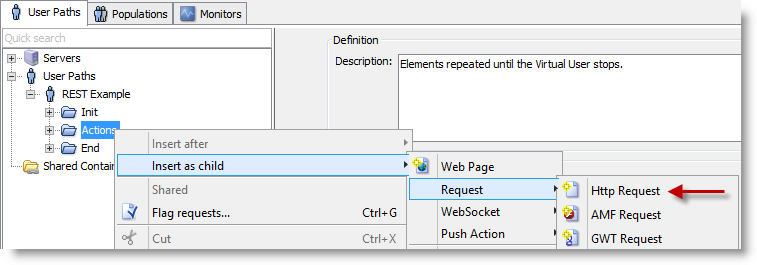
The next steps are to create a User Path and insert a standard HTTP request into the Actions section.
Note: Good practice is to place requests like these inside a ‘Transaction’, this helps with reporting and is a useful way of documenting the test.
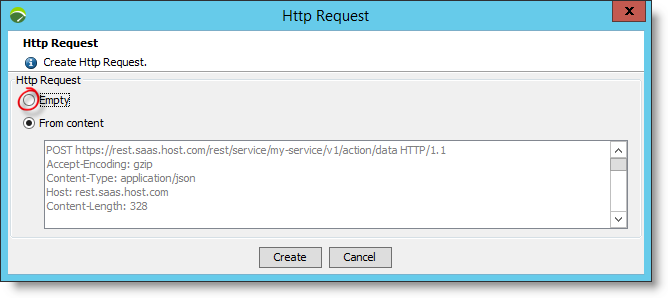
When inserting an HTTP request, users can either paste in content from an external source such as a log or trace file or create an empty entry.
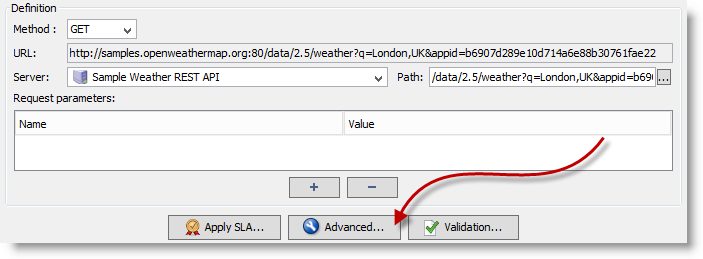
In the HTTP request, select the server entry created above and enter details of the URL path where the REST API can be found. In this example we will be using an HTTP GET method and supplying the location.
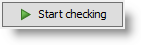
The next step is to execute the request and view the result by running the Check User Path.
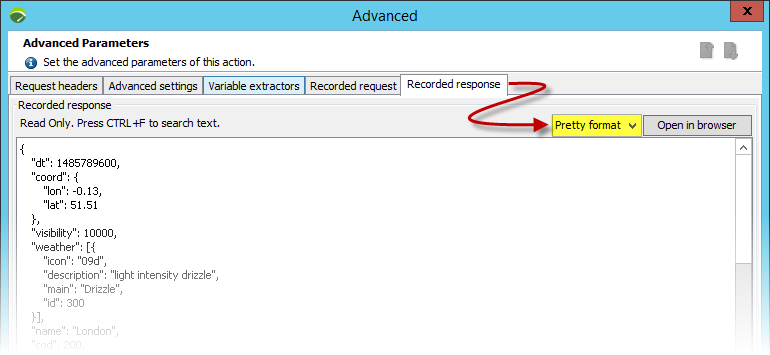
Looking at the response from the HTTP request Action, we can see that the request executed successfully and a JSON response was received.

Just like before, we can take this response and update our test with this expected result by clicking the Advanced button and selecting Update. We confirm we wish to replace the empty response.

We can now leave the Check User Path dialog (closing windows as needed) and view this new response in the User Path by clicking the Advanced button.
Now we have a response in our test, we can create Variable Extractors and do Validations as needed.
While our example is quite simple, you will likely need to provide additional details on the Request Headers tab above to enable you to test your own APIs. These would be provided by your development teams.
In addition to the request/response message exchanges covered above, NeoLoad supports querying and updating databases records via JDBC. These options can be found in the Actions view of the NeoLoad Design perspective. For more information, see Database.
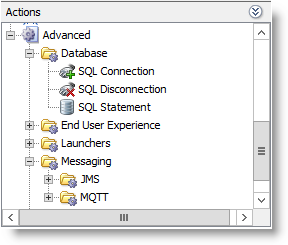
Drivers for Oracle, Microsoft SQL Server, MySQL and PostgreSQL are distributed with NeoLoad. For other database vendors, JDBC drivers can be copied into the lib/jdbc folder under the NeoLoad installation directory.
The first steps are to create a User Path and drag the SQL connection, SQL Statement and SQL Disconnect into the Actions section of the User Path from Actions view above.
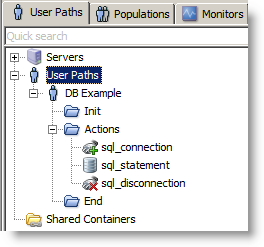
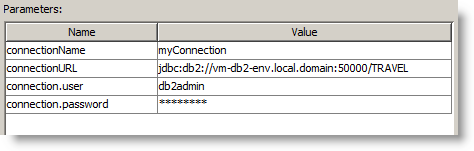
For the SQL connection, we need to specify connection details of the database we are connecting to, in this example we use DB2. The connection URL consists of the host, the port and the database name. We also supply the user name and password we use to authenticate. The "connectionName" is user-defined and links our 3 database actions.
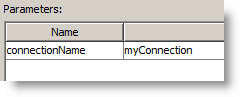
Using "connectionName", we specify the "sqlSatement" to execute against the connected database. The "variableName" is used to store the result set returned by the database. Valid types are "QUERY" and "UPDATE".

The last action is closing the connection to the database referenced by the "connectionName".
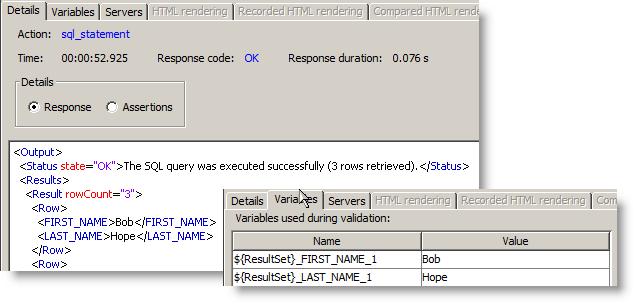
We can check the User Path like before by selecting the tool bar button shown below and then clicking the Start checking button on the Check User Path dialog.
Looking at the response from the SQL Statement Action, we can see that the query ran successfully and the "ResultSet" variable has been populated.
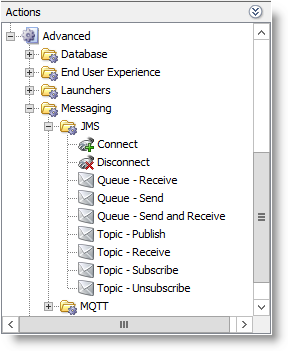
The last example in this guide is JMS. NeoLoad supports various queuing technologies such as ActiveMQ, Rabbit MQ and IBM MQ through the use of custom Actions and its JMS support. These options can be found in the Actions view in the NeoLoad Design perspective. For more information, see JMS.
The following examples use ActiveMQ and demonstrates sending and receiving items to and from a queue as well as subscribing and unsubscribing to a topic and publishing/receiving updates.
In ActiveMQ we have the following items created: someQueue and someTopic.


In NeoLoad we have created a User Path and dragged the required JMS custom Actions into the Action section of our test. These can be seen below.

The steps have been renamed to be more meaningful, queues are typically first in, first out. In our example, we add 2 items and remove 2 items, however, we have correlated the requests so we can decide the order items are removed from the queue. In order to connect, we enter the following parameters into the "connect" Action.
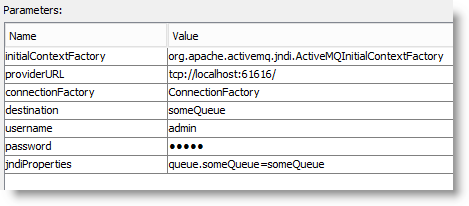
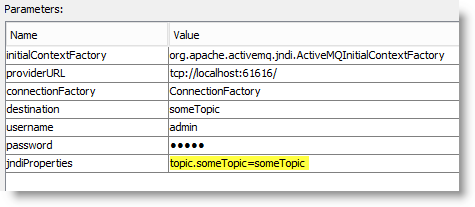
Depending on the queuing technology being used, "InitialContextFactory", "providerURL" and "ConnectionFactory" will vary. Details can be found in the appropriate MQ documentation. The "jndiPropertes" allows us to map the queue name onto the JNDI equivalent.
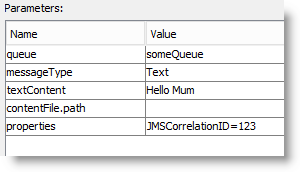
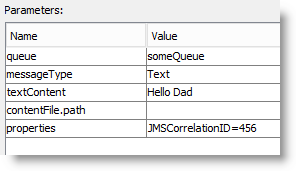
In order to send an item, we need to specify the queue, the message type and the message to send, we are also providing an extra parameter (properties) in order to correlate the send with the appropriate receive. The name/value pair in the properties field can be any user-defined text.
The delay is included in this example purely to give enough time see the message on the queue before it is taken from the queue and received by the NeoLoad "receive" Actions.

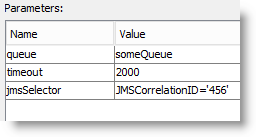
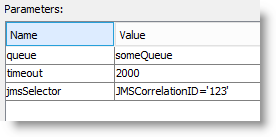
The "receive" requires the name of the queue, a timeout on how long to wait and the criteria to decide which item to receive from the queue (the jmsSelector). One important thing to note is that the correlation value should be in single quotes, this is unlike the send properties where the quotes are not required.
Once the "receive" has been executed, you can see the items are now dequeued.

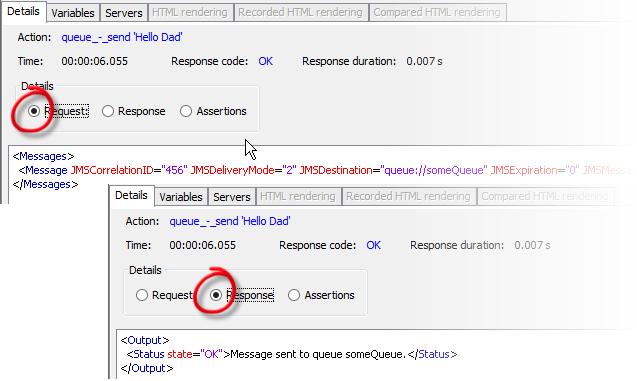
In order to test this, we can execute the User Path by selecting the tool bar button and clicking Start checking.
We can see the sends have taken place successfully by looking request/response details in the Check User Path dialog.
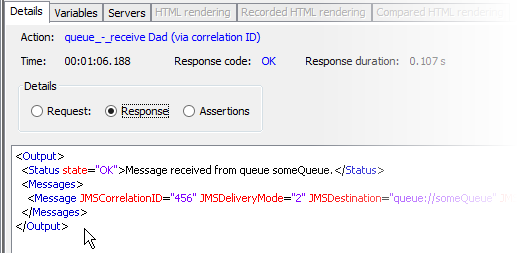
Looking at the receives shows us that the messages have been received from the queue correctly and that the "jmsSelector" parameter has allowed us to take the correct items from the queue using the "JMSCorrelationID" value identifier.
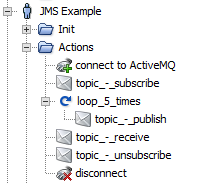
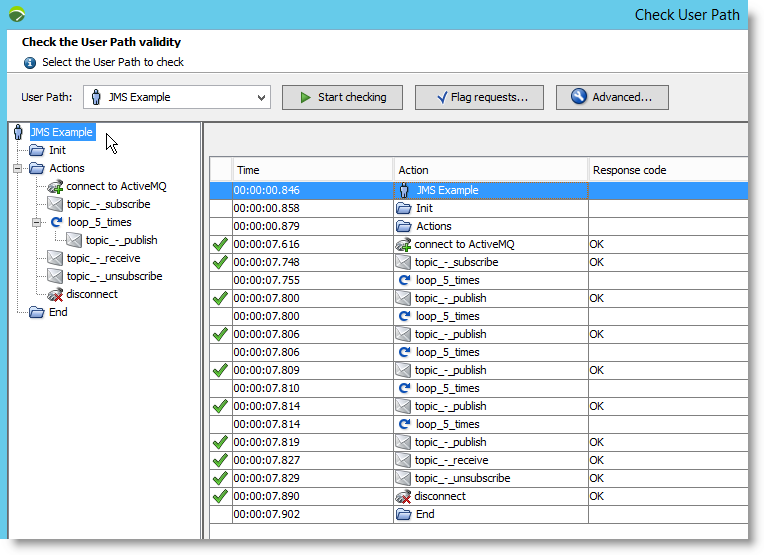
The second part of this JMS example shows subscribing to a topic and publishing messages to it, those messages can then be received and the topic unsubscribed. Just like before, we create a User Path and drag the required JMS custom Actions into the Action section of our test. These can be seen below
We connect, subscribe and loop around publishing messages to a particular topic. We can then receive all 5 messages, unsubscribe and disconnect. Like the "connect" above, the JMS settings for the "connect" Action are the same except that we are now connecting to a topic rather than a queue.
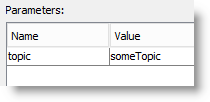
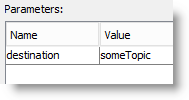
The "subscribe" and "unsubscribe" Actions also refer to the topic.
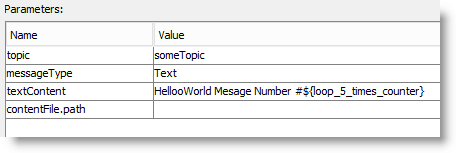
Within our loop, we are publishing messages to the topic. The ${loop_5_times_counter} in the "textContent" refers to the current iteration around the loop, so with 5 iterations, we should publish messages numbered #1 - #5.
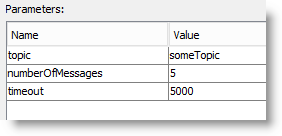
Finally, the "receive" Action will download all 5 messages, we unsubscribe and we disconnect using the "disconnect" Action.
To execute the User Path, we select the tool bar button and click Start checking from the Check User Path dialog.
We can see the test executed successfully as every Action has returned "OK".
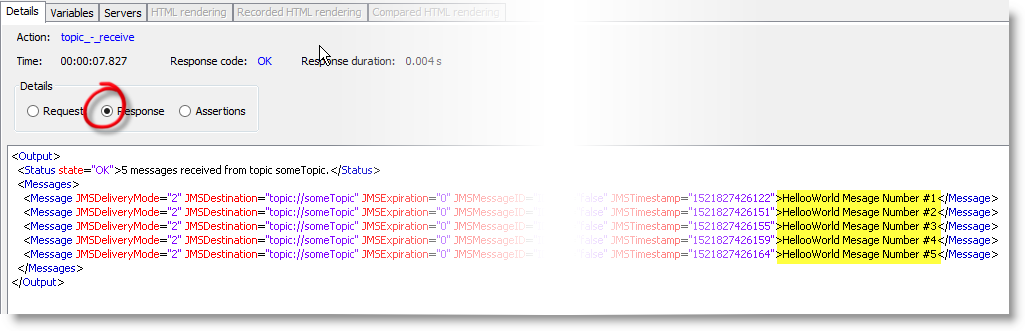
By selecting the Actions, we can see the requests and responses values, showing items were published and received correctly.
So what’s next…
Once we have a set of working component tests, these can be incorporated as part of a development teams continuous integration and delivery pipeline. NeoLoad integrates with tools such as Jenkins, Bamboo and Team City as well as having a comprehensive command line and runtime APIs.