SOAP: Web Services testing
This tutorial describes how to design a Virtual User containing SOAP requests. It will show you three different ways of creating SOAP requests in NeoLoad: from a WSDL file, from scratch, or from a recording sequence.
To gain the most from this tutorial, it is recommended to read SOAP requests.
Understand the context
In the same way NeoLoad lets you define and load test HTTP interactions, NeoLoad provides the means to load test SOAP requests. SOAP requests are in many ways similar to pure HTTP requests. This means that all the features NeoLoad provides for HTTP requests will be available for SOAP. This includes, among others, using variables, defining validation expressions and of course obtaining load test results. However it is worthy to note that SOAP requests differ from HTTP requests in several ways:
-
SOAP requests may not be associated to an HTML page the way HTTP requests are. If you record an HTML page containing SOAP requests, these requests will be recorded and associated to the page. On the other hand, if you record only SOAP requests, they will appear as standalone requests. For more information, see Record a SOAP request.
-
Not belonging to an HTML page, independent SOAP requests have no associated Think Time. If you want to test a sequence of SOAP calls, it is up to you to define delay actions to simulate latencies. For more information about delay actions, see Delay.
-
The way NeoLoad displays results differ from HTML pages and HTTP requests. For more information, see Quick tour on analyzing SOAP results.
Ways to define SOAP requests
NeoLoad provides these ways of defining a SOAP request:
The first example will use a web service provided by StrikeIron, this service is a Text Disguise CAPTCHA-Image service. Provided you register your email you will be allowed to freely test the service. The WSDL is available at http://web.archive.org/web/20170918222402/http://www.textdisguise.com:80/TextDisguise/CaptchaService/CaptchaService.asmx?WSDL
A CAPTCHA (Completely Automated Public Turing test to tell Computers and Humans Apart) is a program that can generate images that most humans can see, but current computer programs cannot. Many applications need the security of knowing that the "thing" interacting with them is, in fact, a real live person capable of thinking who is responsible for the interaction. Text Disguise solves this problem by embedding a word into an image, distorted and is then shown to the user. The user has to confirm the value entered into the box to continue.
The Text Disguise CAPTCHA-Image service defines two basic methods called GetNewWord and ValidateImageWord. The first method, GetNewWord, expects no direct arguments. It returns a captcha image identifier and a link to that image. The image can be displayed and the user prompted to enter the text he or she sees in the image.
The second method, ValidateImageWord, expects two arguments, the text entered by the user and the image identifier. The method returns true if the text is consistent with the image identifier and false otherwise.
The HTTP request containing a call to the GetNewWord method looks like the following:
POST http://ws.strikeiron.com/textdisguise/CaptchaService
Content-Type: text/xml; charset=utf-8
SOAPAction: "http://www.textdisguise.com/TextDisguise/CaptchaService/GetNewWord"
User-Agent: Jakarta Commons-HttpClient/3.0
Host: ws.strikeiron.com
Content-Length: 723
<?xml version="1.0" encoding="UTF-8"?>
<soapenv:Envelope
  xmlns:soapenv="http://schemas.xmlsoap.org/soap/envelope/"
  xmlns:xsd="http://www.w3.org/2001/XMLSchema"
  xmlns:xsi="http://www.w3.org/2001/XMLSchema-instance">
  <soapenv:Header>
    <ns1:LicenseInfo
        xmlns:ns1="http://ws.strikeiron.com"
        soapenv:actor="" soapenv:mustUnderstand="0">
      <ns1:UnregisteredUser>
        <ns1:EmailAddress>john.doe@dot.com</ns1:EmailAddress>
      </ns1:UnregisteredUser>
      <ns1:RegisteredUser>
        <ns1:UserID/>
        <ns1:Password/>
      </ns1:RegisteredUser>
    </ns1:LicenseInfo>
  </soapenv:Header>
  <soapenv:Body>
    <GetNewWord
        xmlns="http://www.textdisguise.com/TextDisguise/CaptchaService/">
      <GetNewWord/>
    </GetNewWord>
  </soapenv:Body>
</soapenv:Envelope>
Several points are worth noticing:
-
The HTTP request header defines the end point of the method, the address where the service resides, in the example this is
http://ws.strikeiron.com/textdisguise/CaptchaService. -
The HTTP request header contains a
SOAPActionitem. -
The HTTP request defines a text/xml content type.
-
The SOAP header,
soapenv:Headerelement, expects annsl:unregisteredUserelement that must contain your email address. -
The SOAP body,
soapenv:Bodyelement only contains a reference to the invoked methodGetNewWordand has no parameters.
The previous points are noteworthy because most of these elements are generated by NeoLoad and based on the WSDL definition, but as detailed in the following section, NeoLoad user interface will let you customize and configure all of them.
The process is composed of the following steps:
-
Creating and defining the SOAP request based on WSDL definition
-
Configuring the request (parameters)
-
Testing the request
To define a SOAP request based on a WSDL definition, follow these steps:
-
Create a SOAP Request:
-
Select the Design section.
-
Create a new User Path: Right-click the User Path node and select New User Path. Enter "UserPath", then click OK.
-
Add a new SOAP request: Right-click the Actions Container of the User Path just created and select Insert as child, then SOAP request
. -
Create the request from a WSDL definition: Check the Generate request using a WSDL file option and enter the URL of that file. In the example the URL is:
http://www.textdisguise.com/TextDisguise/CaptchaService/CaptchaService.asmx?WSDL
NeoLoad analyzes the WSDL and extracts the methods that can be called. Click Next. -
Select the method to call: Based on the WSDL definition, NeoLoad lists the methods that you can choose from. Here, you will select the
CaptchaServiceSoap.GetNewWordmethod. Click Next. -
Define a request name: NeoLoad provides a default request name which it usually derives from the method name defined in the WSDL. Most of the time you will not need to change this name. You might want to change it if you use this call several times with different parameter and configuration values. Click Next.
-
Define the service end point: This step lets you define the address for invoking the specified service. The WSDL includes this URL and most of the time you will not need to change this address. You might want to change the endpoint to switch from a test environment to a production one. Click Finish.
-
Check the main configuration elements:
-
At this point, the SOAP request is added to the User Path.
-
NeoLoad right panel displays the main configuration elements of the SOAP request. This includes the end point URL which is defined by both the
ServerandPathelements. These elements, as mentioned earlier, have been extracted from the WSDL but can be changed to custom values. As with HTTP requests, thePathelement can been defined using NeoLoad variables. -
The
WSDLelement can equally be changed or reloaded. Reloading is particularly useful when the SOAP request and it is associated WSDL are out of sync. -
Reloading WSDL will re-initialize all previous configuration elements. All previously defined parameters will be lost.
-
-
Check the HTTP headers:
-
Most SOAP requests require at least two HTTP header elements when SOAP is tunneled through HTTP. Always make sure that these elements are correctly set. They are available in the Advanced parameters dialog box and are accessed by selecting the Advanced button.
-
In the example these elements are
ContentTypeandSOAPAction. If your web service Framework requires additional HTTP header elements you can set them in the Advanced parameters dialog box.
-
-
-
Configure the SOAP request:
-
Before actually testing the SOAP request, additional elements including parameter values and encoding types must be configured. Select the Edit Call Parameters button to access the SOAP configuration dialog box.
-
Define the main parameters of the SOAP body:
-
The Parameters tab makes it possible for you to define the structure of the SOAP body. The tree structure in the left most panel of the SOAP Parameters dialog box displays the structure and content of the SOAP body.
-
As mentioned earlier, the
GetNewWordmethod expects no parameters or an empty so the tree only has one root element calledGetNewWord(an empty element as defined in the WSDL). Had there been several elements or several possible elements, NeoLoad would have displayed them in the tree. In the example no further configuration for the body is necessary.
-
-
Define the SOAP header:
-
Select the Headers tab to define and configure elements related to the SOAP header. The SOAP header elements are presented in exactly the same way as the SOAP body elements are. The left most panel contains an XML tree displaying the structure and contents of the header of the SOAP envelope. Adding and removing elements is achieved using the + (plus) and - (minus) buttons. Moving elements around is achieved using the up and down buttons
-
The structure contains either Container elements, such as
UnregisteredUserin this case, or leaf elements such asEmailAddress. Container elements are meant to contain other elements. Right clicking on them will pop up a menu from which you can choose to move the selected element or add and remove child elements. NeoLoad will only suggest child elements that are consistent with the WSDL definition. -
Leaf elements on the other hand cannot contain other elements but have an associated value. In the example you must enter a valid email address for the
EmailAddresselement. -
For both Container and leaf elements, you can define attribute names and attribute values. Again attributes must be consistent with WSDL definition.
Encodingallows special characters such as >, <, or &'to be encoded.
-
-
Configure advanced settings: The Advanced Settings panel makes it possible for you to configure the binding styles of the SOAP request and the format of attachments. This information has been extracted from the WSDL and you should definitely be familiar with the types of bindings if you decide to change this setting.
-
View XML: The last tab of the SOAP Parameters dialog box displays the actual XML content that will be sent. NeoLoad generates its content on the fly using the XML elements and attributes you have defined. Right clicking on the XML and selecting the Format as Pretty XML item will display a neatly indented XML. You can search the generated XML for a particular expression by right clicking on the XML and selecting the Search item (or using the CTRL + F shortcut keys).
-
-
Test the SOAP request:
-
By creating a temporary User Path, NeoLoad provides an easy and quick method to check your SOAP request. Select the Check button to open the Check User Path dialog box.
-
Start checking: If you have already tested User Paths using NeoLoad you will be familiar with the following dialog box. By selecting the Start checking button, NeoLoad will generate the SOAP request and send it to the specified end point. NeoLoad displays the associated response code and the number of failed assertions for the sent request. When the line associated to the request is selected the dialog box displays further details in the lower part of the dialog box. You can choose to display the SOAP request that was sent or the XML response. You can search the SOAP request or the XML response for a particular expression by right clicking on the XML and selecting the Search item (or using the CTRL + F shortcut keys). You can neatly format SOAP request or the XML response by right clicking on the XML and selecting the Format as pretty XML item.
-
If you are following the example and testing it, the first time you will send the request the response will look like the following (the HTTP header has been omitted):
Copy<?xml version="1.0" encoding="utf-8"?>
<soap:Envelope
xmlns:soap="http://schemas.xmlsoap.org/soap/envelope/"
xmlns:xsi="http://www.w3.org/2001/XMLSchema-instance"
xmlns:xsd="http://www.w3.org/2001/XMLSchema">
<soap:Header/>
<soap:Body>
<soap:Fault>
<faultcode>soap:Client</faultcode>
<faultstring>
Thank you for your attempt to try this Web service. Before the
free trial can occur,
you must first validate your email address.
Simply click on the link in the email that was just sent to you,
and you will then be able to invoke every Web service
within the StrikeIron Web Services Marketplace, including this one.
</faultstring>
<faultactor/>
</soap:Fault>
</soap:Body>
</soap:Envelope> -
As indicated in the
faultstringelement, all you need to do to use the service a limited amount of times is to validate the email address you sent by following the link that StrikeIron has sent to you. Once your address is validated invoking the service should get you a response such as the one that follows (the HTML header has been omitted):Copy<?xml version="1.0" encoding="utf-8"?>
<soap:Envelope
xmlns:soap="http://schemas.xmlsoap.org/soap/envelope/"
xmlns:xsi="http://www.w3.org/2001/XMLSchema-instance"
xmlns:xsd="http://www.w3.org/2001/XMLSchema">
<Header xmlns="http://schemas.xmlsoap.org/soap/envelope/">
<SubscriptionInfo xmlns="http://ws.strikeiron.com">
<LicenseStatusCode>1</LicenseStatusCode>
<LicenseStatus>Valid key</LicenseStatus>
<LicenseActionCode>0</LicenseActionCode>
<LicenseAction>Decremented hit count</LicenseAction>
<RemainingHits>4</RemainingHits>
<Amount>0</Amount>
</SubscriptionInfo>
</Header>
<soap:Body>
<GetNewWordResponse
xmlns="http://www.textdisguise.com/TextDisguise/CaptchaService/">
<GetNewWordResult>
<CaptchaImageGuid>
82e16912-14c1-4253-bbcb-699585e3ba63
</CaptchaImageGuid>
<Url>
http://www.textdisguise.com/TextDisguise/CaptchaService/
CaptchaImage.aspx?
guid=82e16912-14c1-4253-bbcb-699585e3ba63
</Url>
</GetNewWordResult>
</GetNewWordResponse>
</soap:Body>
</soap:Envelope> -
From this point on you can use the link defined by the
URLelement in an HTML page. As detailed in the following section you can then use theValidateImageWordmethod and theCaptchaImageGuidto validate a text entered by the user.
-
This section describes how to define a SOAP request based on some XML rather than starting on a WSDL definition.
This will be illustrated by continuing the previous example and by invoking the ValidateImageWord method. This method expects two parameters, an image identifier, the CaptchaImageGuid, returned by the GetNewWord method and the text entered by a user. The ValidateImageWord method will return true if the text entered by the user and the captcha image are consistent. The XML you will be building your SOAP request on follows:
<?xml version="1.0" encoding="UTF-8"?>
<soapenv:Envelope
xmlns:soapenv="http://schemas.xmlsoap.org/soap/envelope/"
xmlns:xsd="http://www.w3.org/2001/XMLSchema"
xmlns:xsi="http://www.w3.org/2001/XMLSchema-instance">
<soapenv:Header>
<ns1:LicenseInfo
xmlns:ns1="http://ws.strikeiron.com"
soapenv:mustUnderstand="0">
<ns1:UnregisteredUser>
<ns1:EmailAddress>john.doe@dot.com</ns1:EmailAddress>
</ns1:UnregisteredUser>
<ns1:RegisteredUser>
<ns1:UserID/>
<ns1:Password/>
</ns1:RegisteredUser>
</ns1:LicenseInfo>
</soapenv:Header>
<soapenv:Body>
<ValidateImageWord
xmlns="http://www.textdisguise.com/TextDisguise/CaptchaService/">
<captchaImageGuid>53fd3b31-1089-455b-a1b6-d78bc73f80b9</captchaImageGuid>
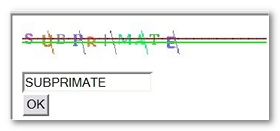
<word>SUBPRIMATE</word>
</ValidateImageWord>
</soapenv:Body>
</soapenv:Envelope>To manually define a SOAP request, follow these steps:
-
Manually create a SOAP request:
-
Select the Design section: Click on the Design button.
-
Add a new SOAP request: Right-click the Virtual User just created and select Insert into, then SOAP request
. -
Specify a manually-generated request: Check the Generate request manually option. Click Next.
-
Enter a name for the request: Enter a name for the manually-defined request. In the example you will name the request
ValidateImageWord. Click Next. -
Define the end-point of the request: This is the URL where the service is located. You can also change this later on. In the example the service end point is
http://ws.strikeiron.com:80/textdisguise/CaptchaService. Click Finish. -
Check main configuration elements: At this stage the SOAP request is added to the Virtual User. You can rename this node to your convenience. In the example a
ValidateImageWordnode has been added at the end of the existing SOAP requests. NeoLoad right panel displays the main configuration elements of the SOAP request. This includes the end point URL which is defined by both theServerandPathelements. These elements can be changed to custom values. As with HTTP requests, thePathelement can been defined using NeoLoad variables. -
Check the HTTP headers: Most SOAP requests require at least two HTTP header elements when SOAP is tunneled through HTTP. Always make sure that these elements are correctly set. They are available in the Advanced parameters dialog box and are accessed by selecting the Advanced button. In the example these elements are
ContentTypeandSOAPAction.
-
-
Configure the XML content:
-
To configure the XML content, select the Edit XML Content button.
-
At this stage you must define the XML request either by copying and pasting a request you have tested or by manually defining each element and attribute of the request. You will be using the first method in the example.
-
Copying and pasting an existing XML request using the
Flat XMLpanel is the easiest way to define the XML content of the request. In the example you have copied and pasted the XML containing the call to theValidateImageWordmethod. -
You could also use the XML Tree panel to manually define or to edit the XML using elements and attributes. NeoLoad automatically constructs one view from the other (the XML tree view from the flat view and vice versa).
-
At this stage the request is completely defined and configured, you can immediately start testing it.
-
-
Test the SOAP request:
-
By creating a temporary Virtual User, NeoLoad provides an easy and quick method to check your SOAP request. Select the Check button to open the Check Virtual User dialog box.
-
Start checking: If you have already tested Virtual Users using NeoLoad you will be familiar with the following dialog box. By selecting the Start checking button, NeoLoad will send the SOAP request to the specified end point. NeoLoad displays the associated response code and the number of failed assertions for the sent request. When the line associated to the request is selected the dialog box displays further details in the lower part of the dialog box. You can choose to display the SOAP request that was sent or the XML response. You can search the SOAP request or the XML response for a particular expression by right clicking on the XML and selecting the Search item (or using the CTRL+F shortcut keys). You can neatly format SOAP request or the XML response by right clicking on the XML and selecting the Format as pretty XML item.
-
This section illustrates another means of defining SOAP request. Of all the techniques described so far, it is the one that resembles the most what you usually do with HTTP requests: acting as a user and letting NeoLoad do the job of recording requests and responses. The example uses the Google search API. For more information about this API you will need to create an account and obtain a license key, see http://www.google.com/apis.
To record a SOAP request, follow these steps:
-
The example is basic and really simple so that the underlying mechanisms are made clear:
The HTML page you will be recording consists of a Test button and a
textareacontaining the request to send. Hitting the Test button sends the request to the correct end point, the response is then displayed in thetextarea. The request contains an invocation to the Google search API. The body of the request contains among others, an XMLkeyelement which you will have to obtain from Google. The XMLqelement is the text you are actually searching for. In your very basic interface you can change this by editing thetextareacontent before invoking the request.The JavaScript code that manages the request opens the service end point, consistently sets the HTTP headers and sends the content of the
textarea. When the response is received it is content is copied to thetextarea. Note the code only works with Microsoft Internet Explorer. Other browsers will in any case refuse to connect to a URL not belonging to the same domain as the test page.The following listing contains the
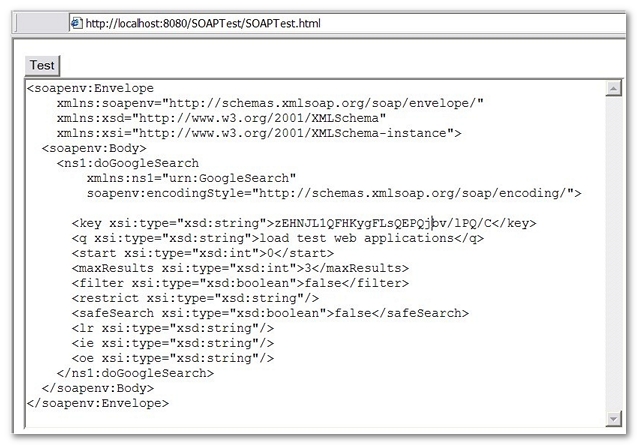
SOAPTest.htmlcode and the code of the function called when the Test button is hit:Copy<html>
<body>
<h1>Google</h1>
<script type="text/javascript">
function doIEGoogle() {
textarea = document.getElementById("debugbox");
xhr = new ActiveXObject("Microsoft.XMLHTTP");
xhr.open('POST', "http://api.google.com/search/beta2");
xhr.setRequestHeader("SOAPAction", "urn:GoogleSearchAction");
xhr.setRequestHeader("Content-Type", "text/xml; charset=utf-8");
xhr.onreadystatechange =
function() {
if(xhr.readyState != 4) return;
if(xhr.status != 200) {
textarea.value = xhr.status + " " + xhr.statusText
+ "\n" + xhr.responseText;
return;
}
textarea.value = xhr.responseText;
};
xhr.send(textarea.value);
}
</script>
<form name="input" action="javascript:doIEGoogle()">
<input type="submit" value="Test">
</form>
<p></p>
<textarea rows="30" cols="100" name="debugbox">
<?xml version='1.0' encoding='UTF-8'?>
<SOAPENV:Envelope
xmlns:SOAPENV="http://schemas.xmlsoap.org/soap/envelope/"
xmlns:xsi="http://www.w3.org/2001/XMLSchema-instance"
xmlns:xsd="http://www.w3.org/2001/XMLSchema">
<SOAPENV:Body>
<ns1:doGoogleSearch
xmlns:ns1="urn:GoogleSearch"
SOAPENV:encodingStyle="http://schemas.xmlsoap.org/soap/encoding/">
<key xsi:type="xsd:string">ABQIAAAA-YwsmHQspwIU9OcKL4b5rhTd9gLE95ZWCg
lQjFVS1XYlL9GwFBSIRS2y1JQBK8NE1ktm1oJWkWiTZQ</key>
<q xsi:type="xsd:string">load testing web applications</q>
<start xsi:type="xsd:int">0</start>
<maxResults xsi:type="xsd:int">3</maxResults>
<filter xsi:type="xsd:boolean">false</filter>
<restrict xsi:type="xsd:string"/>
<safeSearch xsi:type="xsd:boolean">false</safeSearch>
<lr xsi:type="xsd:string"/>
<ie xsi:type="xsd:string"/>
<oe xsi:type="xsd:string"/>
</ns1:doGoogleSearch>
</SOAPENV:Body>
</SOAPENV:Envelope>
</textarea>
</body>
</html> -
Record the page:
-
To record this test page you follow exactly the same procedure as when recording an HTML page. From there you selected the Test button and waited for the results from the Google search API. You might end the recording at this stage.
-
The recorded node contains a node called
/search/beta2 -
As they do not belong to an HTML page, independent SOAP requests have no associated Think Time. If you want to test a sequence of SOAP calls, it is up to you to define delay actions to simulate latencies. For more information about delay actions, see Delay.
-
NeoLoad has correctly identified the request as a being a SOAP request: the
URL,Server,PathandMethodproperties of the request are consistently set.
-
-
Edit the SOAP request: If you select the Edit XML Content button and choose the XML Tree Tab, you can easily browse through the SOAP request elements. This is typically where you could use variables, changing for instance the search text for the
qparameter: -
Check the SOAP request: As for any SOAP request, you can test the recorded request by selecting the Check button to open the Check Virtual User dialog box. In this simple example, the Java script code just fills in the textarea with the received XML. In a real world scenario, the HTML page would obviously do otherwise, it would probably analyze the results, display them neatly in HTML and then let the user navigate on those results. Keep in mind that NeoLoad, just as for HTML requests, will let you extract information from the SOAP response and inject that information in further requests.
-
Record from a real client: The previous sample shows how to record the request using a web browser. For more information, see Record a SOAP request.
Based on the two previous examples, this section briefly shows you how, just as for HTML requests, NeoLoad variable extractor mechanism can be used with SOAP requests.
The process is composed of the following steps:
-
Extracting into a variable the image identifier, in other words the
CaptchaImageGuid, fromGetNewWordresponse -
Re-injecting the value of the variable when invoking the
ValidateImageWordrequest.
To use the variable extractor, follow these steps:
-
Extract the image identifier CaptchaImageGuid from GetNewWord response
-
Go to the Design section by selecting the Design button.
-
Select the Virtual users tab.
-
Unfold the appropriate Virtual User node.
-
Select the
GetNewWordrequest from which the image identifier value will be extracted. -
Go to the Variable extractors tab.
-
Open the Advanced settings dialog box by selecting the Advanced button.
-
Select the Variable extractors tab.
-
-
Define a new variable:
-
Select the + (plus) button to add a new variable. This opens a Variables Extractor dialog box. In the example you will define the
captchaImageGuidvariable . The way the value is identified and extracted is quite straightforward since the XML response is simple. You may want to extract anything appearing between the starting<captchaImageGuid>and ending</captchaImageGuid>XML tags. -
At this stage the extraction part of the process is complete. Each time the
GetNewWordis invoked NeoLoad will extract the value of the image identifier and set thecaptchaImageGuidvariable with it. -
For more details on extracting variables refer to Create a variable extractor and Variable extractors.
-
-
-
Re-inject the value into the
ValidateImageWordrequest using a variable:-
Select the
ValidateImageWordrequest in which the image identifier value will be injected. -
Select the Edit XML Content button to configure the XML content.
-
Select the XML Tree tab.
-
Select the
captchaImageGuidelement in the XML panel. -
Select the Variable Picker dialog box using the picker button. You can also start typing something like
${cand NeoLoad will suggest variable name completions. -
Choose the
captchaImageGuidvariable. NeoLoad will extract the image identifier from theGetNewWordresponse and inject it in theValidateImageWordrequest. This sequence can be replayed multiple times.
-
Quick tour on analyzing SOAP results
Contrary to HTTP requests, which always belong to an HTML page, SOAP request are defined and managed by NeoLoad outside HTML pages. This has a particular consequence in the way NeoLoad displays the results. If you have defined a scenario that includes SOAP requests, these requests will not be detailed in the summary.
In this case the scenario only contains the HTML test page called SOAPTest.html. You can take a look at it in the Test Summary.
It is only in the Values tab that you will see statistics on the SOAP request, in the example the /search/beta2 request. Of course all graphing functionalities are equally available for SOAP requests (Graphs tab).