Advanced parameters
Under particular conditions, it is useful to check a User Path.
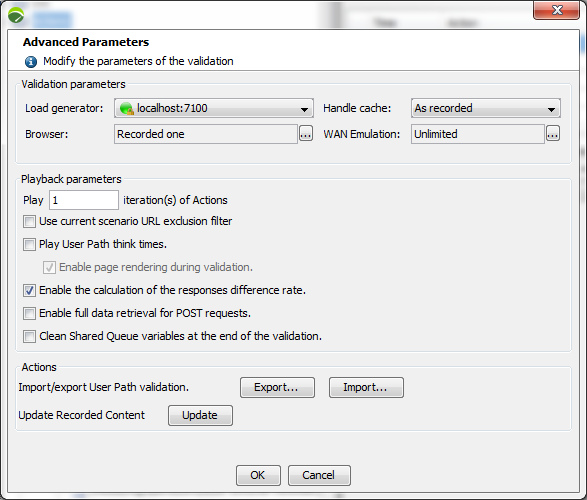
In the Check User Path dialog, a click on the Advanced button displays the Advanced Parameters dialog.
When advanced values and options are chosen in the Advanced Parameters dialog, it is necessary to start a new User Path checking process again, as documented in Check a user path.
Validation parameters
In the Virtual User Parameters box, the Validation parameters group box makes it possible to modify the operational conditions of the validation process:
-
Load generator
-
Cache management
-
Browser profile
-
Network conditions
Load Generator
By default, the localhost Load Generator is used for the Virtual User validation. It may be necessary however to use a remote Load Generator instead. For example, changing the local Local Generator for an remote one can be required to access an application stored in a secured environment.
The Load Generator drop-down list allows checking the Virtual User with one of the Load Generators available in the test scenario.
Cache management
Initializing the cache when the Virtual Users are started can be defined in three behaviors in the Handle Cache drop-down list:
-
As recorded: The Virtual Users cache behavior is the same as in the scenario recording.
-
New user: The Virtual Users are started with an empty cache to simulate users who have never visited the application.
-
Returning user: The Virtual User cache is up to date. The application does not return any response which contains information that is already cached.
Browser profile
The Browser dialog makes it possible to define a browser profile used by the selected User Path. It may prove relevant to use a specific browser profile for a load test when the content of the server response depends on the browser used.
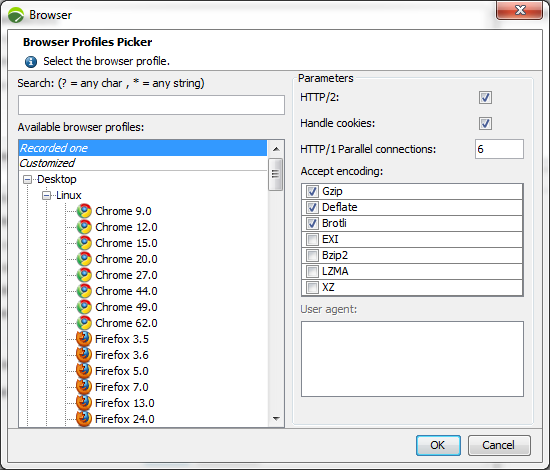
The Available browser profiles list makes it possible to select one of the following profiles:
-
Recorded one is the default option. It is the browser used when recording the scenario. As soon as a parameter is modified, it automatically switches to Customized.
-
Customized is applied when one or more specific parameters are set on a listed profile.
-
A pre-configured profile carries default values according to the simulated browser. The Search field above is useful to filter the profiles list. A pre-defined profile can serve as a frame to set a Customized one.
Note: Additional pre-configured browsers can be specified in the C:\Program Files (x86)\NeoLoad 8.2\conf\pickers\browser_profiles folder. However, it is easier to configure a Customized profile in the Browser dialog when the need is specific.
When a browser profile is selected, the Parameters group box displays its default and additional parameters:
-
HTTP/2: Checking this box enables the HTTP/2 protocol on the selected browser profile.
SPDY is no longer supported and has been replaced by HTTP/2. The focus of HTTP/2 protocol is on performance; specifically, end-user perceived latency, network and server resource usage. One major goal is to allow the use of a single connection from browsers to a Web site. For more information about HTTP/2, see https://http2.github.io/.
-
Handle cookies: Selecting the check box activates the ability for Virtual Users to handle cookies. Deactivating cookies helps check that the application can be used with a browser whose cookies management is deactivated, and force the server to use the URL rewriting facility to keep the session alive.
-
HTTP/1 Parallel connections: This field makes it possible to set the number of HTTP1 connections which may be opened simultaneously on the remote server by one Virtual User.
-
Accept encoding: The list allows selecting the encoding format for the request content. The supported formats are: "Gzip", "Deflate", "Brotli", "EXI", "BZip2", "LZMA", "XZ". Ticking the appropriate check box selects/unselects the format to be used.
Note: For POST requests, the only format supported is "gzip".
-
User agent: In this field, the authenticating HTTP User Agent headers of the browser can be specified.
Network conditions
A click on the picker button of the WAN Emulation field displays the WAN Emulation dialog box.
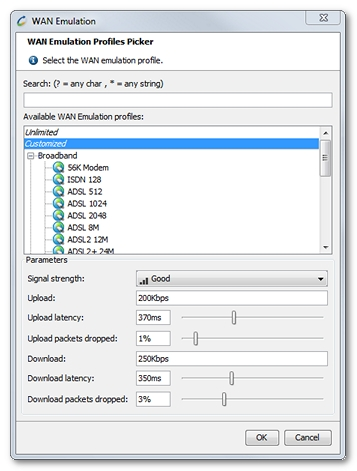
The WAN Emulation function is useful to simulate degraded network conditions with latency periods and packet loss percentages.
Note: On Linux, the WAN Emulation requires a driver or module to be installed. For more information, see Install the WAN Emulation.
In the WAN Emulation dialog box, the Available WAN Emulation profiles list makes it possible to select one of the following profiles:
-
Unlimited is the default option. It is bandwidth, latency, and packet loss free, meaning that no WAN Emulation is applied. As soon as a parameter is modified, it automatically switches to Customized.
-
Customized is applied when one or more specific parameters are set on an Unlimited profile or a pre-configured one.
-
a pre-configured profile carries default real-world values according to the simulated protocol. The Search field above is useful to filter the profiles list. A pre-defined profile can serve as a frame to set a Customized one.
The values for the network conditions applicable in the tests are configured in the Parameters group box.
-
The Signal strength drop-down list is reserved for mobile networks. The Good selection stands for the highest real uploading and downloading values in Mbps for the selected network type. The other Average and Poor options suggest signal measures (66% and 33% respectively). Custom values can be entered in the fields beneath according to the quality of the local mobile network.
-
In the Upload and Download fields, custom bandwidth values can be specified in Kbps or Mbps.
-
In the Upload latency and Download latency fields, custom latency values in ms can be entered or set with the field sliders. The values specified here are additional simulated latency measures: The IT architecture may generate its own latency, according to the location of the NeoLoad Controller, the NeoLoad Load Generators, and the application itself.
-
In the Upload packets dropped and Download packets dropped fields, custom packet loss percentage values can be entered or set with the field sliders.
-
A click on the OK button closes the WAN Emulation box.
Note: The WAN Emulation parameters are left aside when a connection error occurs. When a Load Generator generates NL-NETWORK-* errors, additional latency values are ignored when the connection is lost between the Load Generator and the server.
For more information about the WAN Emulation facility, see Install the WAN Emulation
The easiest way to measure the latency and packet loss rate between a computer and a server is to use the ping command with enough requests to get a reliable number of packets lost. For example ping –n 100 www.myserver.com to send 100 packets.
When each packet has been sent, the program displays the statistics for response times (latency) and the number of packets sent, received and lost.
The latency given is a round-trip latency. It is necessary to divide the measure by two to get a sound approximation of upload and download latency.
A number of free mobile applications are available on mobile stores to send the same Ping commands as it can be done on computers. For example, Free Ping is one application on iOS.
These programs displays the statistics for response times (latency) and the number of packets sent, received and lost.
The latency given is a round-trip latency. It is necessary to divide the measure by two to get a sound approximation of upload and download latency.
Playback parameters
In the Advanced Parameters dialog, the Playback parameters group box makes it possible to modify the functional conditions of the User Path used during the validation process:
-
In Play <number> iteration(s) of Actions, more than one iteration of an Actions Container can be defined for the execution.
-
The Use current scenario URL exclusion filter option allows excluding the requests whose URL corresponds to one of the regular expressions in the exclusion filter from the scenario and ignoring them during the test playback. For more information, see URL exclusion filter.
-
The Play User Path think times option allows including think times in the playback. The Enable page rendering during validation sub-option displays pages in HTML automatically.
-
When the Enable the calculation of the responses difference rate option is checked, NeoLoad identifies the level of differences between the record responses and the playback ones. In the Check User Path dialog, the Difference column lists the pages with potential response issues.
It is recommended to deactivate the option when checking a large User Path.
-
When the Enable full data retrieval for POST requests option is checked, NeoLoad stores the full response of POST, PUT and DELETE requests.
-
It is recommended to leave the option disabled when checking a large User Path.
-
The Clean Shared Queue variables at the end of the validation option allows to automatically clear "Shared Queue" variables at the end of the User Path check.
Export
With the Export button in the Actions group box, the current Virtual User check may be exported. In this case, NeoLoad creates an XML file containing all the sent requests, the server responses as well as the Load Generator log file. This may be useful for analyzing a script or when contacting the technical support team. Below is a sample of an XML export:
<?xml version="1.0" encoding="UTF-8" ?>
<Project user="JPetStore" population="Check-JPetStore-Population" lghost="localhost">
<StartContainer checkID="0" timestamp="703" objectID="2" objectName="JPetStore">
</StartContainer>
<StartContainer checkID="1" timestamp="797" objectID="3" objectName="Index"
size="1161" duration="109">
</StartContainer>
<StartPage checkID="2" timestamp="860" objectID="4" objectName="/jpetstore"
size="1161" duration="109">
</StartPage>
<Transaction checkID="3" timestamp="1000" objectID="5" objectName="http_1"
size="1701" duration="31">
<Request binary="false">
<Body><![CDATA[GET http://host/jpetstore/ HTTP/1.1...]]></Body>
</Request>
<Response code="200" type="text/html; charset=UTF-8">
<Headers><![CDATA[HTTP/1.1 200 OK...]]></Headers>
<Body><![CDATA[...]]></Body>
</Response>
</Transaction>
...
<LoadGeneratorLogFile fileName="VirtualUser.zip" nbEntry="1">
2012/08/20 12:00:08 INFO - neoload.LG_INFO: Starting LoadGenerator...
...
</LoadGeneratorLogFile>
</Project>
Import
NeoLoad allows importing a Virtual User check that has been exported in XML format with a click on the Import button. The file to be imported can then be selected.
Note: The Virtual User whose check file has been exported must be in the same state (requests, logical actions, etc.) at import as it was at export time. A Virtual User check file can be imported only after an export performed in NeoLoad 8.2.
Update recorded content
The Check User Path dialog helps you identify the number of changes between the recorded scenario and the checked one, and to pinpoint every change in the application with the Compare function, for example changes in paths, in URL arguments, in AJAX calls, and so on. The Update Recorded Content function makes it possible to merge the changes in the User Path, and synchronize it with the latest version of the application. It is particularly useful for test script maintenance.
Note: When the Check User Path dialog displays a Difference percentage, you can get a compared view on the selected element with a click on the Compare with recording button or with a double-click on the Difference cell. The Comparison dialog that pops up includes icons to switch between requests, changes, and blocks. For more information, see Compare requests and responses.
The Update Recorded Content feature is available in the Check User Path dialog:
-
for the entire User Path with:
-
a right-click in the User Path, then a click on Update Recorded Content, or
-
a click on the Advanced button, then on the Update button in the Advanced Parameters dialog
-
-
for selected pages in the User Path tree:
-
with a right-click on a selected page, then a click on Update Recorded Content
-
Alerts are raised when:
-
Requests cannot be played.
-
Errors are detected.
Errors must be fixed in the User Path definition, as described in Check a user path.
A click on the Overwrite button updates the entire User Path to the current application, except for the requests which cannot be played. In the Check User Path dialog, the Difference column shows 0%.
Note: Updating the recorded content of a User Path is definitive and cannot be reverted. To back up a User Path before it is updated, you can export it, as described in Export.
To update the recorded content of a User Path, follow these steps:
-
Select a User Path and start a User Path check.
-
In the Check User Path dialog, click Start checking.
-
Right-click the User Path tree, and, when differences are detected, click Update Recorded Content.
-
Click Overwrite to confirm the update.