Upgrade an SVN project
The upgrade process consists of two steps:
One team member migrates the local project onto the collaboration server.
The other team members check out the remote migrated project from the collaboration server.
Migrate a project
After upgrading to NeoLoad2024.1, designate a team member to perform the migration. It is advised to designate the member with the most advanced project design. The other team members will check out the remote migrated project which will overwrite their local project.
Before starting the migration process, it is necessary to pay attention to the following prerequisites:
All the other team members must publish their local projects from a previous minor version of NeoLoad onto the collaboration server. At that moment, they must stop updating it until the migration is complete.
The local disk must have enough free space because it is used as a temporary workspace for the migration process.
It is advised to back up the project in the previous version of NeoLoad before migrating it. For more information, see Export a project.
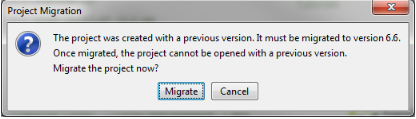
Migrating a project after upgrading NeoLoad is necessary to benefit from all the new functions available in the new major or minor version installed. The project migration process is fully automated. When a project is opened in NeoLoad, it detects the creation version and converts it.
The local project migration is suspended, because the associated remote project must be upgraded beforehand to be compatible. NeoLoad prompts for it to be migrated.
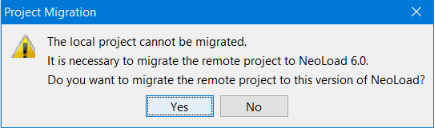
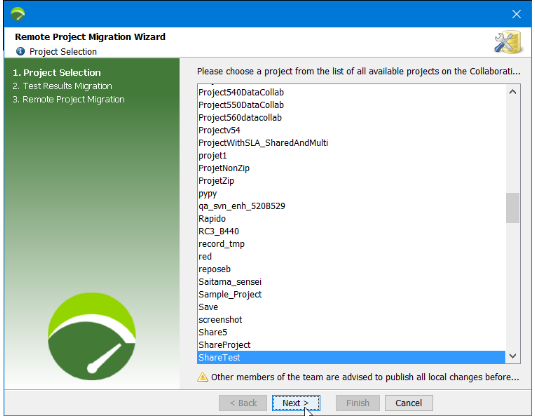
Choosing to migrate the remote project starts the Remote Project Migration Wizard.
Note: The Remote Project Migration Wizard can be accessed directly with the Share > Migrate Remote Project command available in the Welcome to NeoLoad2024.1 screen.
A click on the Next button displays the second screen of the wizard to include the test results published for the selected project in the migration process

The migration process may take a few minutes.
Clicking the Next button launches the migration process.
All the operations for the migration are executed until a message indicates that the migration is over. To close the wizard, click Finish. The project on the collaboration server is now upgraded in NeoLoad2024.1.
Opening the local project again makes it possible to resume its migration. Migrating a project after upgrading NeoLoad is necessary to benefit from all the new functions available in the new major or minor version installed. The project migration process is fully automated. When a project is opened in NeoLoad, it detects the creation version and converts it.
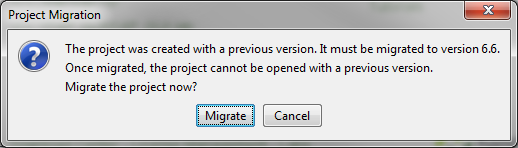
Clicking Migrate validates the migration process.
The tester can publish the local migrated version onto the collaboration server to share all the components which can be published in NeoLoad2024.1. For more information, see Publish a project.
The other team members must check it out to get the latest version of the project.
Migration process
To migrate a collaborative project on the collaboration server, follow these steps:
Ensure that:
All the test team members have published their local versions of the project.
Nobody in the test team is making any change to the project.
You have enough free space on the local disk where the migration is performed.
You have a backup copy of the project.
The project is open.
In the message box for the local project migration, click Yes.
In the warning box for the remote project migration, click Yes.
In the Remote Project Migration Wizard, select the project you want to migrate. Click Next.
When necessary, select Design + Results to include the test results in the migration. Click Next.
Wait for the migration to be processed. Click Finish.
The project on the collaboration server is upgraded in NeoLoad2024.1.
Open your local project again.
In the message box for the local project migration, click Yes.
When your local project is migrated in NeoLoad 2024.1, you can publish it onto the collaboration server.
Tell the other team members to check out the remote project.
Locally check out a migrated remote project
After the remote project has been migrated in NeoLoad2024.1, designate team members to do the following:
Check out the remote migrated project to get the latest version of the project.
To check out the remote project, NeoLoad 2024.1 must be started. The Welcome to NeoLoad 2024.1 screen is displayed. To check out a project, the Share > Check Out Project command must be chosen. The list of the projects shared on the collaboration server is displayed
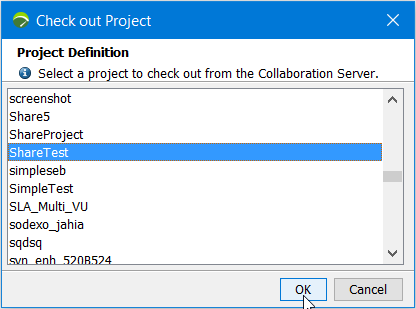
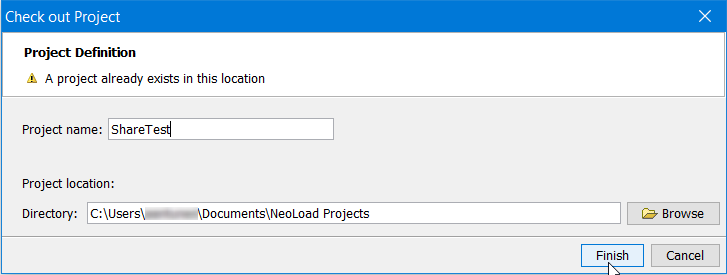
The project to check out must be selected in the list. Once selected, NeoLoad 2024.1 makes it possible to give it a local name. The name can be different from the project collaborative name. By default, the suggested local name is the same as the remote one.
Click Finish to launch the retrieval of the project. The Project Sanity Check function starts automatically in the background. When consistency errors or warnings are detected, the Project Sanity Check wizard is displayed, as described in Check the sanity of a project at design time.
To check out a project, follow these steps:
Choose Share > Check Out Project.
Select a project.
Click OK.
When necessary, enter another name for the local duplicate.
When necessary, change the local storage directory.
Click Finish.
If the Project Sanity Check wizard is displayed, you are able to see the project consistency errors or warnings.