Contribute to a collaborative project
When every member in a test team has a local version of a collaborative project, they can work on it simultaneously. Changes remain local until the project is published and shared on the collaboration server. Testers can publish only the Virtual Users they are in charge of.
The other team testers can update their local version of the project with the one available on the collaboration server get the latest changes implemented and shared by the other test members.
When canceling the local changes on the project proves necessary, NeoLoad 8.2 makes it possible to revert back to the last updated version.
Note: To ensure all contributions to the local project are consistent, NeoLoad 8.2 starts the Sanity Check function every time the project is opened, updated, or reverted. The Project Sanity Check wizard can be also started manually at any time. For more information, see Check a project with the Sanity Check wizard.
Publish a project
Publishing a project consists in pushing a local project onto the collaboration server in order to make it available for the other test team members.

The publishing action is driven through a wizard. The wizard lists the steps to publish all the changes brought to a local project:
Selecting the elements among the ones which can be published
Entering a comment for the publication
Completing the publication
Note: Two members may well bring changes on the same section in the design tree. This may generate conflicts. Although NeoLoad can handle such conflicts in most situations, it is strongly advised to read Test in collaborative mode.
For SVN
For more information about how to configure the connection to an SVN server, see Configure the connection to a collaboration server
To open the project publication wizard, the Share > Publish Project command must be chosen or the Publish project elements on Collaboration Server button in the toolbar must be clicked. The Elements Selection screen is displayed.
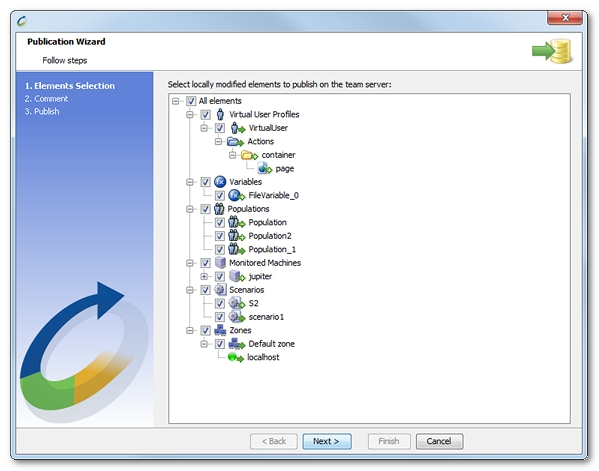
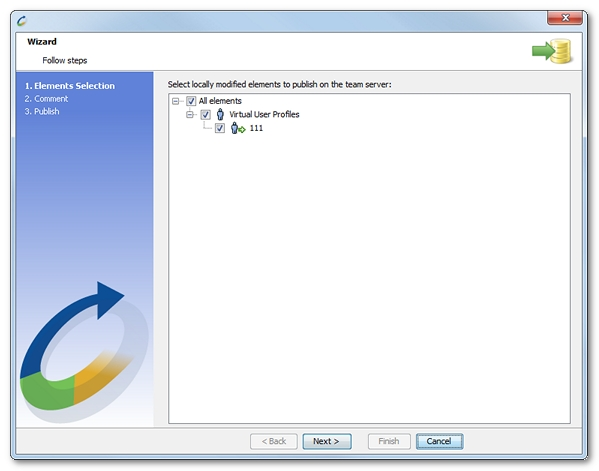
The elements to publish are listed in the form of a design tree, making it possible to publish a selection of them:
Servers to publish all servers
<host> to publish only the <host> server
Virtual User Profiles to publish all Virtual Users
<virtual_user> to publish only the <virtual_user> Virtual User. In order to be legible and although the publishing process manages the content of Virtual Users down to the requests level, the wizard develops Virtual Users down to pages level only.
Shared Containers to publish all Containers
<shared_container> to publish only the <shared_container> Container
Variables to publish all Variables
<variable> to publish only the <variable> Variable
Project Settings to publish all project Preferences
<setting> to publish only the <setting> preference
Populations to publish all Populations
<population> to publish only the <population> Population with its Virtual User Profiles breakdown and its parameters (browser profile, WAN emulation, etc.)
Monitoring Agents to publish all monitoring agents
localhost to publish only the monitoring agent for the localhost
<machine> to publish only the monitoring agent for the <host> machine
Monitored Machines to publish all machines
<machine> to publish only the <machine> machine and its monitors
<monitor> to publish only the <monitor> monitor for the <machine> machine, with its associated monitors
Scenarios to publish all scenarios
<scenario> to publish only the <scenario> scenario with its duration and load policies
Load Generators to publish all Load Generators
Default zone to publish all the Load Generators for the default zone
<machine> to publish only the Load Generator available on the <machine> machine, with the proxy settings
localhost to publish only the Load Generator available on the local host machine
<zone> to publish all the Load Generators for the <zone> zone
<machine> to publish only the Load Generator available on the <machine> machine in this <zone> zone, with the proxy settings
Note: By default, the All elements entry is selected. The option includes the whole project for the publication process. This ensures that the project on the collaboration server remains consistent. However, some elements can be unselected before publishing the project to prevent inconsistencies within the project configuration (e.g. a request without a server to query).
Every element which can be published carries an icon bringing information about the kind of changes, and the way of the collaborative transaction. The publishing direction is always from the local machine toward the server. It is represented with a right-oriented green arrow.
| Icon | Meaning |
|---|---|
 | Green arrow with a + (plus) sign: The vu_1 Virtual User is going to be pushed onto the server. |
 | Green arrow: The container Container is going to be modified on the server. |
 | Green arrow with a – (minus) sign: The delay delay is going to be deleted on the server. |
NeoLoad publishes only the elements selected in the tree view. Depending on the type of the selected elements, NeoLoad may also select the associated elements. For example, when elements are renamed, NeoLoad automatically selects the deletion and the addition of the elements.
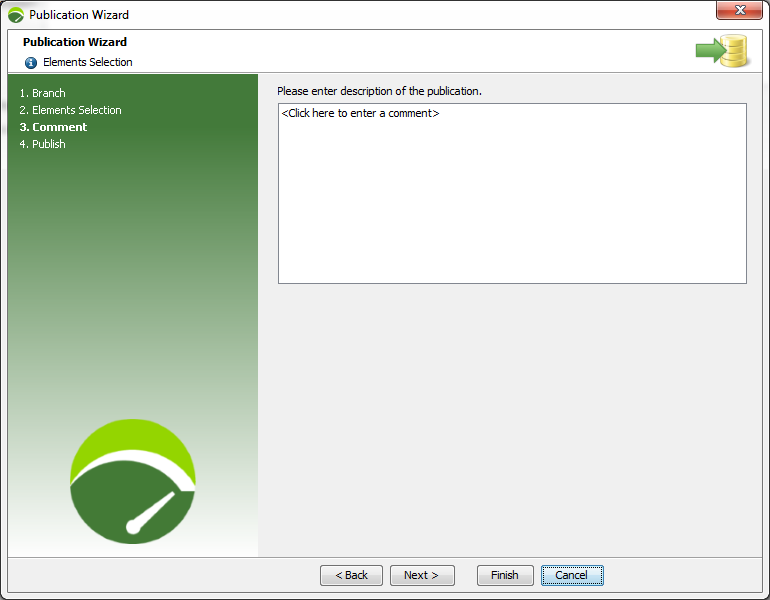
In the publication wizard, a click on Next displays the Comment dialog.
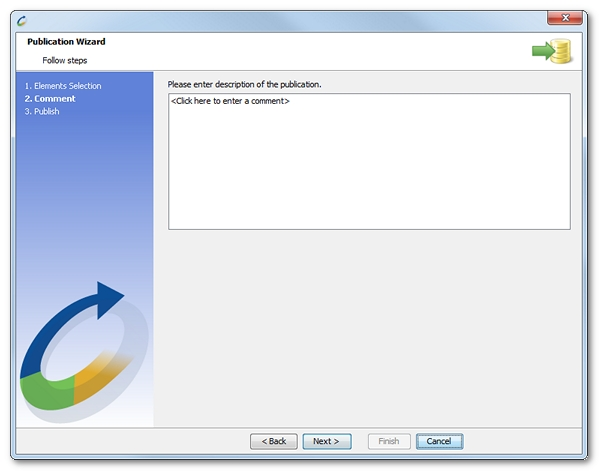
A description of the publication can be entered. The comment will be available to the other team members who update their local project with the elements published. A click on Next displays the Publish dialog. All selected elements are pushed onto the collaboration server.
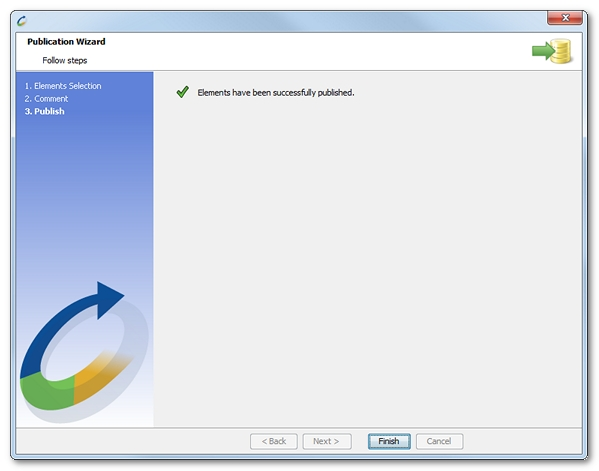
A click on Finish closes the publication process.
Note: Like other collaborative actions, publishing a project causes the complete deletion of the Cancel/Recover actions list.
When, on publishing a project, a subset of selected element has been modified and published by another team member, NeoLoad determines that the elements to publish are out of date and need be updated before they are published. Publication is only available after the project is updated and the potential conflicts are solved. For more information, see Update a project.
To publish a project on an SVN server, follow these steps:
Click Share > Publish Project.
In the Publication Wizard first screen, select the elements you want to load onto the collaboration server.
Click Next.
In the Comment screen, you can enter a description for the other team members.
Click Next to launch the publication process.
Click Finish to close the Publication Wizard.
For GIT
For more information about how to configure the connection to a GIT server, see Configure the connection to a collaboration server
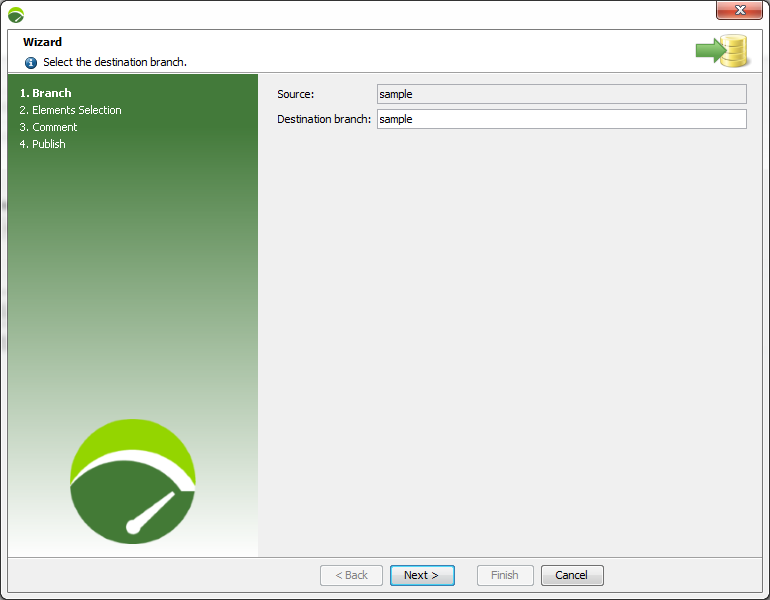
To open the project publication wizard, the Share > Publish Project command must be chosen or the Publish project elements on Collaboration Server button in the toolbar must be clicked. The Branch screen is displayed.

Source: The name of the current branch or current commit ID.
Destination branch: The location where the project is to be published onto. The project can only be published on a new branch.
Ticking the Tag check box allows entering a tag in the facing field to identify a significant modification in the project. This heps clearly identify a project.
A click on Next displays the Elements Selection screen.
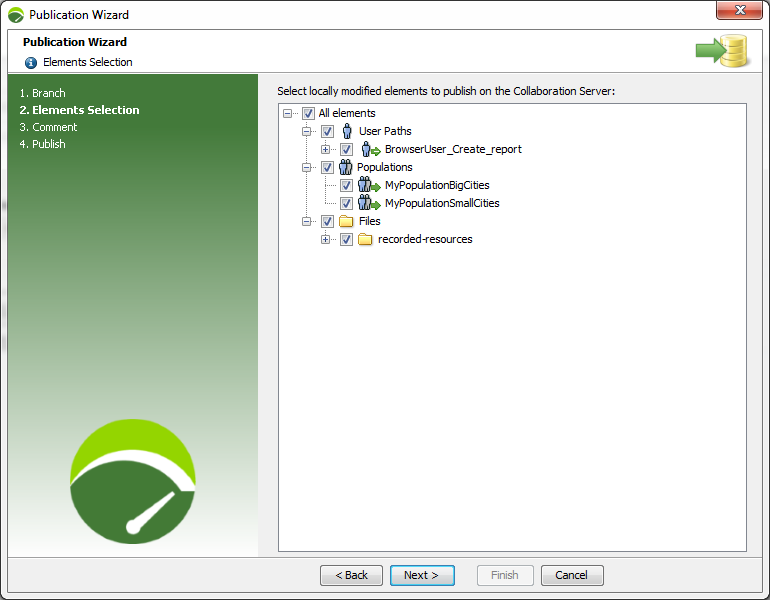
The elements to publish are listed in the form of a design tree, making it possible to publish a selection of them:
- Servers to publish all servers
<host> to publish only the <host> server
Virtual User Profiles to publish all Virtual Users
<virtual_user> to publish only the <virtual_user> Virtual User. In order to be legible and although the publishing process manages the content of Virtual Users down to the requests level, the wizard develops Virtual Users down to pages level only.
Shared Containers to publish all Containers
<shared_container> to publish only the <shared_container> Container
Variables to publish all Variables
<variable> to publish only the <variable> Variable
Project Settings to publish all project Preferences
<setting> to publish only the <setting> preference
Populations to publish all Populations
<population> to publish only the <population> Population with its Virtual User Profiles breakdown and its parameters (browser profile, WAN emulation, etc.)
Monitoring Agents to publish all monitoring agents
localhost to publish only the monitoring agent for the localhost
<machine> to publish only the monitoring agent for the <host> machine
Monitored Machines to publish all machines
<machine> to publish only the <machine> machine and its monitors
<monitor> to publish only the <monitor> monitor for the <machine> machine, with its associated monitors
Scenarios to publish all scenarios
<scenario> to publish only the <scenario> scenario with its duration and load policies
Load Generators to publish all Load Generators
Default zone to publish all the Load Generators for the default zone
<machine> to publish only the Load Generator available on the <machine> machine, with the proxy settings
localhost to publish only the Load Generator available on the local host machine
<zone> to publish all the Load Generators for the <zone> zone
<machine> to publish only the Load Generator available on the <machine> machine in this <zone> zone, with the proxy settings
Note: By default, the All elements entry is selected. The option includes the whole project for the publication process. This ensures that the project on the collaboration server remains consistent. However, some elements can be unselected before publishing the project to prevent inconsistencies within the project configuration (e.g. a request without a server to query).
Every element which can be published carries an icon bringing information about the kind of changes, and the way of the collaborative transaction. The publishing direction is always from the local machine toward the server. It is represented with a right-oriented green arrow.
| Icon | Meaning |
|---|---|
| Green arrow with a + (plus) sign: The vu_1 Virtual User is going to be pushed onto the server. |
| Green arrow: The container Container is going to be modified on the server. |
| Green arrow with a – (minus) sign: The delay delay is going to be deleted on the server. |
NeoLoad publishes only the elements selected in the tree view. Depending on the type of the selected elements, NeoLoad may also select the associated elements. For example, when elements are renamed, NeoLoad automatically selects the deletion and the addition of the elements.
In the publication wizard, a click on Next displays the Comment screen.
A description of the publication can be entered. The comment will be available to the other team members who update their local project with the elements published.
A click on Next displays the Publish dialog. All selected elements are pushed onto the collaboration server.
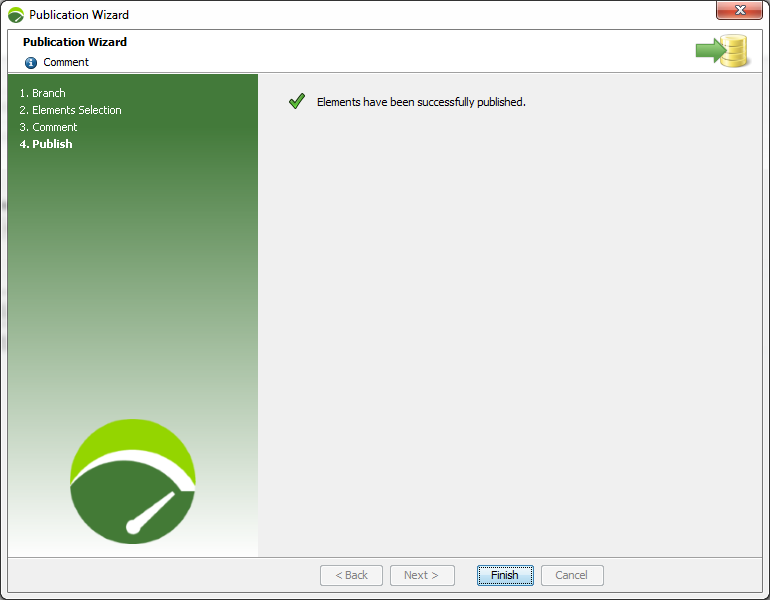
A click on Finish closes the publication process.
To publish a project on a GIT server, follow these steps:
Click Share > Publish Project.
In the Branch screen, enter the location where the project is to be published onto in the Destination branch field.
In the Elements screen, select the elements you want to load onto the collaboration server.
Click Next.
In the Comment screen, you can enter a description for the other team members.
Click Next to launch the publication process.
Click Finish to close the Publication Wizard.
Publish a User Path
NeoLoad makes it possible to publish a single User Path of a project. When changes are applied on a given User Path, it may be useful to publish that User Path only. This saves time as it relievesNeoLoad from searching elements to publish on the whole project.
For SVN
To publish a User Path on an SVN server, NeoLoad must be configured to connect to an SVN collaboration server. For more information, see Configure the connection to a collaboration server.
To publish a User Path on an SVN server, follow these steps:
In the User Path tree, select a User Path.
Right-click on the selected User Path and select Publish this User Path.
The publication wizard displays the selected User Path with its dependencies in the elements tree view.
Follow the wizard steps.
Click Finish.
For GIT
To publish a User Path on a GIT server, NeoLoad must be configured to connect to a GIT collaboration server. For more information, see Configure the connection to a collaboration server.
To publish a User Path on a GIT server, follow these steps:
In the User Path tree, select a User Path.
Right-click on the selected User Path and select Publish this User Path.
The GIT publication wizard displays to help you publish the User Path in a few steps.
Follow the wizard steps described in Publish a project.
Click Finish.
Update a project
Updating a project consists of downloading it from the collaboration server to benefit from all the changes published by the other team members.
A shared project must be opened in NeoLoad to be updated. A click on the Share > Update Project command or on the Update project elements from Team Server button in the toolbar displays the update wizard. The step-by-step wizard helps update all the changes brought by the team members.
The last wizard step includes the Launch Project Sanity Check option in the last wizard screen makes it possible to verify the updated project and raise blocking or warning issues, when any. For more information, see Check the sanity of a project at design time.
For more information about updating a project, see Manage updates of a collaborative project
To update a project, follow these steps:
Choose Share > Update Project.
Follow all the wizard steps.
Select the option Launch Project Sanity Check if desired.
Click Finish.
Cancel project changes
Canceling the changes brought to a project makes it possible to recover the version of the project before it was last updated. All changes made meanwhile are ignored.
To cancel a project changes, the Share > Cancel local changes command must be chosen. In the Elements Selection step of the wizard, only the elements which have been modified after the last update can be selected. By default, no element is selected.
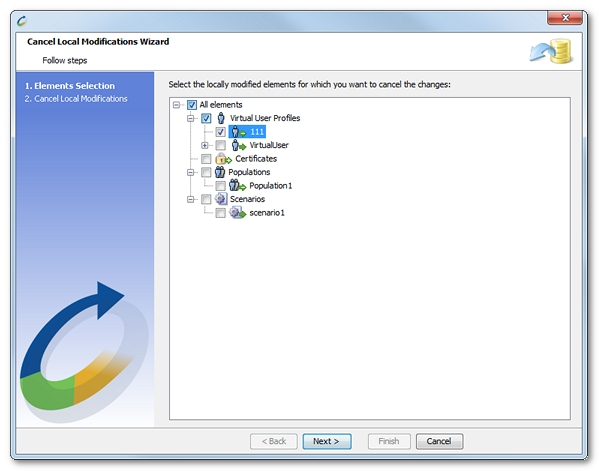
Every element to cancel carries an icon bringing information on the kind of change and the direction of the collaborative operation. Here, the direction is similar to a publication, i.e. as if the changes are not canceled. The direction is always from the local machine toward the server. It is represented with a green, right-oriented arrow.
| Icon | Meaning |
|---|---|
| Green arrow with a + (plus) sign: The vu_1 Virtual User is going to be pushed onto the server. |
| Green arrow: The container Container is going to be modified on the server. |
| Green arrow with a – (minus) sign: The delay delay is going to be deleted on the server. |
Click Next to validate the cancellation of the modifications.
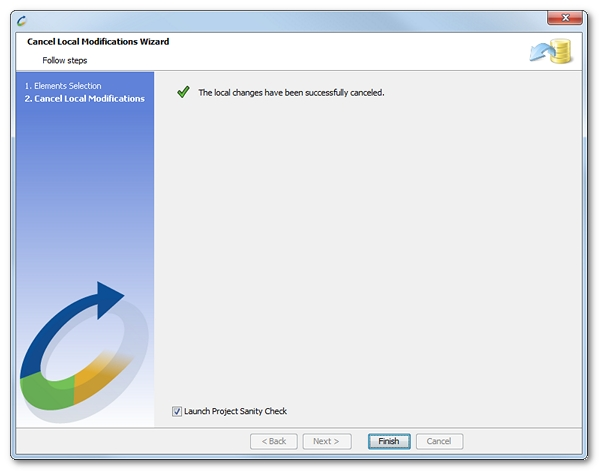
The last wizard step includes the Launch Project Sanity Check option which makes it possible to verify the reverted project and raise blocking or warning issues, when any. For more information, see Check the sanity of a project at design time.
Note: Canceling changes never brings the content of the project back to the state of the version stored on the server. The project must be updated explicitly. For more information, see Update a project.
To cancel a project changes, follow these steps:
Choose Share > Cancel local changes.
Follow the steps in the wizard.
Select the option Launch Project Sanity Check if desired.
Click Finish to close the wizard.
Check a project with the Sanity Check wizard
The Project Sanity Check wizard goes through the organization of a project. When consistency issues are detected, it displays a list of warnings and errors which help ensure the quality of the project after:
checking out a project from the collaboration server
updating a local project with the changes available on the collaboration server
canceling changes on a local project
selecting the Tools > Project Sanity Check command
Note: The Project Sanity Check wizard is optional when updating or canceling a local project. It is displayed only when the Launch Project Sanity Check option is checked in the last screen of the Publication wizard and Cancel Local Modifications wizard.
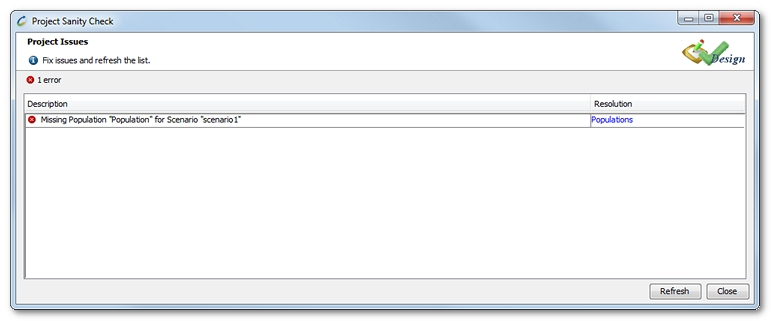
The Execution Sanity Check dialog lists and depicts the errors and warnings detected:
Description describes the nature and the cause of the notice.
Resolution gives a link, when available, to access the defective scenario component.
The Refresh button must be clicked to update the list whenever changes are brought to the test design. The Execution Sanity Check dialog is non-modal, making it possible to check and fix issues at the same time.
Sharing components of a project among different team testers may bring a number of inconsistencies when opening, publishing, updating, or reverting a collaborative project with the collaboration server. The Project Sanity Check wizard may raise the following issues about missing elements in a collaborative project.
For more information about collaborative projects, see Design collaborative projects.
Message | |
Description | In the collaborative project, Population Y is configured to use a Virtual User X that does not exist. |
Resolution | Population Y must be modified, as described in Configure a population or the missing Virtual User X must be recreated. |
 Missing Virtual User X in Population Y
Message |
|
Description | In the collaborative project, scenario Y is configured to use X population that does not exist. |
Resolution | Scenario Y must be modified or missing population X must be recreated, as described inPopulations. |

Message |
|
Description | In the collaborative project, scenario Z uses Y population which is missing. Or scenario Z uses Y population which requires a missing X population. |
Resolution | Missing Y population must be recreated, as described in Populations. Or the runtime parameters of Y population must be modified, as described in Population advanced parameters or the missing X population must be recreated, as described in Populations. |

Message |
|
Description | In the collaborative project, Y request refers to X server that does not exist. |
Resolution | X server must be recreated, as described in Servers or the Y request must be modified, as described in HTTP requests |

Message |
|
Description | In the collaborative project, Y monitor refers to X server that does not exist. |
Resolution | X server must be recreated, as described in Servers or the Y monitor must be modified, as described in Configure a monitored machine. |

Message |
|
Description | In the collaborative project, the same Load Generator X is declared twice. |
Resolution | The Load Generator duplicate must be renamed or removed, as described in Zones and Load Generator hosts. |

For more information about the Sanity Check, see Check the sanity of a project at design time.