Submit defects
With defects, you can record any problems you encounter, at any stage of test run execution. This lets you create or reuse a Jira issue that describes the problem in detail. You can then assign this defect to the appropriate team and include it in your product development cycle.
We also offer an AI tool that uses the information you've already entered into the Test Pad to quickly record a defect. This can include useful description content, such as steps to replicate and links to the affected test run. With this feature, you won't need to manually track this information down.
After your team addresses the defect, create a new test run to make sure the problem is fixed.
Manage defects in the Test Pad
In the Test Pad, you can submit a defect for an individual step or for the whole test run:
-
If the defect affects the entire test run, select the Submit Defect button at the top-right corner of the test run.
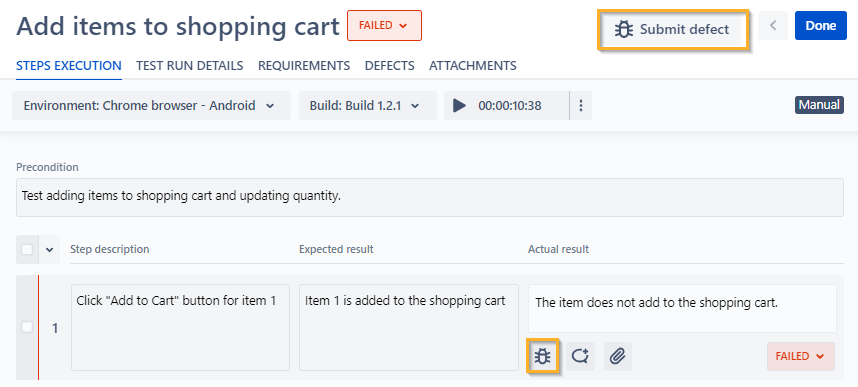
Submit a defect for a test run or for an individual test step
-
If the defect only affects an individual test step, select the
 button next to the appropriate test step.
Whether you attach a defect to the entire test run or an individual test step, choose one of the following options to add a defect:
-
Add new defect, if you want to manually create a new Jira issue to attach as a defect. Fill out all mandatory fields in the subsequent dialog and select Create.
-
Add an existing defect, if you want to attach an existing Jira issue as a defect. In the subsequent dialog, choose the issue you want to attach as a defect and select Add. You can add any type of issue that exists in your current project.
-
Create a defect with AI, if you want to let our AI tool create a new, pre-filled Jira issue for you. In the subsequent dialog, make sure all of the AI-generated information is correct, adjust anything you need, and select Create.
When you create a new defect, Jira defaults to the Bug issue type (opens in new tab). However, you can specify any issue type you want. This is useful if your Jira project uses different issue types to track different types of defects.
View defects by test run
To view defects by test run, go to the Test Pad, select the test run you want to review and open the Defects tab.
You can use this tab to view existing defects or to submit new defects for the entire test run.
View defects by test case
Not only can you add and view defects for each test run in the Test Pad, you can also view defects associated with a test case in Test Design.
To view defects attached to a test case, go to the Test Design tab and open the test case you want to review. Then, select Defects from the Test Case Panel. Here, you can view all defects created from any test runs attached to the test case you selected. Please note that you can only create new defects in the Test Pad.

View defects associated with each test case
Unlink existing defects from a test run
You can unlink an existing defect through either the Steps Executions tab or the Defects tab. Both options offer the exact same functionality.
Unlink via the Steps Executions tab
To unlink an existing defect in the Steps Executions tab, follow these steps:
-
Go to the Test Pad and select the desired test run.
-
In the Steps Execution tab, select the
button next to the test step whose defect you want to unlink. -
Under Linked Defects, hover over the relevant defect and select x.

Unlink a defect for an individual test step through the Steps Execution tab
Unlink via the Defects tab
To unlink an existing defect in the Defects tab, follow these steps:
-
Go to the Test Pad and select the desired test run.
-
In the Defects tab, under Steps linked defects, hover over the relevant defect and select x.
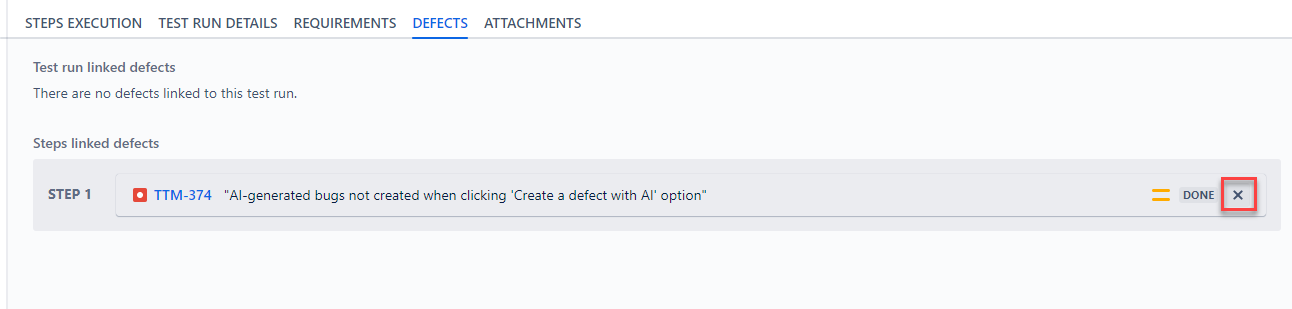
Unlink a defect for an individual test step through the Defects tab
What's next
Now that you've created your defects, check how you can analyze your test results.