Image-Based Test Automation
Screen objects can be found and steered by means of images. This requires a control to be created by capturing an image which is used for identification later on. This image is then searched and an according action is performed upon control steering.
Please note that the system starts searching for images on the monitor that is primarily used upon test execution.
Image-Based Test Automation controls are steered like any other Tosca standard controls. For further information on how to steer controls, please refer to "Steering Controls".
Creating controls
Make sure you have the required application (i.e. browser for XBrowser controls) in the foreground before you start:
-
Select Scan->More->Image-based from the context menu of a Module folder. A window for creating the image will open.
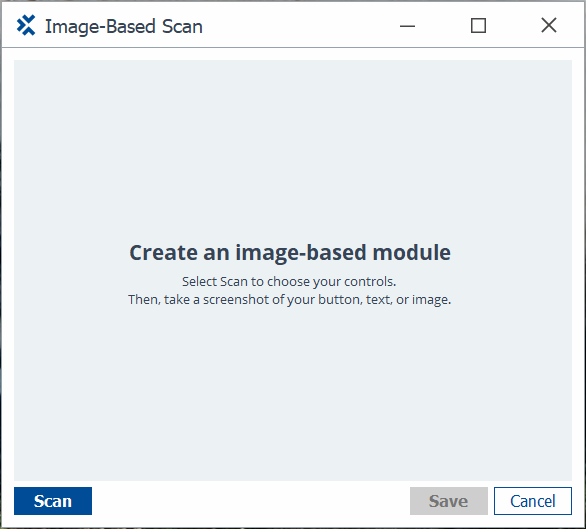
Window used for capturing an image
-
Select Scan to create your control and screenshot. The Image-Based Scan window then minimizes, and the cursor changes to a reticle.
-
Select the area you want to capture. Tricentis Tosca searches for this image when your test runs.
-
Select the control type via the corresponding button, e.g. Button.
This option is only available when you create a new control.
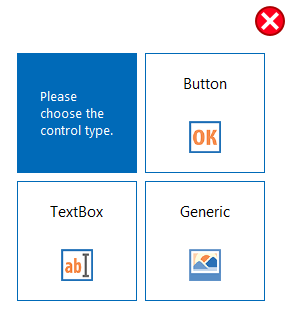
Selecting the control type
-
Select Enter to create the image.

Creating a screenshot
-
The upper section of the window shows the control's image, and the lower section shows the image used for identifying the control area. The images are identical here since the image of the control is used for identification purposes.
-
Enter a unique name for the control in the Name field.
You can store several images for a control. For example, if a toggle button changes according to the context. Identification requires that one of the stored images is found.
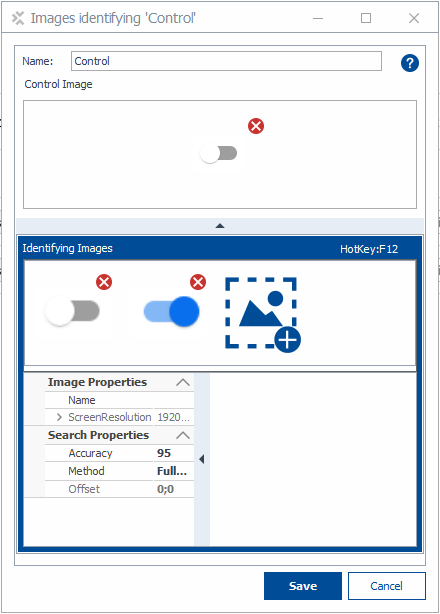
Capturing toggle button screenshots
-
Select Save to create the control.
Identifying controls via an image anchor
You can add an anchor to help identify controls. Tricentis Tosca captures the distance between the control and the image anchor as the offset.
This is also possible even if the image anchor and the control overlap each other.
-
Create an image-based control (see Creating controls) but select the plus sign in the blue square before saving your control.
The Image-Based Scan window then minimizes, and the cursor changes to a reticle.
-
Define the area to be captured in a screenshot for identifying the control.
Tricentis Tosca marks both areas with red rectangles and an arrow pointing from the image anchor to the control.

Defining the distance between the image anchor and the control
-
Assign a unique name to the control in the Name field.
The distance between the control image and the image used for identification is shown as Offset property in the Search Properties section of the window.
Properties and configuration options
|
Option |
Description |
|---|---|
|
ScreenResolution |
This shows the image resolution at the time the image is being created. This value cannot be modified. |
|
Accuracy |
Indicates up to which accuracy level the found image must match the stored image in percent. |
|
ActionPoint |
This shows the exact position where operations are performed upon steering, for instance a click into the center of a button. This value cannot be modified. |
|
ControlArea |
Defines the screen area for the control to be steered (check out "Identifying controls via an image anchor"). This value cannot be modified. |
|
Mode |
This option can be modified, provided that the image to be used is already applied for identifying an existing HTML control. The search mode for identifying a control is defined here. The following values are possible:
|
|
Indicates the distance from the control to the stored screenshot (check out "Identifying controls via an image anchor"). This value cannot be modified. |
Mapping images used for identifying controls in Tosca Commander™
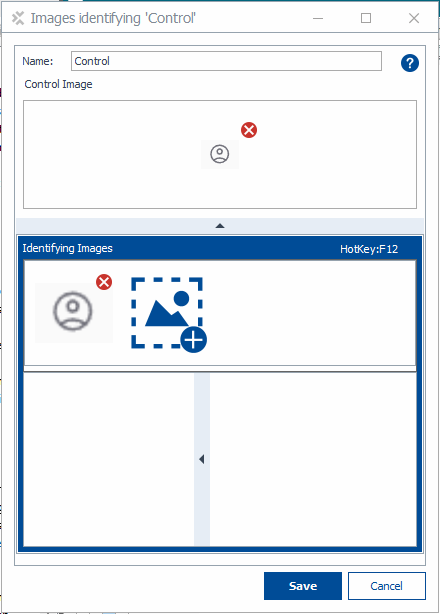
Image-based controls have an additional tab called Identification images in the details view of Tosca Commander.
Here you can view the control image along with all images used for identifying the control.

Identification images tab in the details view
-
Click on the Edit images button if you would like to edit your images. As a result, the window used for creating new images will open (check out " Capturing images for identifying controls").
-
Double-click onto an image to open this in a new window.
Verifying texts
Texts of image-based controls which are found via images can be verified by using either optical character recognition (OCR) or the UIA interface. Tosca uses the UIA interface by default for verifying texts.
Verifying image texts via OCR (Tesseract)
Texts of image-based controls are verified. The optical character recognition engine Tesseract is used for the verify operation.
The image is modified according to the Tesseract default settings in the Settings dialog prior to performing verify operations (check out "Settings - OCR").
If the system should be unable to identify the text immediately, these settings will be automatically modified as follows (SmartOCR):
-
The setting UseMonochrom is disabled.
-
The value of the setting ScaleFactor is increased by 1.
-
The setting UseMonochrom is enabled and the gray scale value is set to 0.2 (MonochromBrightnessFactor).
-
The value of the setting MonochromBrightnessFactor is set to 0.05.
-
The setting UseInversion is enabled.
Tesseract settings can also be defined by using either test configuration parameters or Steering Params for one or more objects. As a result, the global settings of the Settings dialog are overwritten.
The test configuration parameter names match the setting names without any spaces, and they have the prefix Tesseract, e.g. TesseractScaleFactor.
ActionMode: Verify
Value: OCRText property and the string to be verified
This example verifies whether the value Google Search exists in the control image to be steered.

If the text is not found, the results of the steps taken are shown in the Detail column (SmartOCR).
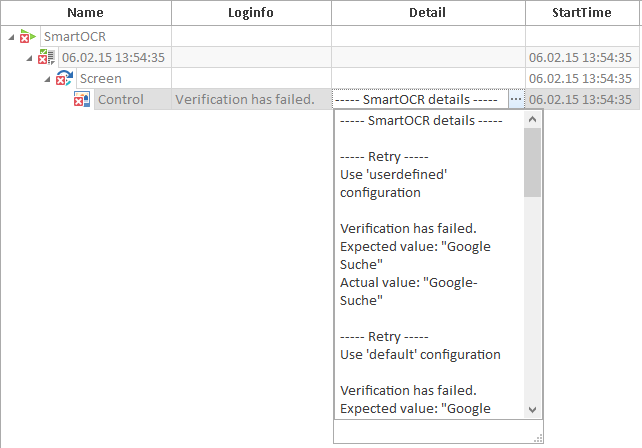
Test result in the Detail column
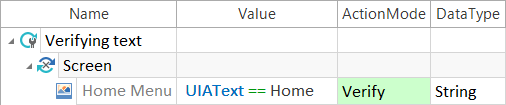
Verifying control texts via the UIA interface
Control texts are verified, but the control text does not necessarily match the text of the image that was captured for identification purposes. Verification is performed via the UIAText property. The ActionMode is set to Verify. The value defined in the Value column is verified.
The system verifies whether the value Home exists in the control to be steered.