Mobile Modules
The folder Engines->Mobile in the Standard subset contains Modules that perform specific tasks for the Mobile Engine 3.0.
Capabilities
Desired Capabilities let you define key parameters that control your test session behavior in Appium. These settings instruct the Appium Server on how to execute your tests. For more details on how to use Desired Capabilities in your tests, see Set Desired Capabilities.
The Engines->Mobile->Capabilities folder in the Standard subset contains the Modules that you can use to customize your test execution environment with capabilities.
Set Desired Capabilities
The Module Set Desired Capabilities allows you to apply Desired Capabilities to your test execution. It has to be the first TestStep of your TestCase (check out "Set Desired Capabilities for test execution").
The Module has the following ModuleAttribute:
|
ModuleAttribute |
Description |
|---|---|
|
Capability |
Specify which Desired Capability you want to apply:
Names and values are case-sensitive. |
In this example, you apply the Desired Capabilities skipServerInstallation and skipDeviceInitialization to reduce the startup time of Android test execution.
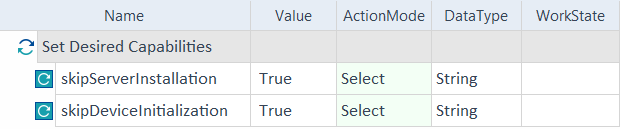
Set Desired Capabilities Module in a TestCase
Add Desired Capabilities
The Add Desired Capabilities Module allows you to add new capabilities to your test execution, without overriding any capabilities you already defined. For more information on how to use this Module, check out "Add Desired Capabilities for test execution".
The Module has the following ModuleAttribute:
|
ModuleAttribute |
Description |
|---|---|
|
Capability |
Specify which Desired Capability you want to apply:
Note that names and values are case-sensitive. |
In this example, you run your TestCase on multiple cloud providers and dynamically modify the capabilities. At the same time, you keep a set of shared capabilities that apply across all providers. To do so, you use both the Set Desired Capabilities and Add Desired Capabilities Modules.
When you run your tests on Tricentis Device Cloud (TDC), you set your Desired Capabilities to customize your tests as follows:
-
Wait up to 300 seconds before timing out, because you want to give your tests enough time to finish, if there are delays due to the device or network.
-
Select a random device from the cloud pool for testing, because you want to test a variety of devices. This helps catch device-specific issues and gives you broader test coverage.
-
Disable device screenshots, because you want to speed up test execution time by skipping unnecessary screenshot captures, especially when you don't need visual verification.
-
Configure the device to restart at the start of each session, because you want to ensure a clean environment for each test run, avoiding issues from leftover processes or data.
When testing on native apps, you add a Desired Capability to specify the app ID, which ensures the correct app launches on the device, while also applying the previously defined capabilities.
Without the Add Desired Capabilities Module, you would need to use the Set Desired Capabilities Module. This would require you to manually reconfigure the previous capabilities to include the app ID. Building your capabilities piece-by-piece makes your test setups smoother, more flexible, and less prone to errors.
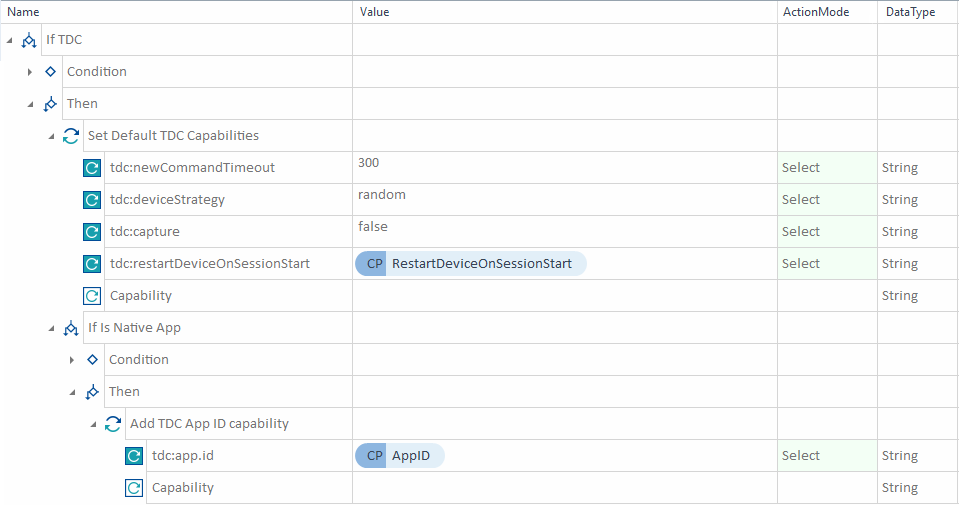
Set Desired Capabilities and Add Desired Capabilities Modules in a TestCase
Activate App
The Module Activate App allows you to activate a specific application when your test requires switching between multiple applications. You can find the Module in the Standard subset under Engines->Mobile->App Management.
It has the following ModuleAttribute:
|
ModuleAttribute |
Description |
|---|---|
|
PackageName |
Specify the unique identifier of the application you want to activate. |
In this example, you use the Module Activate App in a TestCase called My TestCase. Use it to activate the application with the value com.example.myapp, which you specify as the PackageName.

Activate App Module in a TestCase
Android Text Input (KeyEvents)
The Android Text Input (KeyEvents) Module allows you to send text input to an Android device via key events. This helps when your application doesn't support standard text input methodsor relies on hardware-style key interactions.
The Module has the following ModuleAttribute:
|
ModuleAttribute |
Description |
|---|---|
|
Text |
Specify the text you want to send to the device as key events. |
In this example, you use the Android Text Input (KeyEvents) Module in a TestCase called My TestCase. This TestCase sends the text test123 to the focused input field as Android key events.
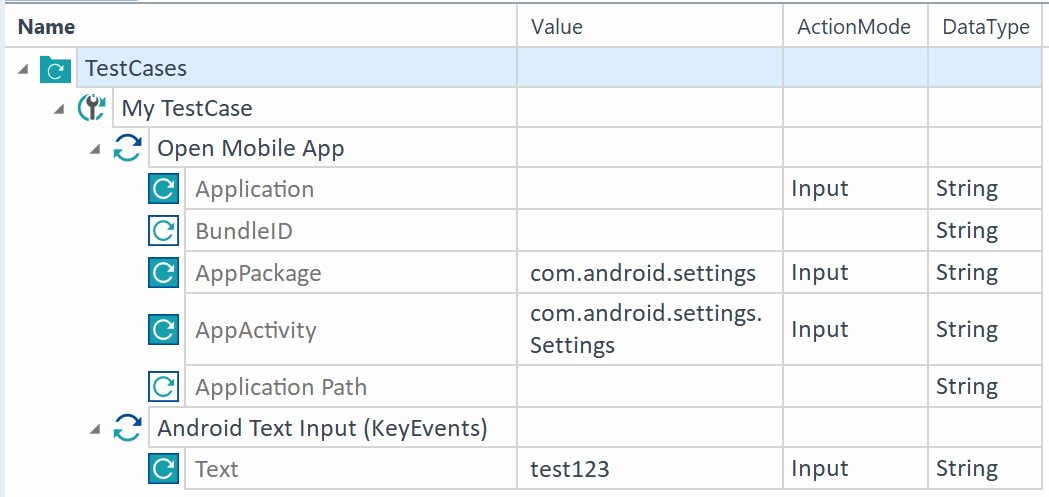
Android Text Input (KeyEvents) Module in a TestCase
Android Snackbar
The Module Android Snackbar allows you to steer snackbar in Android applications.
It has the following ModuleAttributes:
|
ModuleAttribute |
Description |
|---|---|
|
Text |
Specify the text that appears on the snackbar. |
|
Action |
If the snackbar contains a button, specify the action you want to perform on it. |
In this example, you perform the following actions:
-
You open the mobile application with the Module Open Mobile App.
-
You click on the button Show SnackBar With Delay, which triggers the snackbar.
-
You use ActionMode WaitOn to wait until the snackbar with the text message Speed changes everything appears.
-
You verify whether the message is Speed changes everything.
-
You click the button on the snackbar to close it.

Android Snackbar Module in a TestCase
Click On Screen
This Module allows you to perform a tap gesture on a specific point of the mobile device screen.
It has the following ModuleAttributes:
|
ModuleAttribute |
Description |
|---|---|
|
X |
Horizontal click position. Specify the x-coordinate either in percent or pixels:
|
|
Y |
Vertical click position. Specify the y-coordinate either in percent or pixels:
|
In this example, you perform a tap gesture at 10% of the x-coordinate and at 50% of the y-coordinate from the top left corner of the screen.
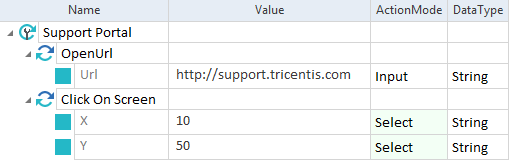
Click on Screen Module in a TestCase
Check If App Is Installed
The Module Check If App Is Installed allows you to verify whether an application is installed or uninstalled. You can find the Module in the Standard subset under Engines->Mobile->App Management.
It has the following ModuleAttributes:
|
ModuleAttribute |
Description |
|---|---|
|
AppID |
Specify the application you want to check. To do so, enter the bundle ID (iOS) or package name (Android) of the application. |
|
Result |
Specify the state of the application. Possible values are:
|
In this example, you use the Module Check If App Is Installed in a TestCase called My TestCase. Use it to check if the application with the AppId value com.example.myapp is installed by setting the TestStepValue Result to True.

Check If App Is Installed Module in a TestCase
Context Management
The Context Management folder contains Modules that let you change and retrieve Appium contexts during a mobile test. This is useful when you test hybrid applications that contain both native and web content.
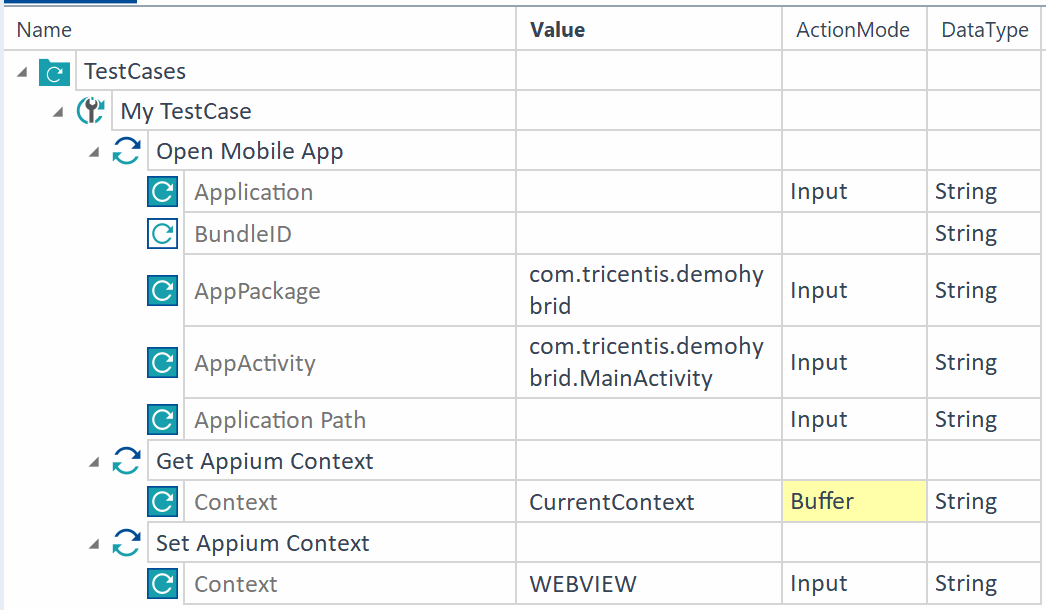
Get Appium Context
The Get Appium Context Module retrieves the currently active Appium context (for example, NATIVE_APP or a WEBVIEW). Use this module when you test hybrid applications to identify which context is active before switching contexts with Set Appium Context when testing hybrid applications that contain both native and web content.
It has the following ModuleAttribute:
|
ModuleAttribute |
Description |
|---|---|
|
Context |
Name of the buffer in which the current context name should be set. |
Set Appium Context
The Set Appium Context Module switches the active Appium context to the specified value. Before using this module, retrieve the currently active Appium context with Get Appium Context to ensure that you switch to the correct context when testing hybrid applications that contain both native and web content.
|
ModuleAttribute |
Description |
|---|---|
|
Context |
Name of the context to switch to. |
In this example, you open a hybrid mobile app, retrieve the currently active Appium context, and then switch to the WEBVIEW context to continue testing web content inside the app.
Set Appium Context and Get Appium Context Modules in a TestCase
Download File from Mobile Device
The Module Download File from Mobile Device allows you to download a file from an Android device to a computer (check out "Transfer files to Android").
If the file already exists on the computer, the Mobile Engine 3.0 overwrites it.
It has the following ModuleAttributes:
|
ModuleAttribute |
Description |
|---|---|
|
Mobile Device Path |
Specify the full path to the file that you want to upload, including the file name and extension. Use forward slashes (/) in the path. Example: /sdcard/Download/abc.pdf On Samsung devices, replace Internal Storage with sdcard in the file path. For example, replace /Internal storage/Download/abc.txt with /sdcard/Download/abc.txt. |
|
Desktop Path |
Specify the full path to the location where you want to save the file, including the file name and extension. Example: D:\abc.pdf You can specify a different name for your file. |
In this example, you download the file example.png from your Android device to your computer.

Download File from Mobile Device Module in a TestCase
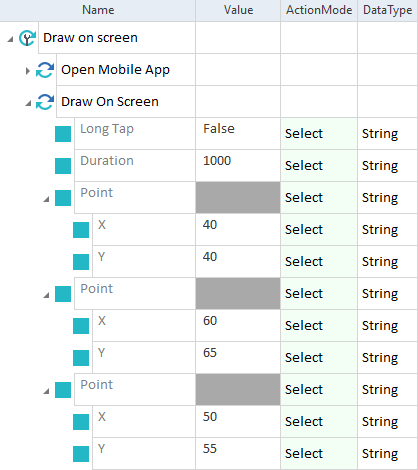
Draw On Screen
The Module Draw On Screen allows you to draw a shape directly on the screen.
The Module has the following ModuleAttributes:
|
ModuleAttribute |
Description |
|---|---|
|
Long Tap |
Specify whether you want to start the drawing with a tap or a long tap. Possible values are:
|
|
Duration |
Specify the duration of the movement in milliseconds. A higher value makes the movement slower and shorter. A lower value makes the movement faster and longer. This ModuleAttribute is optional. The default value is 300 ms. |
|
Point->X |
Specify the start x-coordinate in percent. The leftmost value is 0 and the rightmost value is 100. |
|
Point->Y |
Specify the start y-coordinate in percent. The top value is 0 and the bottom value is 100. |
In this example, you draw a simple shape with three swipe movements. Each movement lasts one second.
Draw On Screen Module in a TestCase
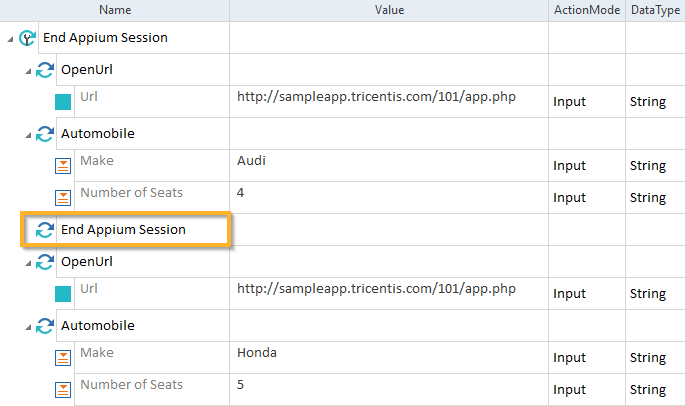
End Appium Session
The Module End Appium Session allows you to end the current Appium session.
In this example, you perform the following actions:
-
You start a new Appium session and open the URL http://sampleapp.tricentis.com/101/app.php.
-
You interact with the mobile controls on the screen.
-
In the End Appium Session TestStep, you use the Module End Appium Session to end your current Appium session.
-
You start a new Appium session and interact with the same screen.
End Appium Session Module in a TestCase
Execute Driver Script
The Execute Driver Script Module allows you to run a custom JavaScript on the Appium server within the current session. Use this module to run advanced Appium driver commands, such as invoking custom driver logic, accessing session-specific information, or running mobile actions. For regular actions, such as clicking on screen or opening a mobile app, use the dedicated Mobile modules.
The Appium server runs this code and returns the values defined in the script. You can use this module to bundle multiple Appium commands and run them as a single operation.
For more information on writing the JavaScript code, see the Appium documentation execute-driver-plugin (opens in new tab) and WebdriverIO (opens in new tab).
This Module works for devices connected via Tricentis Mobile Agent and Tricentis Device Cloud.
The Module has the following ModuleAttributes:
|
ModuleAttribute |
Description |
|---|---|
|
Driver Script from File |
Specify the name of the JavaScript file stored on the device running Tosca. You must specify either a Driver Script from File or an Inline Driver Script value. |
|
Inline Driver Script |
Enter the driver script as TestStepValue. You must specify either a Driver Script from File or an Inline Driver Script value. |
|
Result |
Returns all the values specified by the script. |
In this example, you verify that exactly three browser tabs are open and that their titles include Google, Wikipedia, and Demo Web Shop by evaluating the result returned from a driver script.

Execute Driver Script Module in a TestCase
Execute Driver Command
The Execute Driver Command Module allows you to run Appium mobile commands during an active Appium session.
It has the following ModuleAttributes:
|
ModuleAttribute |
Description |
|---|---|
|
Command |
Specify the Appium mobile command you want to run. |
|
Arguments JSON |
Enter the arguments for the command in JSON format. |
|
Result |
Stores the result returned by the Appium command. |
In this example, you use the Execute Driver Command Module to run the command mobile: type to send the text Wi-Fi to the focused input field.

Execute Driver Command Module in a TestCase
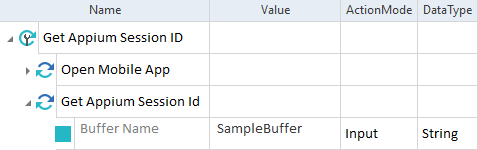
Get Appium Session Id
The Module Get Appium Session Id allows you to save the Appium session ID to a buffer.
It has the following ModuleAttribute:
|
ModuleAttribute |
Description |
|---|---|
|
Buffer Name |
Specify the name of the buffer to which you want to save the ID of your current Appium session. |
In this example, you save the Appium session ID to a buffer named SampleBuffer.
Get Appium Session Id Module in a TestCase
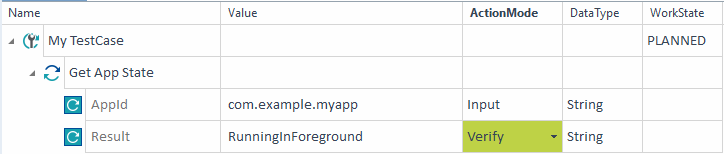
Get App State
The Module Get App State allows you to verify or save the current state of a mobile app, either native or hybrid. Tosca supports the following states:
-
NotInstalled
-
NotRunning
-
RunningInBackgroundOrSuspended
-
RunningInBackground
-
RunningInForeground
You can find the Module in the Standard subset under Engines->Mobile->App Management.
It has the following ModuleAttributes:
|
ModuleAttribute |
Description |
|---|---|
|
AppId |
Specify the app whose state you want to know. Choose one of the following options for the Value column:
|
|
Result |
Specify what you want to do with the state of the app. Choose one of the following options:
|
In this example, you use the Module Get App State in a TestCase called My TestCase. With it, you check whether a specific Android app has a particular state.
-
In the value for AppId, you define the package name of your app, com.example.myapp.
-
In the value for Result, you define the expected state, RunningInForeground. To tell Tosca that you want to verify this state, you use ActionMode Verify.
Verify the expected state of an Android app
Install App
The Module Install App allows you to install an app—either native or hybrid—during a running Appium session. We support this functionality for Tosca Device Cloud, Headspin, SauceLabs, Perfecto, and BrowserStack. If you use a different provider, Install App might work, but we can't guarantee it.
You can find the Module in the Standard subset under Engines->Mobile->App Management.
It has the following ModuleAttribute:
|
ModuleAttribute |
Description |
|---|---|
|
App Path |
Enter a publicly accessible URL to the .apk or .ipa file of the app you want to install. For iOS apps, make sure that the app is signed. Some cloud providers also support app repository paths:
|
In this example, you use the Module Install App in a TestCase called My TestCase. With it, you install an Android app that you host in SauceLabs.
In the value for App Path, you define the app's storage path: storage:filename=myApp_debug_v1.2.3.apk.

Install an app
ME3.0 Hardware Button Operations
The Module ME3.0 Hardware Button Operations allows you to steer the following platform-specific hardware buttons:
-
Home button for iOS and Android
-
Back button on Android
-
App Selection button on Android
It has the following ModuleAttribute:
|
ModuleAttribute |
Description |
|---|---|
|
Button |
Specify which button you want to click. Possible values are:
|
In this example, you press the Back button on Android.

ME 3.0 Hardware Button Operations Module in a TestCase
ME3.0 Set Device Orientation
The Module ME3.0 Set Device Orientation allows you to define whether the Mobile Engine 3.0 should steer your device in portrait or landscape orientation.
It has the following ModuleAttribute:
|
ModuleAttribute |
Description |
|---|---|
|
Orientation |
Specify the orientation of your device and use ActionMode Select. The following values are available:
|
In the example below, you set the screen orientation to Landscape.

ME3.0 Set Device Orientation Module in a TestCase
Open Mobile App
The Open Mobile App Module allows you to open native and hybrid mobile applications on your Android or iOS device.
This step is a mandatory first TestStep in Mobile Engine 3.0 TestCases. The only exception is if you want to set Desired Capabilities.
For more information on the Open Mobile App Module, see Open mobile applications.
The Module has the following ModuleAttributes:
|
ModuleAttribute |
Description |
|---|---|
|
Application |
For Android devices and emulators, specify the full path or PackageName and Activity of the application you want to steer. Separate the PackageName from the Activity with a forward slash (/). However, we recommend that you use the AppPackage and AppActivity ModuleAttributes. For iOS devices and simulators, specify the full path or BundleID of the application you want to steer. However, we recommend that you use the BundleID ModuleAttribute. |
|
BundleID |
For iOS devices and simulators, specify the BundleID of the application you want to steer. |
|
AppPackage |
For Android devices and emulators, specify the PackageName of the application you want to steer. |
|
AppActivity |
For Android devices and emulators, specify the Activity of the application you want to steer. |
|
Application Path |
For devices connected to Tricentis Mobile Agent, specify the full path of the application you want to steer. |
In this example, you open the mobile application with the Open Mobile App Module by specifying the PackageName and the Activity of the application you want to steer.
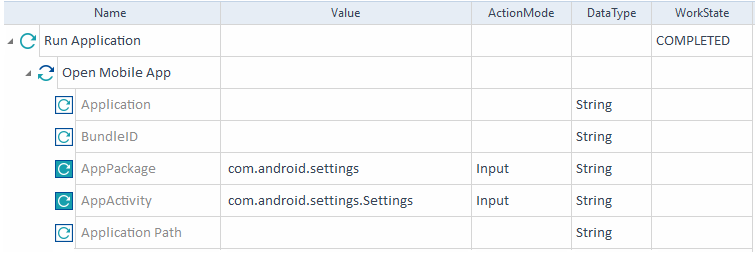
Open Mobile App Module in a TestCase
If you want to open a native or hybrid app, use the Module OpenURL from the Standard subset.
When you upgrade Tricentis Tosca 12.3 or any earlier versions to 2025.1 LTS, you have to perform an XEngines migration to ensure that the Open Mobile App Module works correctly. To do so, right-click on the project root element and select XEngines Migration->Update project to current version.
Remove App
The Module Remove App allows you to remove an app—either native or hybrid—during a running Appium session. You can find the Module in the Standard subset under Engines->Mobile->App Management.
It has the following ModuleAttribute:
|
ModuleAttribute |
Description |
|---|---|
|
AppId |
Specify the app you want to remove. To do so, enter the bundle ID (iOS) or package name (Android) of the app. |
In this example, you use the Module Remove App in a TestCase called My TestCase. With it, you remove the Android app with the package name com.example.myapp, which you specify as the value for AppId.

Remove an app
Send Text Input To Focused Control
The Module Send Text Input To Focused Control allows you to send text input to a focused control to simulate user action.
The Module has the following ModuleAttribute:
|
ModuleAttribute |
Description |
|---|---|
|
Text |
Specify the text input that you want to send to a focused control. |
In this example, you send text input to a dynamic search field.
-
The Focused Control TestStep sets the focus on the dynamic search field.
-
The next TestStep uses the Send Text Input To Focused Control Module to send text input to the search field.
-
After the search, a drop-down list appears with results that match your search query. The Destination Airport TestStep selects the correct result from the drop-down list.
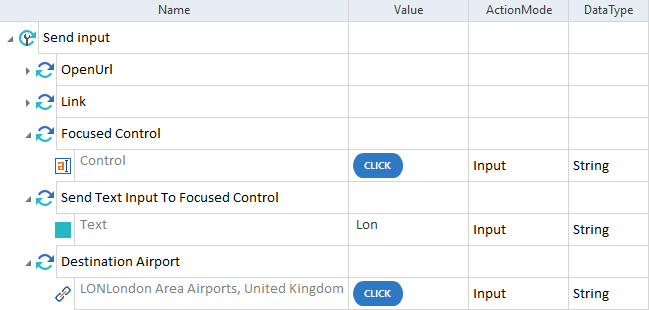
Send Text Input To Focused Control Module in a TestCase
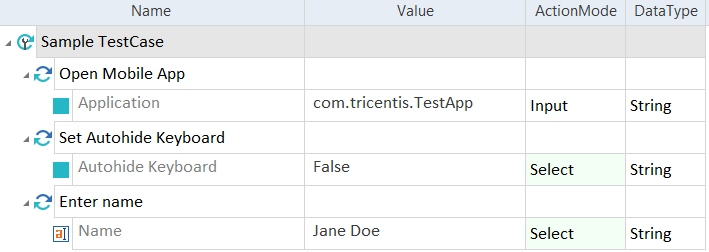
Set Autohide Keyboard
The Module Set Autohide Keyboard allows you to disable the auto-hide mode for keyboards in native applications. This impacts the performance of steering text boxes.
Note that you can also configure steering parameters to automatically close keyboards. To learn more, see the Hide the keyboard on iOS topic.
The Module has the following ModuleAttribute:
|
ModuleAttribute |
Description |
|---|---|
|
Autohide Keyboard |
Specify whether you want to enable the auto-hide mode of the iOS onscreen keyboard. Possible values are:
|
In this example, you disable the default auto-hide mode of the onscreen iOS keyboard.
Set Autohide Keyboard Module in a TestCase
Set iOS biometrics enrollment
The Module Set iOS biometrics enrollment allows you to enable or disable FaceID or TouchID user authentication on your iOS simulator.
The Module has the following ModuleAttribute:
|
ModuleAttribute |
Description |
|---|---|
|
State |
Enable or disable the biometrics enrollment on your iOS simulator. Possible values are:
|
In this example, you perform the following actions:
-
You open the mobile application with the Module Open Mobile App.
-
You enable biometric authentication on your iOS simulator. In the TestStep Set iOS biometrics enrollment, you set the ModuleAttribute State to True.
-
In the Click the Login button TestStep, you click a button which triggers an action that requires user authentication.
-
In the TestStep Use iOS biometric authentication, you set the type of user authentication to TouchID.
-
To trigger positive authentication, you set the TestStepValue Positive authentication to True.
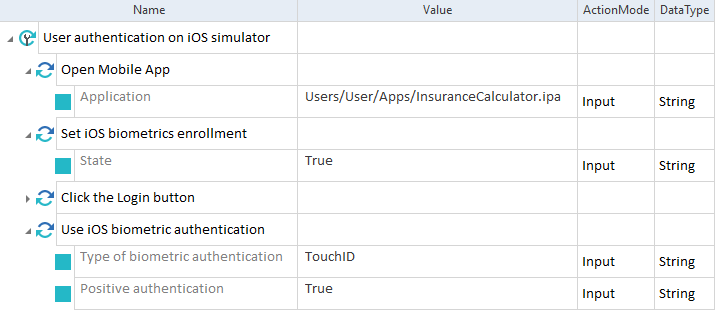
Set iOS biometrics enrollment Module and Use iOS biometric authentication Module in a TestCase
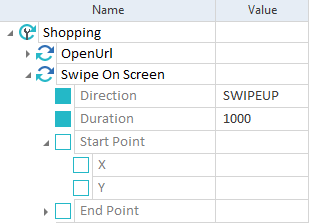
Swipe On Screen
The Module Swipe On Screen allows you to perform a swipe operation directly on the screen. The length of the swipe movement is equal to one-third of the mobile screen size.
The Module has the following ModuleAttributes:
|
ModuleAttribute |
Description |
|---|---|
|
Specify the type of swipe you want to perform. Possible values are:
|
|
|
Specify the duration of the swipe in milliseconds. A higher value makes the swipe slower and shorter. A lower value makes the swipe faster and longer. The default value is 300 ms. |
|
|
Define the start coordinates of the swipe. You can specify different coordinates. If you specify one coordinate, you also have to enter a value for the other. Note that if you don't specify a start point, the default for the swipe movement is at 10% from the screen edge opposite to the swipe direction. For example, if you set the direction to SWIPEUP, the movement starts 10% from the bottom edge. |
|
|
Start Point->X |
Specify the x-coordinate either in percent or pixels:
|
|
Start Point->Y |
Specify the y-coordinate either in percent or pixels:
|
|
Define the end coordinates of the swipe. If you enter end coordinates, set the Direction to SWIPE. If you specify one coordinate, you also have to enter a value for the other. Note that if you don't specify an end point, the default for the swipe movement is the center of the screen. For example, if you set the direction to SWIPE with a start point at coordinates 90% (x) and 10% (y), the movement starts in the upper right corner and ends with a vertical swipe at the center of the screen with coordinates 90% (x) and 50% (y). |
|
|
End Point->X |
Specify the x-coordinate either in percent or pixels:
|
|
End Point->Y |
Specify the y-coordinate either in percent or pixels:
|
In this example, you perform an upward swipe that lasts 1 second.
Swipe On Screen Module in a TestCase
Switch Mobile App
The Module Switch Mobile App allows you to switch to a different mobile application during a single TestCase.
The Module has the following ModuleAttribute:
|
ModuleAttribute |
Description |
|---|---|
|
Application |
Specify the application to which you want to switch:
|
In this example, you perform the following actions:
-
You open the first mobile application with the Module Open Mobile App.
-
You click on a screen position in the first application.
-
You switch to the second mobile application with the Module Switch Mobile App.
-
You click on a screen position in the second mobile application.
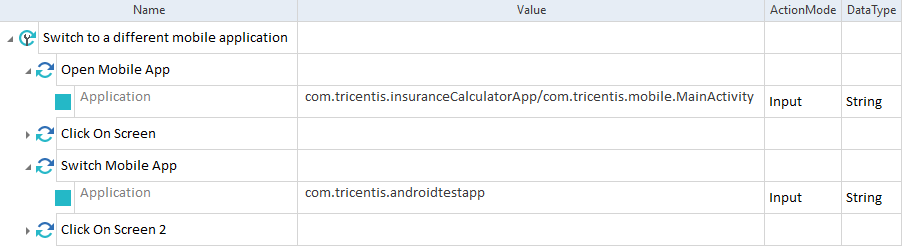
Switch Mobile App Module in a TestCase
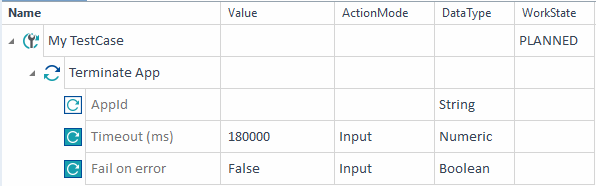
Terminate App
The Module Terminate App allows you to terminate a running mobile app, either native or hybrid. You can find the Module in the Standard subset under Engines->Mobile->App Management.
It has the following ModuleAttributes:
|
ModuleAttribute |
Description |
|---|---|
|
AppId |
Specify the app you want to terminate. Choose one of the following options for the Value column:
|
|
Timeout |
Enter the maximum time in milliseconds that Tosca should try to terminate the app. Note that not all providers support timeouts. |
|
Fail on error |
Specify how Tosca reports a failure to terminate the app. Choose one of the following options for the Value column:
|
In this example, you use the Module Terminate App in a TestCase called My TestCase. With it, you terminate the last app you opened with the Module Open Mobile App.
-
In the value for AppId, you don't enter anything. This tells Tosca to terminate the last app you opened with the Module Open Mobile App.
-
In the value for Timeout, you enter the desired timeout limit, 180000.
-
In the value for Fail on error, you enter False. This tells Tosca to report the TestStep as passed even if Tosca can't terminate the app.
Terminate an app
Upload File to Mobile Device
The Module Upload File to Mobile Device allows you to upload a file from a computer to an Android device (check out "Transfer files to Android"). The file upload limit is 2 GB.
If the file already exists on the Android device, the Mobile Engine 3.0 overwrites it.
It has the following ModuleAttributes:
|
ModuleAttribute |
Description |
|---|---|
|
Desktop Path |
Specify the full path to the file that you want to upload, including the file name and extension. Example: D:\abc.pdf |
|
Mobile Device Path |
Specify the full path to the location where you want to save the file, including the file name and extension. Use forward slashes (/) in the path. Example: /sdcard/Download/abc.pdf You can specify a different name for your file. On Samsung devices, replace Internal Storage with sdcard in the file path. For example, replace /Internal storage/Download/abc.txt with /sdcard/Download/abc.txt. |
Use Android fingerprint authentication
The Module Use Android fingerprint authentication allows you to use fingerprint authentication on your Android emulator.
To use this Module in your TestCase, you have to configure fingerprint ID(s) on your Android emulator first.
The Module has the following ModuleAttribute:
|
ModuleAttribute |
Description |
|---|---|
|
FingerprintId |
Enter the fingerprint ID that you configured on your emulator and want to use for user authentication. |
In this example, you perform the following actions:
-
You open the mobile application with the Module Open Mobile App.
-
In the Click the Login button TestStep, you click a button that requires user authentication.
-
In the TestStep Use Android fingerprint authentication, you specify the fingerprint ID. If you have set the same ID on your emulator, the authentication is positive. Consequently, the TestStep passes.
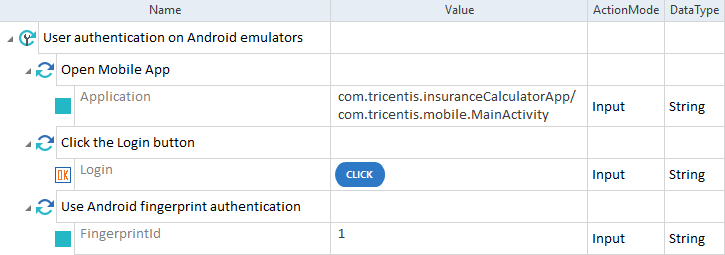
Use Android fingerprint authentication Module in a TestCase
Use iOS biometric authentication
The Module Use iOS biometric authentication allows you to use FaceID or TouchID user authentication on your iOS simulator.
To use this Module, you have to enable biometrics enrollment on your iOS simulator. To do so, use the Module Set iOS biometrics enrollment.
The Module has the following ModuleAttributes:
|
ModuleAttribute |
Description |
|---|---|
|
Type of biometric authentication |
Specify what type of biometric authentication you want to use. Possible values are:
|
|
Positive authentication |
Specify whether the authentication is positive or negative. Possible values are:
|
In this example, you perform the following actions:
-
You open the mobile application with the Module Open Mobile App.
-
You enable biometric authentication on your iOS simulator. In the TestStep Set iOS biometrics enrollment, you set the ModuleAttribute State to True.
-
In the Click the Login button TestStep, you click a button which triggers an action that requires user authentication.
-
In the TestStep Use iOS biometric authentication, you set the type of user authentication to TouchID.
-
To trigger positive authentication, you set the TestStepValue Positive authentication to True.
Set iOS biometrics enrollment Module and Use iOS biometric authentication Module in a TestCase