Generate test cases
The Autonomous Testing feature allows you to generate test cases with natural language, based on a secure, responsible AI. This speeds up test authoring and helps you optimize existing portfolios.
If you're using multiple monitors, all monitors must have the same resolution.
Prepare the test data file
Before you start generating test cases, you need to create a test data file that tells the AI how to generate actionable test steps. Check out our examples to see test data in JSON and natural language formatting styles.
Additionally, consider reusing any manual test cases that you've created. Manual test cases have a built-in structure that improves the AI's accuracy and help avoid problems with vague or poorly written prompts. Simply copy and paste your manual test case into the chat field.
Best practices for test data files
To create the test data file, make sure you do the following:
-
Define clear objectives: Ensure the test data aligns with specific goals of the test and covers required fields, conditions, and expected outcomes.
-
Use realistic data: Create data that mimics real-world scenarios to simulate actual use cases. This includes normal, boundary, and error conditions.
-
Ensure completeness: Populate necessary fields with appropriate values. Missing data fields will prompt the AI to request user input during the test run.
-
Group related fields: Consolidate related fields into a single group for streamlined data entry during the test run. For example, group customer names and addresses.
-
Maintain consistency: Use consistent formats and conventions for fields like dates, IDs, and numerical values.
-
Validate test data: Review test data for accuracy and ensure it meets the requirements of the test scenario.
Generate your first test case
To generate test cases, follow these steps:
- In the Tosca Agentic Test Automation window, select Generate a TestCase.
- Select the application where you want to generate a test case. Please note that test case generation works best with SAP applications.
-
Tell Tosca Agentic Test Automation what you want to achieve with this test. Be specific, so it can create the most effective test case for your needs.
-
Select Add test data and upload a test data file. The test data file can be a text file with a size of max 4 MB.
-
Start the test case generation:
-
Maximize the window of the application under test.
-
Select
 .
. -
Step away from your mouse. Please don't move your mouse while Tosca Agentic Test Automation generates test cases.
-
-
When Tosca Agentic Test Automation is done, select Import to Tosca. You can find your new test cases in the Auto-Generated Tests folder in the project tree.
In this example, you create an SAP sales order:
-
You select the SAP application.
-
You provide the test instructions Create an SAP sales order and upload the test data json file.
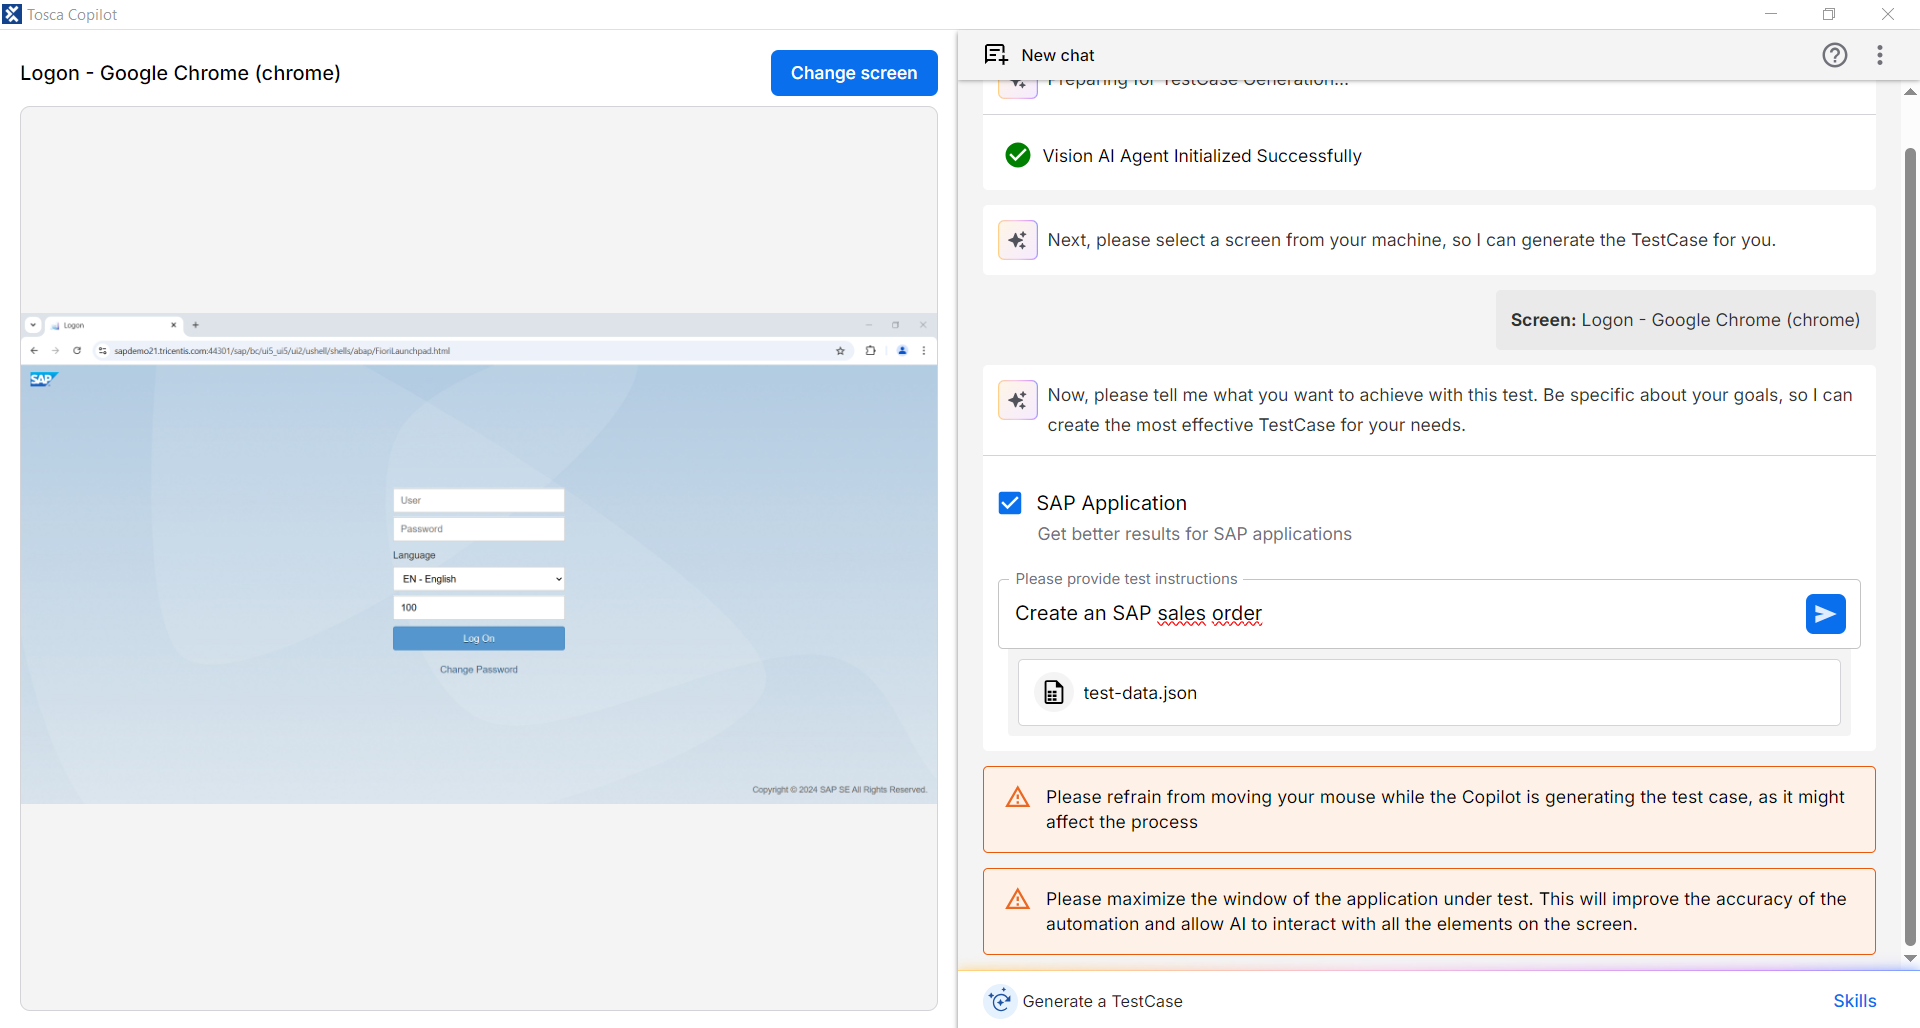
Create an SAP sales order
-
You select Import to Tosca to import the test case to Tosca Commander.
Populate an imported test case
Follow these steps to easily populate previously imported test cases in Tosca Agentic Test Automation:
-
Go to an imported test case that you want to open in Tosca Agentic Test Automation.
-
Right click on the test case and hover over Tosca Agentic Test Automation, then select Populate this TestCase.
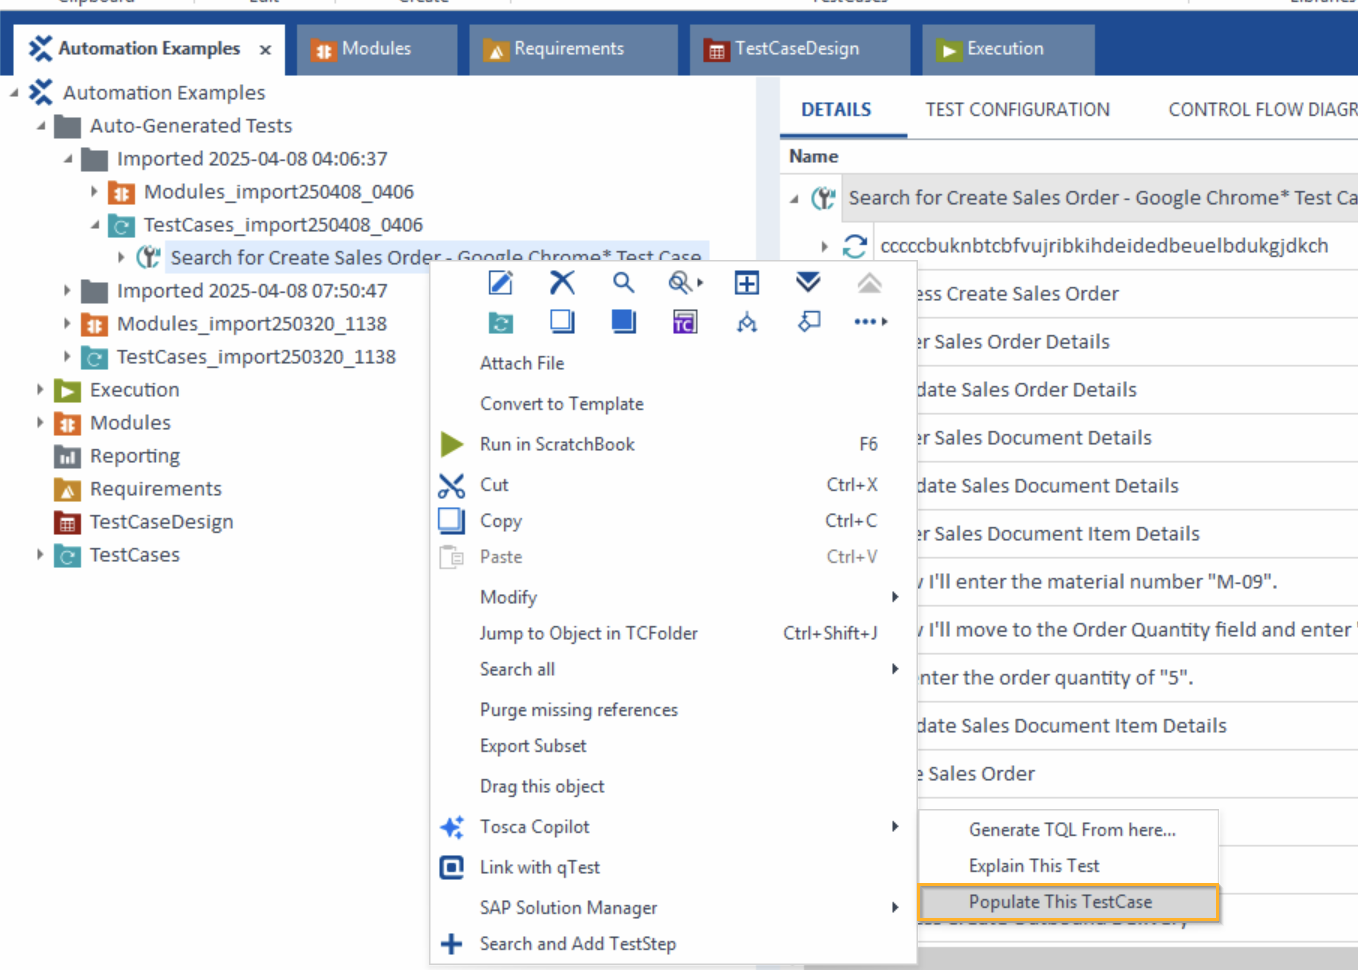
Menu path with Populate this TestCase option
-
Tosca Agentic Test Automation opens, begins the test case generation flow, and prompts you to select the relevant application on your machine.
-
Next, Tosca Agentic Test Automation attaches any data from the imported test case and populates the test case description in the command line.
-
Select
to watch the autonomous testing feature complete the test.
Examples
These examples provide options for natural language and JSON formatting.
Natural language formatting
These examples cover prompts and test data for an SAP Fiori application and a web application.
Let's say you want to create a sales order. Copy and paste this prompt directly into the chat text field.
Create Sales orders VA01Here's the test data. Copy and paste this data into a text file and then upload it to Tosca Agentic Test Automation.
Screen: Create Sales Documents
Data:
- Order Type: OR
- Sales Organization: 1000
- Distribution Channel: 10
- Division: 00


Screen: Create Standard Order: Overview
Data:
- Sold-to Party:  1175
- Ship-to Party: 1175
- Cust Reference: Test
- All Items table:
- Item: 2
- Material: M-09
- Order quantity: 5
Or maybe you want to create a purchase order. Copy and paste this prompt directly into the chat text field:
Create purchase orderHere's the test data. Copy and paste this data into a text file and then upload it to Tosca Agentic Test Automation.
1. Search for 'Create Purchase Order'
2. Click on Dropdown, and Click on the Standard PO
3.Fill in the data for the following fields:
-Vendor: 0010300002
-Purch. Org.: 1010
-Purch. Group: 001
-Company Code: 1010
4. In the first table, fill in the first row the following: Material: SF-FL-FORK-L, PO Quantity: 20, Plnt: 1010 Here's the test data. Copy and paste this directly into the chat text field.
Step 1: select the Automobile table
Step 2: Enter Vehicle Data
Action: On the Enter Vehicle Data screen, input the following details:
    Make: BMW
    kW: 120
    Date of Manufacture: 06/19/2023
    Number of Seats: 5
    Fuel Type: Diesel
    List Price: 17500
    License Plate Number: WU-1234AT
    Annual Mileage: 15000
    Expected Result: Vehicle data is entered correctly.
    Proceed to Insurant Data

Action: Click on the Next » button.
Expected Result: The Enter Insurant Data screen is displayed.

Step 3: Enter Insurant Data
Action: On the Enter Insurant Data screen, input the following details:

    First Name: Rywuzdz
    Last Name: Cdxtlpg
    Date of Birth: 12/12/1989
    Gender: Male
    Street Address: Teststraße 123
    Country: Austria
    Zip Code: 1120
    City: Wien
    Occupation: Employee
    Hobbies: Select 'Speeding'
Action: Click on the Next » button.
Expected Result: The Enter Product Data screen is displayed and direct to the next page.

Step 4: Enter Product Data
Action: On the Enter Product Data screen, input the following details:

    Start Date: 07/19/2025
    Insurance Sum: 15,000,000.00
    Damage Insurance: No Coverage
    Merit Rating: Bonus 7
    Optional Products: Select 'Euro Protection' and 'Legal Defense Insurance'
    Courtesy Car: Yes
Expected Result: Product data is entered correctly.

Step 5: Proceed to Price Option Selection
Action: Click on the Next » button.
Expected Result: The Select Price Option screen is displayed.

Step 6: Select Price Option
Action: On the Select Price Option screen, select the 'Platinum' radio button.
Expected Result: 'Platinum' price option is selected.

Step 7: Proceed to Quote Submission
Action: Click on the Next » button.
Expected Result: The Send Quote screen is displayed.

Step 8: Enter Contact and Account Information
Action: On the Send Quote screen, input the following details:
    E-Mail: j.snow@tricentis.com
    Phone: 004369911223344
    Username: jsnow
    Password: Password+12
    Confirm Password: Password+12
    Comments: OSV rocks!

Expected Result: Contact and account information is entered correctly.

Step 9: Submit the Quote
Action: Click on the « Send XML» button.
Expected Result: The quote is submitted successfully.

Step 10: Confirm Submission
Action: In the Confirmation Dialog, click on the OK button.
Expected Result: Submission confirmation is acknowledged.

Step 11: Return to Home
Action: Click on the Tricentis link in the Confirmation Dialog.
Expected Result: Navigated back to the home page.
JSON formatting
These example test data sets cover various permutations and types of fields. Copy and paste this data into a JSON file and then upload it to Tosca Agentic Test Automation.
{
                "Username": "test_user",
                "Password": "password123"
                }
{
                "Customer Details": {
                "Name": "John Doe",
                "Contact Number": "123-456-7890",
                "Email": "john.doe@example.com"
                },
                "Order Details": {
                "Order Type": "Online",
                "Payment Method": "Credit Card"
                }
                }
{
                "Order Items Table": [
                {
                "Item": 1,
                "Product Name": "Widget A",
                "Quantity": 2,
                "Price": 10.00
                },
                {
                "Item": 2,
                "Product Name": "Widget B",
                "Quantity": 5,
                "Price": 20.00
                }
                ]
                }
{
                "Order Items": [
                {
                "Item": 1,
                "Product Name": "Widget A",
                "Quantity": 1,
                "Price": 10.00
                }
                ]
                }
{
                "Order Items": [
                {
                "Item": 1,
                "Product Name": "Widget A",
                "Quantity": 2,
                "Price": 10.00
                },
                {
                "Item": 2,
                "Product Name": "Widget B",
                "Quantity": 5,
                "Price": 20.00
                }
                ]
                }
{
                "Credentials": {
                "User": "xxx",
                "Password": "xxx"
                },
                "Test Organizational Data": {
                "Order Type": "OR",
                "Sales Organization": "1000",
                "Distribution Channel": "10",
                "Division": "00"
                },
                "Test Sales Order Data": {
                "Sold-To Party": "1175",
                "Ship-To Party": "1175",
                "Cust. Reference": "Customer Test",
                "All Items Table": [{
                "Item": 1,
                "Material": "M-09",
                "Order Quantity": 5
                },
                {
                "Item": 2,
                "Material": "M-09",
                "Order Quantity": 10
                }]
                },
                "Outbound Delivery Data": {
                "Shipping Point": 1201,
                "Selection Date": "11/21/2026"
                }
            }