Add attachments to messages
Some messages contain multiple parts, each with its own content type and potentially different data. You can send these different parts in a single request, such as combining text and attachments. To send a multipart message, you need to add attachment parts to your message first. You can use the following options:
Add attachment via Payload tab
To add a message part directly to the Payload tab, you need to convert the message to a multipart message first. Select the message you want to convert and click the ![]() Toggle Multipart icon.
Toggle Multipart icon.
Add the message parts as follows:
-
Select Add Part.
-
Now you have these options:
-
Select Enter Content if you want to include a plain text part in your message.
-
Select Link To File if you want to send a file.
Add attachment
-
-
Depending on the option you select, proceed as follows:
-
Enter the content for the message part and click Save.
-
Choose the file you want to attach and click Open.
API Scan automatically adds the file path, and populates the Content-Type field based on the file format.
-
-
Edit the properties of the part, such as the name of the new part, if necessary.
-
Enable MTOM if you want to use it for your message.
Add attachment via button
You can add a file using the Add Files button if the message to which you want to add an attachment isn't already a multipart message. Otherwise, the button is disabled.
To add a file, follow these steps:
-
Select a message and click the
 Add Files icon.
 -
Select Attachment from the drop-down menu.
-
In the subsequent dialog, select the file you want to attach and click Open.
API Scan switches to the Multipart View and adds your file as a new part to the payload. API Scan automatically adds the file path and populates the Content-Type field based on the file format.
-
Edit the properties of the part, such as the name of the new part, if necessary.
-
Enable MTOM if you want to use it for your message.
Use the Message Transmission Optimization Mechanism (MTOM)
MTOM optimizes the delivery of binary data, such as images or PDF files, to and from web services. With MTOM, binary data is not included in the payload of the SOAP message but is sent as a Multipurpose Internet Mail Extension (MIME) attachment.
To use MTOM for your message, follow these steps:
-
Select the Multipart Frame of your message and enable MTOM.
You can specify the following MTOM information:
-
MTOM-Content-Transfer-Encoding. If you don't specify a different value, API Scan uses binary.
-
MTOM-Content-Type. If you don't specify a different value, API Scan uses multipart/related.
-
Omit filename star to omit the filename star parameter from the Content-Disposition header. This can help if the web service or client application can't process the filename star parameter correctly and rejects the message you send.
-
-
Select the Main Part item of your message and enter the link to the attachment that contains the binary data in the payload. Use the following reference: "<inc:Include href="cid:myfile.myfileextension" xmlns:inc="http://www.w3.org/2004/08/xop/include"/>" .
Example:
<soapenv:Envelope xmlns:soapenv="http://schemas.xmlsoap.org/soap/envelope/" xmlns:upl="http://UploadService">
    <soapenv:Header/>
    <soapenv:Body>
        <upl:UploadFile>
            <upl:messages>
                <upl:UploadFileMessage>
                    <upl:FileData><inc:Include href="cid:data.bin" xmlns:inc="http://www.w3.org/2004/08/xop/include"/></upl:FileData>
                    <upl:FileName>data.bin</upl:FileName>
                </upl:UploadFileMessage>
            </upl:messages>
        </upl:UploadFile>
    </soapenv:Body>
</soapenv:Envelope>
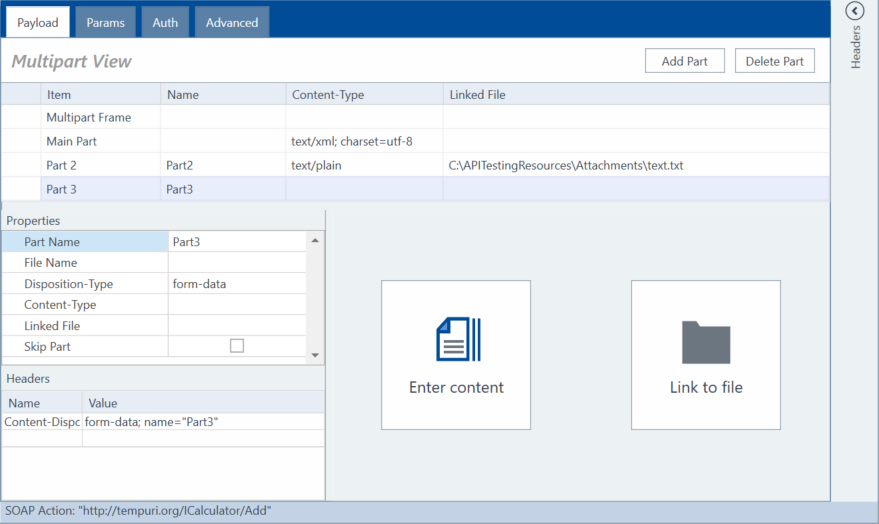
Multipart items and properties
The Multipart view lists these message items:
-
the Multipart Frame which displays the content of the entire message with all parts.
-
the Main Part which is the first part of a multipart message. This part can't be skipped.
-
parts 2 through n, depending on how many parts you add.
For each added part, you can edit the following properties:
|
Property name |
Description |
|---|---|
|
Part Name |
You can either assign a new name to the part or you can use the default name Part<2-n> |
|
File Name |
Name of the attached file. |
|
Disposition-Type |
Specifies the disposition type of each part, such as form data or file uploads. |
|
Content-Type |
The Content-Type depends on the protocol and data format used. |
|
Linked File |
The path and name of the attached file. |
|
Skip Part |
Select the Skip Part check box if you want to skip a part from a test run. If you export the message as an API TestCase, you can also add the property as module attribute. |
Add headers to attachment parts
You can edit the headers for each part. To do so, follow these steps:
-
Select the attachment part you want to edit.
-
Go to the Headers section and double-click the appropriate row to edit your header.
Delete attachment parts
Select the part that you want to remove and click Delete Part. The numbering of the child parts changes depending on the position of the deleted part.