Excel Modules
The folder Engines->Excel in the Standard subset contains Modules that perform specific tasks for the Excel Engine 3.0.
Open Excel Workbook
The Module Open Excel Workbook allows you to open an Excel file, i.e. an Excel workbook. Every workbook can contain several worksheets.
This step is mandatory for every Excel Engine 3.0 TestCase.
The Excel Engine 3.0 opens the file in the background. You do not actually see the file opening in Excel.
The Module Open Excel Workbook has the following ModuleAttributes:
|
ModuleAttribute |
Description |
|---|---|
|
Specify a name for the workbook. This can be any name. The Excel Engine 3.0 uses it to identify the file you want to steer in other Excel Engine 3.0 TestSteps. |
|
|
Path |
Full path to the Excel file that you want to open, including the file name and extension. |
|
Create new |
Specify whether you want to create a new Excel file. You can use the following values:
|
|
Password |
Optional password for password-protected workbooks. |
|
Open as Read-only |
Specify whether you want to open the file in read-only mode.
|
|
Delimiter |
Optional. Use this parameter if Tosca opens files in Excel but doesn't convert columns because of your Microsoft Office language pack. For instance, some locales use ; instead of , in CSV files. Specify which delimiter you want to use:
|

|
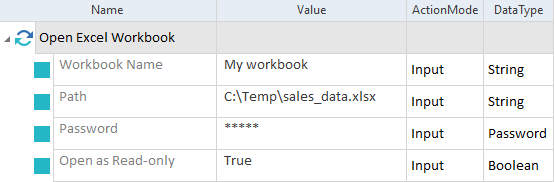
In this example, you open the Excel file sales_data.xlsx, located at C:\Temp. You assign the name MyWorkbook to the workbook that you want to steer. Since the file is password protected, enter the password and then open the file in read-only mode.
Open an Excel file |
|
|
In this example, you create the new Excel file marketing.xlsx. The Excel Engine 3.0 saves it to C:\Users\janedoe\Desktop. You assign the name CustomerData to the workbook that you want to steer.
Create a new Excel file and open it |

|
|
In this example, you open a CSV file that uses ; as the delimiter. Because your Excel language settings support this, you select Office.
Open a CSV with ; delimiter |

Define Excel Range
The Module Define Excel Range allows you to define a data range that you want to steer. This step is mandatory for every TestCase in which you want to manipulate a particular data range.
The Module has the following ModuleAttributes:
|
ModuleAttribute |
Description |
|---|---|
|
Workbook Name |
Name of the workbook that you defined. |
|
Worksheet Name |
Position or name of the Excel worksheet that contains the data.
|
|
Specify a name for the data range that you want to steer. This can be any name. The Excel Engine 3.0 uses it to identify the data range you want to steer in other Excel Engine 3.0 TestSteps. |
|
|
Data Range |
Specify how you want to define your Excel data range:
Note that the specified range influences how the Excel Engine 3.0 calculates the values for the properties ColumnCount, RowCount, ColumnNumber, RowNumber, and ResultCount. |
|
Data Range->Start Cell |
Start cell of the data range that you want to steer. You only need to specify a value for this ModuleAttribute if you specified that your Data Range is Explicit. |
|
Data Range->End Cell |
End cell of the data range that you want to steer. You only need to specify a value for this ModuleAttribute if you specified that your Data Range is Explicit. |
|
|
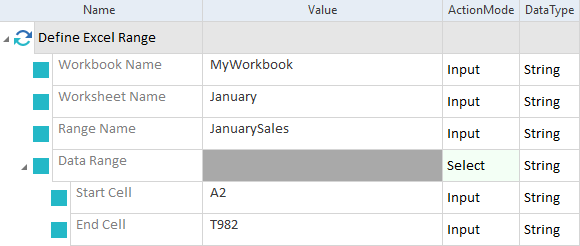
In this example, you define a data range in the workbook MyWorkbook. This data range is located in the Excel sheet January. You assign the name JanuarySales to the data range. The range starts with cell A2 and ends with cell T982.
Define the range that you want to steer |
Create Excel Worksheet
The Module Create Excel Worksheet allows you to create a new worksheet in an existing Excel file.
It has the following ModuleAttributes:
|
ModuleAttribute |
Description |
|---|---|
|
Workbook Name |
Name of the workbook that you defined. |
|
Worksheet Name |
Specify a name for the worksheet. |
|
Worksheet Order |
Define where the Excel Engine 3.0 should add the worksheet. You can enter the following values:
|
|
|
In this example, you create a new worksheet named JAN_summary in the workbook MyWorkbook. The Excel Engine 3.0 creates the worksheet as the second sheet in the Excel file.
Create a new worksheet |

Delete Excel Worksheet
The Module Delete Excel Worksheet allows you to delete a worksheet in an existing Excel file.
It has the following ModuleAttributes:
|
ModuleAttribute |
Description |
|---|---|
|
Workbook Name |
Name of the workbook that you defined. |
|
Worksheet Name |
Position or name of the Excel worksheet that you want to delete.
|
|
|
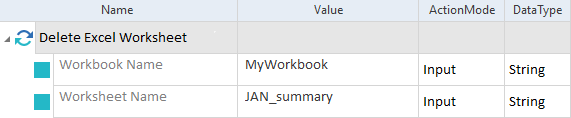
In this example, you delete a worksheet named JAN_summary in the workbook MyWorkbook.
Delete a worksheet |
Update Excel Worksheet
The Module Update Excel Worksheet allows you to update a worksheet in an existing Excel file.
It has the following ModuleAttributes:
|
ModuleAttribute |
Description |
|---|---|
|
Workbook Name |
Name of the workbook that you defined. |
|
Current Worksheet Name |
Position or name of the Excel worksheet that you want to update.
|
|
New Worksheet Name |
The new name you want to give to the worksheet. |
|
New Order |
Define where the Excel Engine 3.0 should move the worksheet to. You can enter the following values:
|
|
|
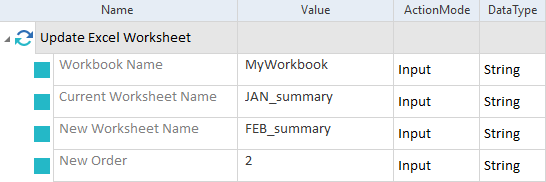
In this example, you perform the following actions for a worksheet named JAN_summary in the workbook MyWorkbook:
Update a worksheet |
Manipulate Excel Range
The Module Manipulate Excel Range allows you to manipulate data in an Excel file.
It has the following ModuleAttributes:
|
ModuleAttribute |
Description |
|---|---|
|
Range Name |
Name of the data range that you defined. |
|
Data Table and its sub-Attributes |
Table element. Steer the data in your Excel file as you would steer a table. For information on how to do so, see chapter "Table". |
|
|
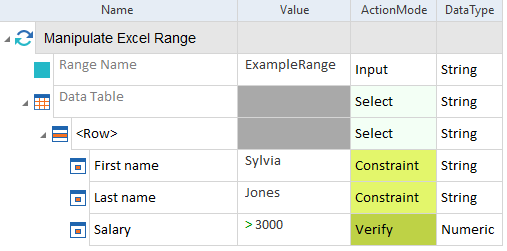
In this example, you steer the data range ExampleRange. The Excel Engine 3.0 looks for a row that fulfills the following requirements:
Then the Engine performs a verification. In this particular row, the value of the cell in the column Salary should be greater than 3000. Steer Excel data |
Special Technical Properties of Excel Cells
Excel table cells have some special technical properties which you can use to automate some features in Microsoft Excel:
-
BackgroundColor: set or verify background color using the format R=<x>,G=<y>,B=<z>, e.g. R=255,G=0,B=0 for bright red background.
-
Comment: use this property to add, update, verify, or perform other operations on the Excel Comment associated with a particular cell.
-
Font: set or verify the name of the font used for the cell, e.g. Arial Black.
-
FontColor: set or verify font color using the format R=<x>,G=<y>,B=<z>, e.g. R=255,G=0,B=0 for bright red font.
-
FontSize: set or verify number indicating font size.
Note that Excel rounds numbers to the nearest .5, e.g. an input of 11.3 will be rounded to 11.5.
-
FontStyle: set or verify if the text in the cell is bold and/or italic, e.g. Bold Italic indicates that it is both.
-
FormattedText: verify or perform read-only operations on the text content of a cell.
-
Formula: set or verify the formula for the cell, e.g. =SUM(A1:A2) for the sum of the values in cells A1 and A2.
-
HasFormula: verify whether the cell has a formula, e.g. True for a cell with a formula.
-
IsHidden: set or verify whether the cell is hidden, e.g. True for a hidden cell.
-
IsLocked: set or verify whether the cell is locked, e.g. False if the cell is not locked.
-
Note: use this property to add, update, verify or perform other operations on the Excel Note associated with a particular cell.
-
NumberFormat: use this property to set, verify or perform other operations using the formatting string for a particular cell. For more information, see the Microsoft documentation.

Some of the formatting syntax is language-specific with regard to the language settings in Microsoft Excel.
As an example,
NumberFormat==0.0%in an English version of Microsoft Excel is equivalent toNumberFormat==0,0%in a German version of Microsoft Excel. -
Underline: set or verify underlining for the text in the cell, e.g. Double for double underlined text.
|
|
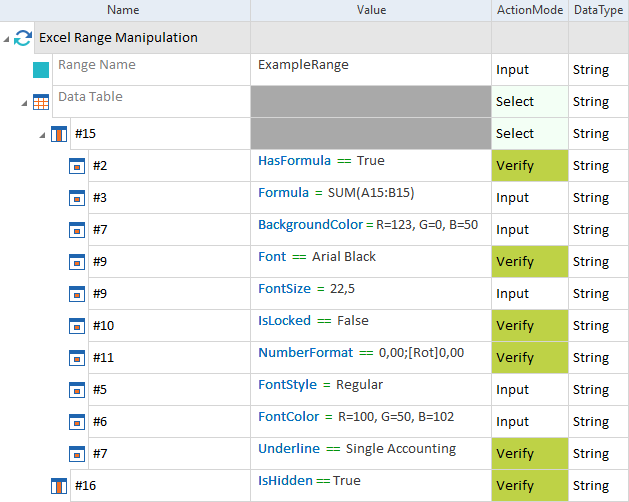
In this example, you steer technical properties of the data range ExampleRange. You perform the following actions:
Use technical properties of cells in Excel |
Clear Excel Range
The Module Clear Excel Range allows you to clear data and formatting from a range of cells in an Excel file.
It has the following ModuleAttributes:
|
ModuleAttribute |
Description |
|---|---|
|
Range Name |
Name of the range that you defined. |
|
Contents |
Specify whether you want to clear the content of the specified range. You can use the following values:
|
|
Formats |
Specify whether you want to clear the formatting of the specified range. You can use the following values:
|
|
Notes and Comments |
Specify whether you want to clear notes and comments from the specified range. You can use the following values:
|
|
Hyperlinks |
Specify whether you want to clear hyperlinks from the specified range. You can use the following values:
|
|
Outlines |
Specify whether you want to clear outlines from the specified range. You can use the following values:
|
|
|
In this example, you clear data and formatting from a range of cells named MyRange.
Clear a range of cells |
Run Excel Macro
The Module Run Excel Macro allows you to run existing Microsoft Excel macros on an Excel file. For information on Microsoft Excel macros, see the Microsoft Excel documentation.
The Module has the following ModuleAttributes:
|
ModuleAttribute |
Description |
|---|---|
|
Workbook Name |
Name of the workbook that you defined. |
|
Macro Name |
Name of the Microsoft Excel macro that you want to run. |
|
Timeout |
Maximum duration (in milliseconds) for which the macro is allowed to run. Upon reaching this threshold, the running macro will terminate and the test step will fail. |
|
|
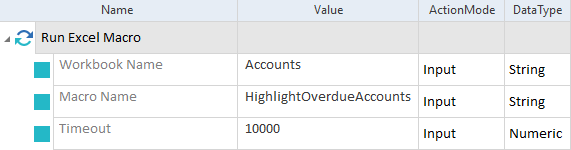
In this example, you run a macro called HighlightOverdueAccounts on the workbook Accounts. You set the maximum duration for the macro to 10000 milliseconds.
Run a macro on the workbook Accounts |
Close/Save Excel Workbook
The Module Close/Save Excel Workbook allows you to close an open workbook. This step is mandatory for every Excel Engine 3.0 TestCase.
The Module has the following ModuleAttributes:
|
ModuleAttribute |
Description |
|---|---|
|
Workbook Name |
Name of the workbook that you defined. Note that you don't need to specify a Workbook Name if you specify a Path in the following ModuleAttribute. |
|
Path |
Full path to the Excel file that you want to close or save, including the file name and extension. Note that you don't need to specify a Path if you provided the Workbook Name in the previous ModuleAttribute. |
|
Operation |
Specify the type of operation you want to perform:
|
|
Save Path |
Absolute path to where you want to save the file, including file name and extension. If you don't provide a path, Tricentis Tosca overwrites the existing file. |
|
File format in which you want to save the file. This ModuleAttribute only works together with Save Path. If Save Path is empty, Tricentis Tosca ignores any value you have selected for Save As Type. If you specify a Save Path but leave Save As Type empty, Tricentis Tosca uses the file format of the existing file. To prevent file corruption, the file extension provided in Save Path must match the extension you choose for this ModuleAttribute. |
|
|
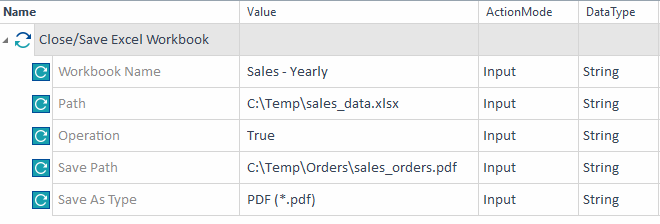
In this example, you close the Excel file sales_data.xlsx, located at C:\Temp. The Excel Engine 3.0 saves any changes to sales_orders.pdf, located at C:\Temp\Orders. You specify the file format as PDF (*.pdf).
Save and close an Excel file |
Excel 1:1 File Compare
The Module Excel 1:1 Compare allows you to compare the cell contents, cell formatting, and objects of two Excel files.
The Module has the following ModuleAttributes:
|
ModuleAttribute |
Description |
|---|---|
|
Reference File |
Full path to the reference Excel file, including the file name and extension. |
|
Reference Password |
Enter the password if your reference file is password-protected. |
|
Target File(s) |
Specify which file(s) you want to compare to the Reference File. To compare the contents to a single target file, choose one of these options:
To compare the contents to multiple target files, choose one of these options:
|
|
Target File Password(s) |
Password(s) for decrypting the Target File(s). To specify multiple passwords, use a semicolon (;) as a separator. Moreover, note the following:
|
|
Include Cells Data |
By default, the Excel Engine 3.0 compares the cell content. If you don't want to compare cell content, enter the value False. |
|
Include Formats |
By default, the Excel Engine 3.0 doesn't compare cell formatting. If you want to compare cell formatting, enter the value True. If you are dealing with very large Excel spreadsheets, this option may have a negative impact on the performance of your tests. We recommend setting this to True only if cell formatting is relevant for your use case. |
|
Include Objects |
By default, the Excel Engine 3.0 doesn't compare object types, such as images, shapes, and charts. If you want to compare objects, enter the value True. |
|
Include Sheets |
If your Excel files have multiple data sheets, you can define which sheets of the Reference File you want to use for the comparison. To do so, enter the sheet names, separated by a semicolon (;). To compare all sheets, leave this value empty. |
|
Output Path |
If you want to save the result to a text file, enter the full path to the file, including the file name and extension. |
|
Abort after Differences |
Optionally, specify the number of differences allowed in a file before the comparison stops and the test fails. This means you don't need to wait for the entire comparison to finish, especially for large reference and target files. If don't specify any number, Tricentis Tosca performs a complete comparison and reports all file differences. |
|
|
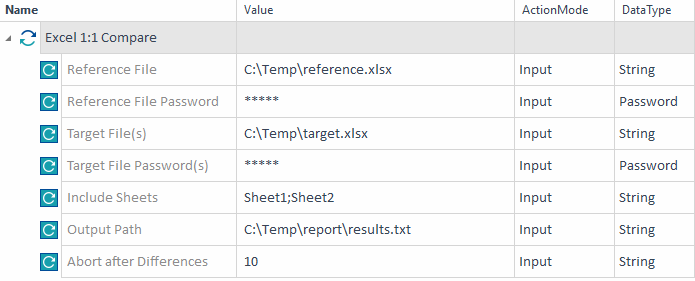
In this example, you compare the Excel files reference.xlsx and target.xlsx. Both files are located at C:\Temp. You perform the following steps:
Compare two Excel files |