Buffer Operations
The folder TBox Automation Tools->Buffer Operations in the Standard subset contains the following Modules:
For information on how to use buffered values in your TestCases, see chapter "Text expressions".
TBox Set Buffer
Use the Module TBox Set Buffer to perform one of the following actions:
-
Create a Buffer with a particular value.
-
Verify the value of an existing Buffer.
The Module has the following ModuleAttribute:
|
ModuleAttribute |
Description |
|---|---|
|
<Buffername> |
Replace <Buffername> with the name of the Buffer.
|

|
This example shows how to work with TBox Set Buffer.
TBox Set Buffer example |

TBox Name To Buffer
This Module allows you to buffer the name of the TestCase that uses the Module.

|
You can buffer the name of a TestCase if you run the TestCase via ExecutionList in the Execution section. ScratchBook does not support this functionality. |
The Module TBox Name To Buffer has the following ModuleAttribute:
|
ModuleAttribute |
Description |
|---|---|
|
Buffer |
Name of the buffer to which you want to save the TestCase. Use ActionMode Input. |
|
|
In this example, you write the name of the TestCase TestCase 12345 to a Buffer named TC_Name.
TBox Name To Buffer example |

TBox Partial Buffer
Use this Module to perform the following actions:
-
Buffer parts of a value.
-
Verify parts of a buffered value.
The Module TBox Partial Buffer has the following ModuleAttributes:
|
ModuleAttribute |
Description |
|---|---|
|
Buffer |
Name of the Buffer. |
|
Value |
Value you want to buffer or verify.
|
|
Start |
Character index from which you want the system to start buffering or verifying the value. |
|
End |
Character index that ends the value you want to buffer or verify. |
|
Last |
Number of characters you want to buffer or verify, starting from the last character. If you set this value, Tosca Commander ignores the ModuleAttributes Start and End. |
|
|
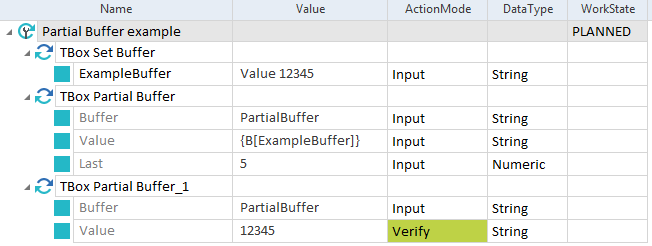
This example shows how to create and verify a partial Buffer.
Set and verify a partial Buffer |
TBox Delete Buffer
Use this Module to remove individual or all existing Buffers.
The Module TBox Delete Buffer has the following ModuleAttribute:
|
ModuleAttribute |
Description |
|---|---|
|
Buffer |
Name of the Buffer that you want to delete. Use ActionMode Select. You can delete Buffers as follows:
Note that to use the wildcard character * with buffers, you must also create a UseWildcards steering parameter and set it to True. |
|
|
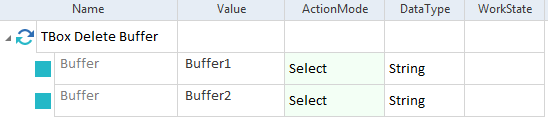
The TestStep in this example deletes the Buffers Buffer1 and Buffer2.
Delete two Buffers |
TBox Iterate Array
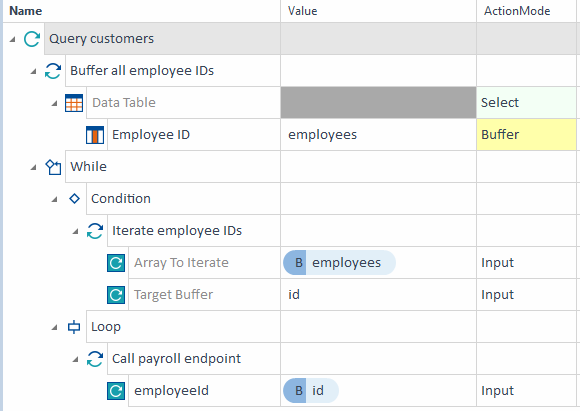
Use this Module to iterate a buffered array, such as a table row or column. TBox Iterate Array outputs each array element individually. For instance, you can buffer a column containing customer names and send each name individually to the system under test. Tosca sends each array element in sequential order.
You need to use this Module in a WHILE statement. Put the TBox Iterate Array under Condition. You then put the module you want to receive the iterated output under Loop. For details on creating WHILE statements, check out Using conditional statements and loops in TestCases.
The Module TBox Iterate Array has the following ModuleAttributes:
|
ModuleAttribute |
Description |
|---|---|
|
Array to Iterate |
Name of the Buffer containing an array that you want to iterate. |
|
Target Buffer |
Name of the Buffer that you want to receive the iterated output. Use ActionMode Input. |
|
|
This example show how to buffer an array, iterate the buffered array, and send iterated output.
Iterate a buffered array |
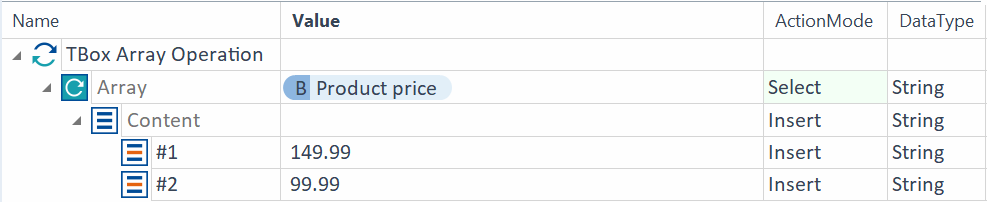
TBox Array Operation
You can use this Module to run advanced operations with array elements of an existing buffer. Or you can use it to create an array from elements you manually define.
The Module TBox Array Operation has the following ModuleAttributes:
|
ModuleAttribute |
Description |
|---|---|
|
Use the dynamic expression {B} to define which buffered array you want to run your operation on. Use ActionMode Select. |
|
|
Content |
Your use case determines what you need to do with Content: |
|
Item |
You don't need Item in every use case. For information on when and how you do, check the respective use case: To specify index positions, use one of the following values:
|
You can add elements anywhere you want in an array:
-
For Array, define the array you want to add elements to.
-
For Content, select ActionMode Select.
-
For <Item> define each element you want to add and where:
-
Replace <Item> with the index position where you want to add a new element.
-
For Value, enter the new value.
-
Select ActionMode Insert.
Tosca adds your elements in the order you list them. This means the index position of your elements changes with each element you add. A new element changes the index of all elements after it by one.
-
|
|
This example shows how to add an element to the end of an array. Your TestCase performs the following actions:
Add elements to an array |

You can delete entire arrays or only select elements.
To delete an entire array, you only need to use Array and Content:
-
For Array, select the buffer you want to delete.
-
For Content, select ActionMode Delete.
Delete specific array elements
You can delete elements by using their index position:
-
For Array, select the buffer you want to delete elements from.
-
For Content, select ActionMode Select.
-
For <Item>, define the index position of the element you want to delete and select ActionMode Delete.
For each element you want to delete, create a new <Item> and define its index position.
Tosca deletes your elements in the order you list them. This means the index position of your elements changes with each element you delete.
Search and delete using ActionMode Constraint
Using ActionMode Constraint for <Item> lets you search for and delete only specific values. To do so, follow these steps:
-
For Array, select the buffer you want to delete elements from.
-
For Content, select ActionMode Delete.
-
For <Item>, enter your search value under Value and select ActionMode Constraint.
|
|
This example shows how to delete elements using a search. Your TestCase performs the following actions:
Delete elements from an array |

You can overwrite elements by using ActionMode Modify:
-
For Array, select the buffer whose elements you want to modify.
-
For Content, select ActionMode Select.
-
In <Item>, define what you want to modify and how:
-
Replace <Item> with the index position of the element you want to modify.
-
For Value, enter the new value.
-
Select ActionMode Modify.
-
|
|
This example shows how to modify an array element. Your TestCase performs the following actions:
Modify an element |

Search and modify elements using ActionMode Constraint
Using ActionMode Constraint for <Item> lets you search for and modify only specific values. To do so, follow these steps:
-
For Array, select the buffer whose elements you want to modify.
-
For Content, enter the new value and select ActionMode Modify.
-
For <Item>, enter your search terms under Value and select ActionMode Constraint.
|
|
This example shows how to modify elements using Constraint. Your TestCase performs the following actions:
Modify elements with Constraint |

You can verify array elements or array size.
Verify specific array elements
To verify array elements, follow these steps:
-
For Array, select the buffer whose elements you want to verify.
-
For Content, select ActionMode Select.
-
For <Item> define the index position of the element you want to verify. Enter the expected value, and select ActionMode Verify.
|
|
This example shows how to verify an element. Your TestCase verifies that the element at index position 23 has the value 42.00.
Verify an array element |

To verify the size of an array, follow these steps:
-
For Array, select the buffer whose size you want to verify.
-
For Content, use the expression .Count==<expected value>. Then select ActionMode Verify.
|
|
This example shows how to verify array size. Your TestCase verifies that there are 50 elements in the array.
Verify the size of an array |

You can create a new buffer array with only the elements you want from another array:
-
For Array, select the buffer containing the source array.
-
For Content enter a name for your new buffer and select ActionMode Buffer.
-
Use <Item> to make the changes you want. For example, define the index position of elements you want to delete and select ActionMode Delete. Your new buffer contains the elements you don't delete.
|
|
This example shows how to create a new array by deleting elements. Your TestCase performs the following actions:
Copy array elements into a new buffer by deleting elements |

You can create an array by creating each element:
-
For Array, enter the name of the new array. Use dynamic expression B.
-
For Content, leave Value blank and select ActionMode Insert.
-
For each element:
-
Replace <Item> with # and the index position.
-
Enter the Value you want.
-
Select ActionMode Insert.
-
|
|
This example shows how to create an array manually. Your TestCase performs the following actions:
Create an array manually |
Create an array with empty elements
You can create an array with empty elements. You can also define how many empty elements you want:
-
For Array, enter the name of the new array. Use dynamic expression B.
-
For Content, enter the number of elements in your new array and select ActionMode Insert.
If you want to define one or more elements:
-
Replace <Item> with # and the index position.
-
Enter the Value you want.
-
Select ActionMode Modify.
-