qTest Manager 101
qTest Manager is a best-in-class test management solution, providing testing teams with streamlined interactions with each other and the rest of the development organization. Built with enterprise teams in mind, qTest Manager is easy to set up for your company’s specific needs. Your site can consist of multiple projects. Each project can be configured as its own workspace, with its own set of data and reporting. Users can be assigned to multiple projects and have different permissions within each project.
Are you using our new look? Take a look at how to navigate qTest's new design.
qTest Manager Organization
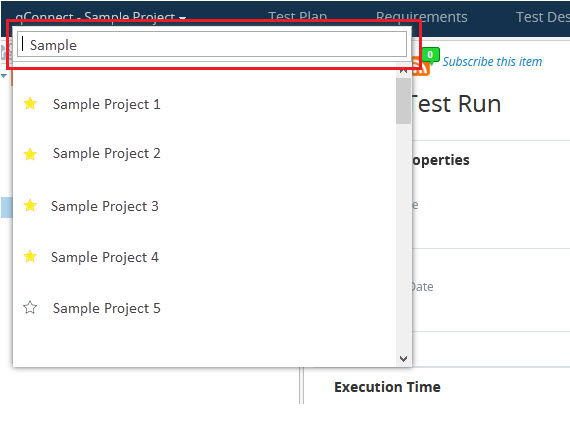
As you start, qTest Manager is organized by project. Switch between projects from the Projects dropdown.
To prioritize a project at the top of the dropdown, select the Star icon next to the project name. Starred projects display at the top of the dropdown.
To quickly search for projects, you can enter keywords in the Search bar. If you have any starred projects that contain those keywords, those project show up at the top of the search results.
Each project contains five main tabs, where you can manage the objects you use in your testing. These tabs also cover different stages of your testing process:
| Tab | Use |
|---|---|
| Test Plan |
Create a test plan to define the testing timeline and objectives for each Release or Build in your project. You can also attach Requirements to each Release or Build. While release and build are the qTest terms for these testing objects, the objects themselves can also be used for other time periods. For example, you could assign these objects to sprints for Agile projects or different testing phases for Waterfall projects. |
| Requirements |
Create or import Requirements to define an individual testing objective. You can use the nested folder structure to create and organize a repository of requirements. Requirements can help you define how different areas of your software should function during testing. You can also link Requirements to Test Plans, Test Cases, or Test Runs for traceability. |
| Test Design |
Create or import Test Cases to define an individual testing scenario, including the specific Test Steps that you need. Use the nested folder structure to create and organize a repository of test cases. You can reuse Test Steps and Test Cases to save time when you design similar tests. To better track changes, you can also use version your test cases and test case approvals, as well as link Test Cases to Requirements for traceability. |
| Test Execution |
Organize and run your Test Runs. You can create Test Runs from Test Cases, and then run them under specific Releases, Test Cycles, or Test Suites. You may choose to organize your test runs based on different scenarios, such as environments, test data parameters, or configurations. When you run your tests, you can view the expected steps and results as you record actual results alongside any defects you encounter. |
| Defects |
Create, view, and edit Defects created with qTest Manager's internal defect tracker. The internal defect tracker is simple, yet powerful, allowing you to manage defects in real-time as they are raised. Please note that this tab and its related functions don't display if you're using a defect integration. |
Collaborate using qTest
We know you don't work alone, so we made sure qTest has features that let you keep track of and communicate with other members of your team.
View object history
If you want to see who made a change, when a change was made, or what changed on an object, check the History tab. The following types of objects have history tracking: requirements, test cases, test suites, test runs, and defects.
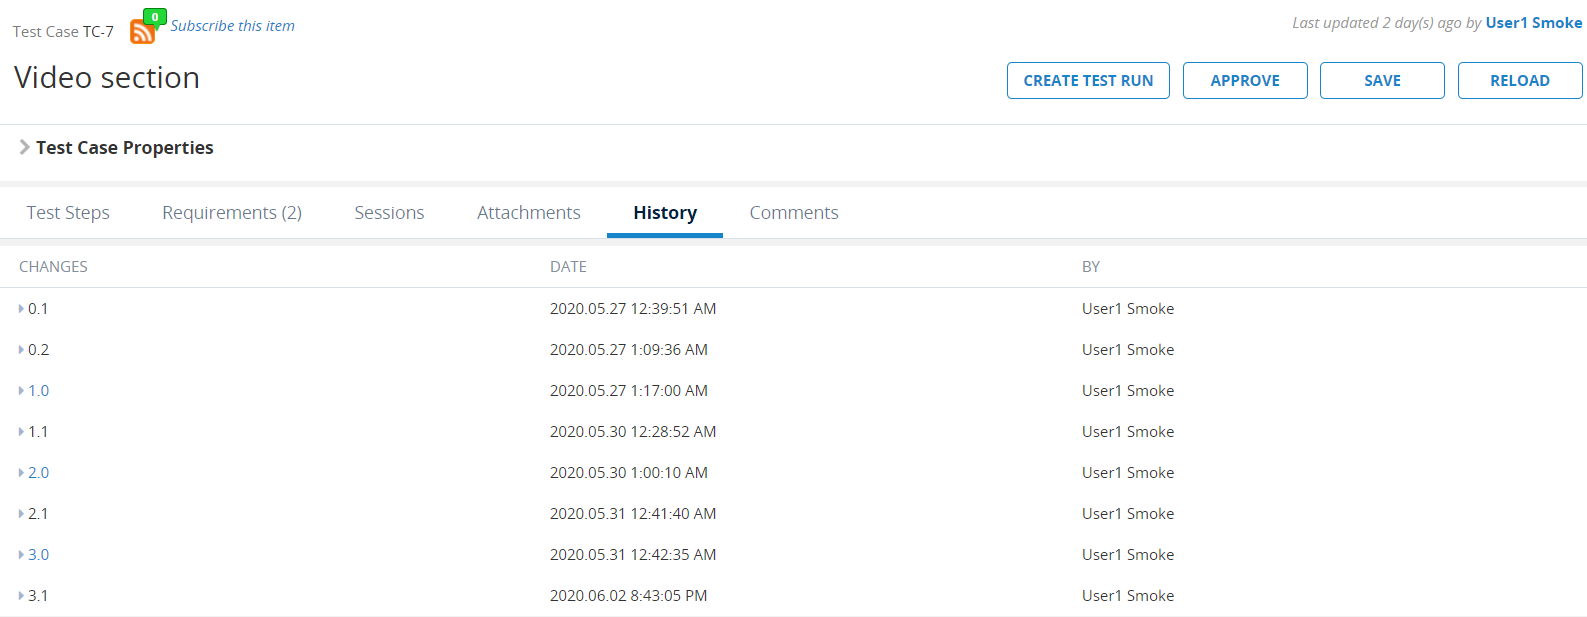
For example, in test cases, the History tab displays changes between different versions of the test case you have open.
Leave comments on objects
If you have a quick note for other users on an object, you can leave a comment. When you add a comment to an object, your name and a time stamp are included.
If you're in a requirement, test case, or test run, go to the Comments tab to leave a comment. If you're using qTest's internal defect tracker, you can use the Comment field on the defect. Note that you need to save a new defect before you can view its comment field.
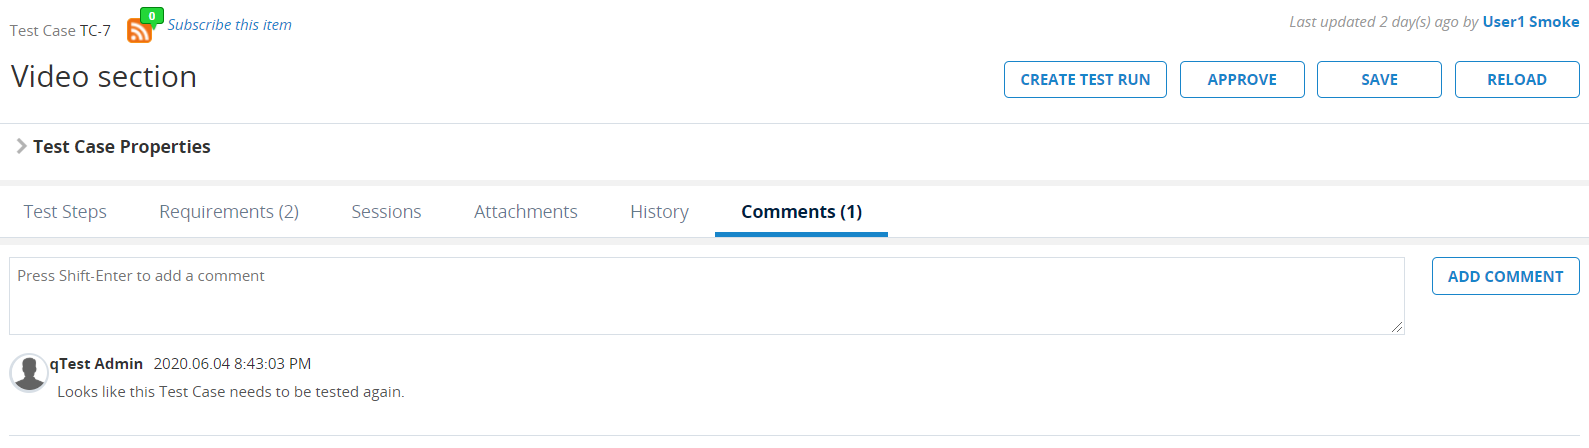
For example, in test cases, the Comment tab displays the comment with a timestamp and the commenter's name.
Get notified about objects
Want to know when an object is assigned, updated, commented on, or otherwise interacted with? Select the Manage subscription button on an object to sign yourself (or someone else) up for email notifications for any updates related to that object.

For example, you can subscribe to a test case to get notified when it's assigned, updated, commented on, or approved.
A few notification events are active for object Assignees and Subscribers by default, but you can go to Notification Settings in Manager to customize what actions on an object send a notification and who gets notified.
Search and filter objects
Need to do a quick search for all objects that mention API testing? Or maybe you remember creating that shopping cart test suite, but can't remember where you saved it.
We offer several different search and filter features, so you can find exactly the object you're looking for, no matter where it is in qTest Manager.
Search for objects
You can use the Search box on the top-right corner of any tab to search through objects in Manager. No matter where you are, when you use the search box, the system searches through the entirety of Manager for objects that contain the keywords you entered. To search for an exact phrase, use quotation marks around the words you search. For example, "shopping cart".
You can also search for specific objects by including the following in your query before any keywords:
-
obj:req: Searches only requirements
-
obj:tc: Searches only test cases.
-
obj:tr: Searches only test runs.
-
obj:df: Searches only defects.
-
obj:ts: Searches only test suites.
For example, your search would look like this: obj:tc "shopping cart".
You can only search for information located in the following standard objects and fields:
-
Release: ID, Name, Status, Description, Release Note.
-
Build: ID, Name, Status, Build Note.
-
Requirement: ID, Name, Status, Description, Type.
-
Test Case: ID, Name, Description, Status, Type, Test Step Description.
-
Test Suite: ID, Name, Description, Execution Type.
-
Defect: ID, Summary, Description, Status, Type.
-
Test Run: ID, Name, Status.
If you create custom fields at the site level or at the project level, you can choose to make the following Field Types searchable: Text box, Text area, Combo box, Rich text editor, Number, Check box, URL, and Multiple selection combo box. Note that we're working to improve search results, and you may have issues with your custom fields displaying in search results. If you run into this problem, please reach out to support.
Filter objects
You can apply filters to narrow down objects in the tree panels on the Test Plan, Requirements, Test Design, and Test Execution tabs.
Just select the Filter icon ![]() on the tree panel toolbar, and go to Set Filter. This opens the Filter window, where you can set your desired filter criteria. Please note that the available criteria change depending on the objects you're trying to filter. When you're done, select Filter to apply the criteria.
on the tree panel toolbar, and go to Set Filter. This opens the Filter window, where you can set your desired filter criteria. Please note that the available criteria change depending on the objects you're trying to filter. When you're done, select Filter to apply the criteria.
To remove a filter, select the Filter icon ![]() and select Clear Filter.
and select Clear Filter.
Search with Data Query
In addition to basic search features, we also offer Data Query. In the tree panel toolbar, select the Data Query ![]() icon to use Data Query to create and save detailed custom queries, edit and approve objects in batches, and create detailed reports.
icon to use Data Query to create and save detailed custom queries, edit and approve objects in batches, and create detailed reports.
The Data Query feature is available in the following tabs:
-
Requirements: You can run queries for requirements, such as queries displaying unassigned requirements or requirements that are not associated with test cases.
-
Test Design: You can run queries for test cases, such as queries displaying all approved test cases or test cases that do not have test steps.
-
Test Execution: You can run queries for test runs, such as queries displaying unassigned test runs or test runs that are not associated with requirements.
-
Defects: You can run queries for defects, such as queries displaying defects assigned to you or defects assigned to another user.
Take a look at Data Query to learn more.
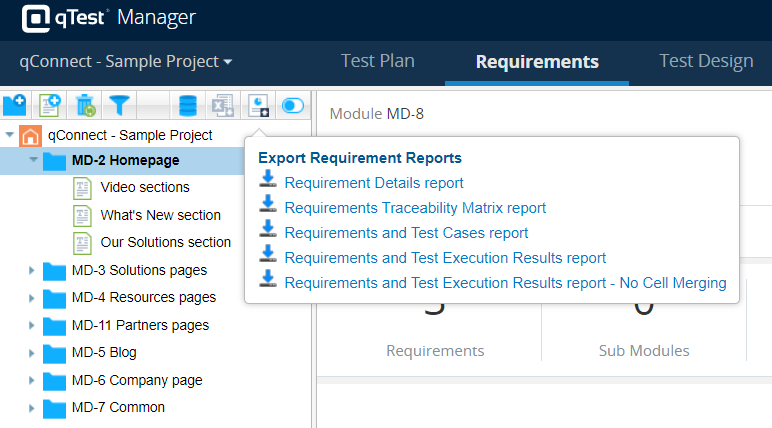
Export Data
You can export your data to an .xls file:
-
Select the objects to export in the tree panel. You can select multiple objects by pressing and holding Ctrl while clicking the objects.
-
Click the Export Reports icon
 in the tree panel toolbar. On the menu that appears, click the report that you want to export.
The name of the icon will differ based on the tab that you are selecting objects on.
An Export window appears.
-
Using the Right Arrow button, move available fields from the left box to the right box to indicate which fields you want to include on the exported report.
You can reorder the fields using the Up Arrow and Down Arrow buttons.
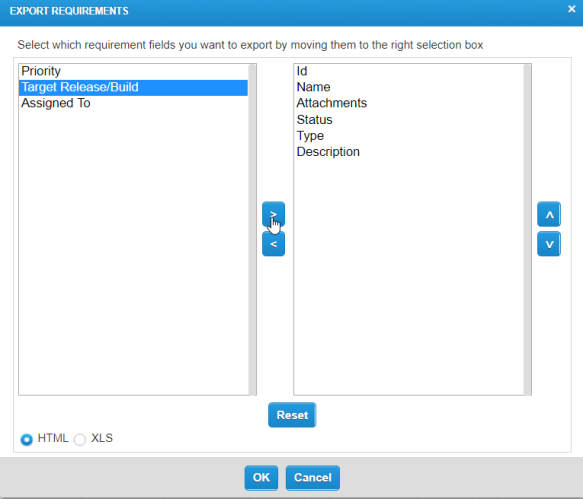
You can export data from the Test Run Grid in Test Execution as well as from the Data Query.
-
Click the OK button.
The reports downloads as a .zip file to your computer.
For additional information about qTest Manager reports, refer to the following articles:
Recycle bin
Deleted objects from any area of qTest are stored in the recycle bin of the project you're working in. To open the recycle bin, select the ![]() Recycle Bin on the tree panel toolbar of the Test Plan, Requirements, Test Design, or Test Execution tabs to open the Recycle bin window.
Recycle Bin on the tree panel toolbar of the Test Plan, Requirements, Test Design, or Test Execution tabs to open the Recycle bin window.
From here, you can select the checkboxes next to deleted objects and then choose one of the following actions:
-
Restore: Users with the permission to delete an object can return any unintentionally deleted objects from the recycle bin to their original location. For example, if you have the Delete Test Runs user permission, you can restore any deleted test runs from the recycle bin.
-
Delete permanently: Users with the Manage Recycle Bin Settings user permission can remove an object from the recycle bin and get rid of it forever. Be careful! Once you select this option, you can't undo it.
Deleted objects stay in the recycle bin until you choose to restore or delete them permanently.
Data privacy notice
qTest is a software testing product to be used in a testing environment with test data. Do not store credentials in qTest.
Have Questions?
You can always access the Support Portal and the qTest manual through your qTest instance. Just select the Help icon ![]() to see your options.
to see your options.
From the dropdown, you can go to Get Help to access a manual article that relates to what you're working on in qTest.
Or, you can go to Submit Tickets to Tricentis to take a look at the Support Hub, where you can look through the knowledge base or log in to get help from a real person, depending on your needs.
Need support to log in to your instance? After you contact us, enable support login and give the support@tricentis.com account the permissions needed for us to see your issue, and we'll be able to log into your qTest instance to see things from your perspective. This won't affect your license count.