Connect to qTest MCP
The qTest Model Context Protocol (MCP) integration lets you interact with your test organization through natural language conversations with AI assistants.
The MCP transforms your performance testing experience by enabling you to perform a variety of tasks in qTest in simple conversation with an API.
With the qTest MCP, you can use agents, such as Claude or Cursor, to communicate between the API and LLMs to complete tasks in qTest. Instead of going through complex UIs or writing scripts, you can manage your testing with simple conversational prompts. See the data flow diagram below for more information on how the MCP works with agents, LLMs, and the qTest API.
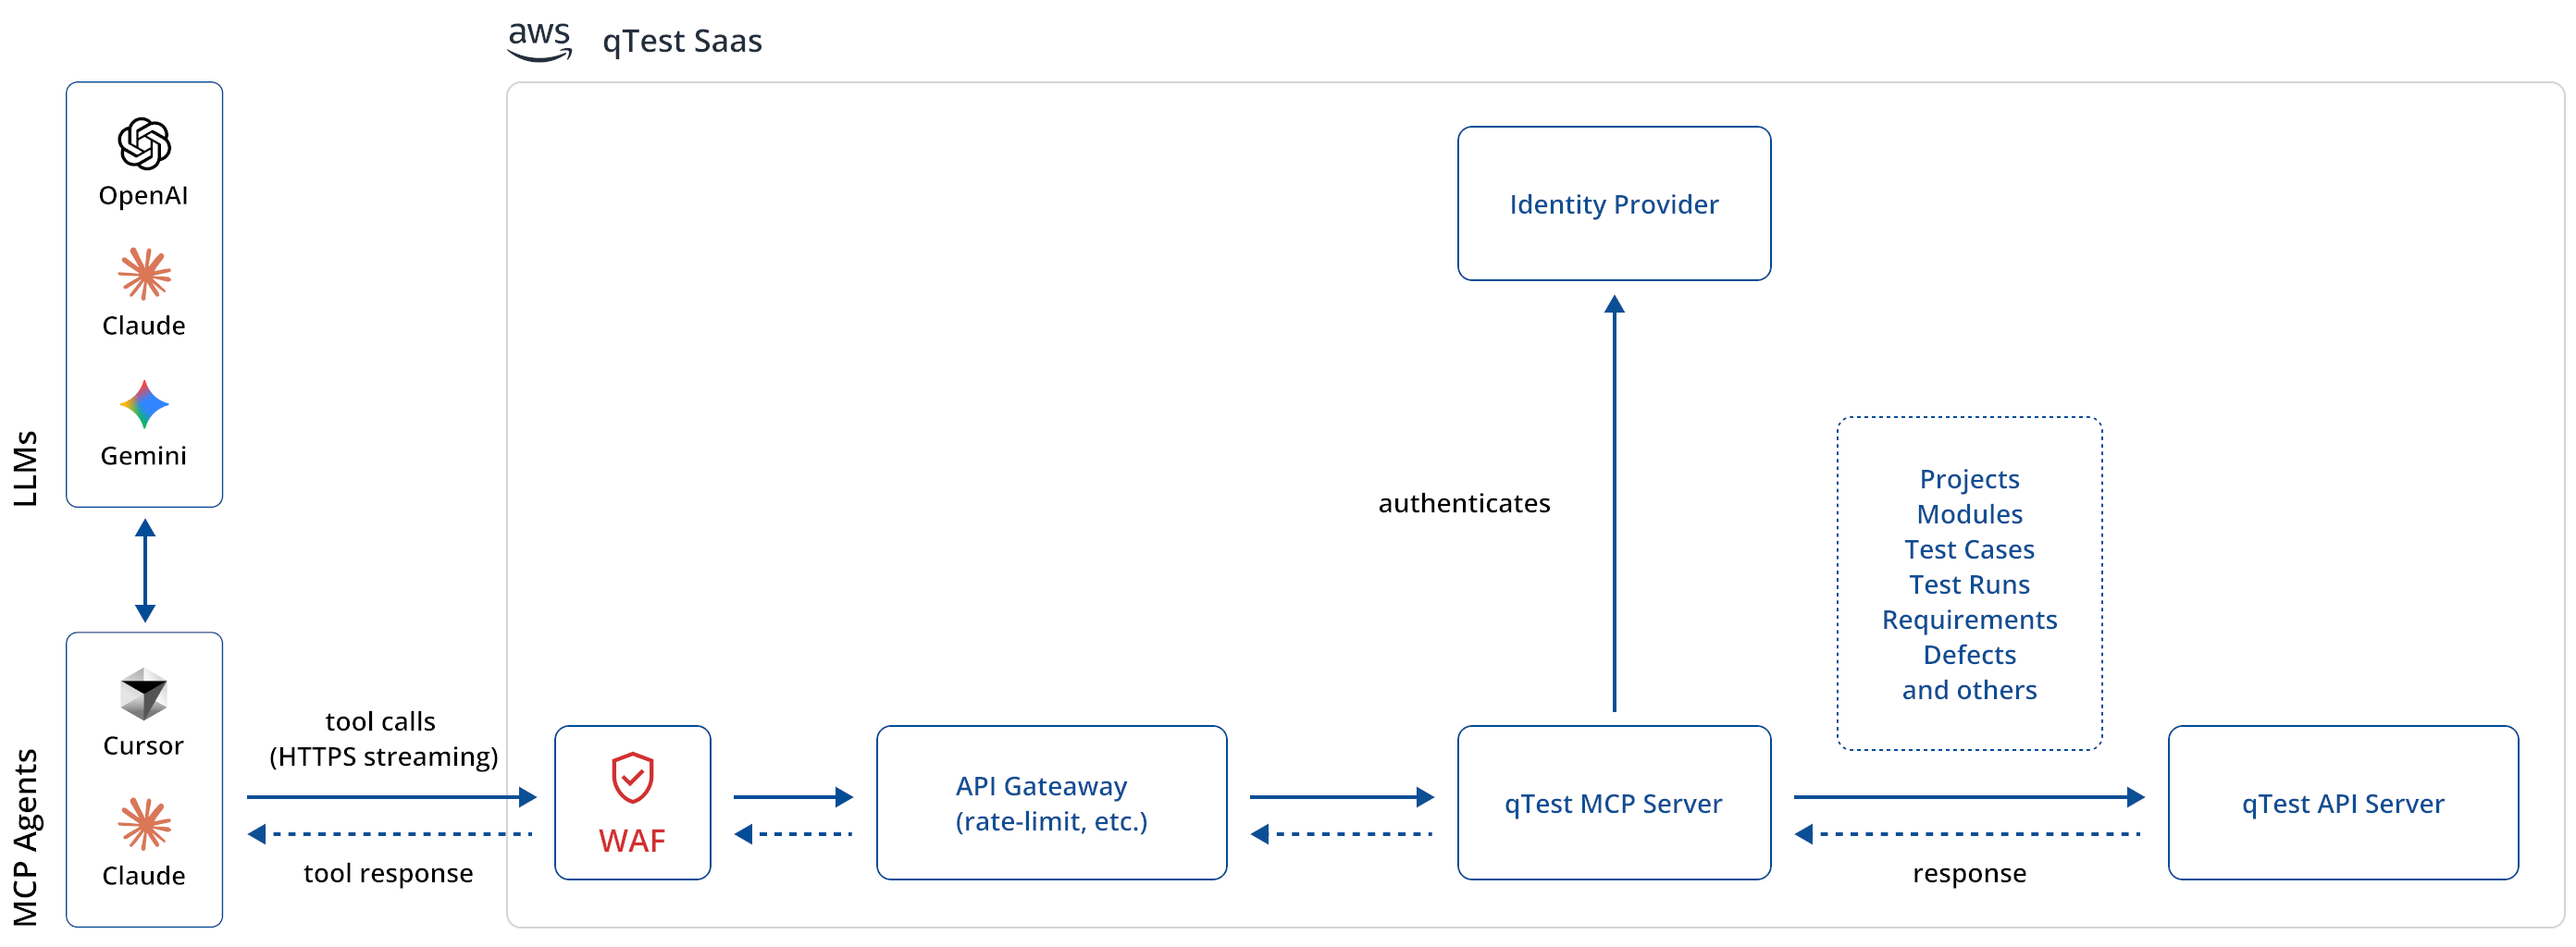
The qTest MCP Server connects agents with the qTest API, allowing users to complete tasks with conversational prompts.
Before you start
Consult the documentation for the tool you want to use. While we can provide an idea of what to expect during installation, this is a rapidly changing space, and set-up requirements for the tool you want to use might differ from our guidelines.
Before you connect to qTest MCP, make sure you have the following things:
-
A valid qTest account with MCP access.
-
The Bearer Token from the API & SDK section of Download qTest Resources.
-
A compatible AI assistant (The qTest MCP is tested with Cursor and Visual Studio Code).
The qTest MCP server doesn't currently support OAuth2 connections. If you use an OAuth2 based connection, you can't set up a connector for certain clients, such as Claude Desktop. As a workaround, you can install Node.js and the MCP-Remote package (opens in a new tab). Consult your IT or Security department to use versions that comply with your company policies.
Make sure you give MCP users the following permissions in qTest:
-
Create Modules
-
Create Test Cases
-
Edit Test Cases
-
View Test Cases
-
Create Requirements
-
Edit Requirements
-
View Requirements
-
View Defects
-
Create Defects
-
View Test Runs
Get your Bearer Token
Once you've logged in to your qTest instance, follow the steps below to locate your Bearer Token:
-
To access API tokens, select the Download qTest Resources
 icon from the toolbar.
 -
Go to the API & SDK dropdown.
-
Copy the Bearer Token and save it somewhere safe.
Configure your AI assistant
Configure your AI assistant to connect to the qTest MCP server. The configuration steps depend on which AI assistant you're using. Though you can connect with the AI assistant of your choice, the qTest MCP is currently tested with and supported in Cursor.
To configure Cursor to connect to qTest, follow these steps:
-
Open your Cursor Settings.
-
Navigate to the MCP Tools section.
-
Select New MCP Server to create a new
mcp.jsonfile. -
Copy and paste the following configuration into the
mcp.jsonfile:
{
  "mcpServers": {
    "<servername>": {
      "type": "http",
      "url": "https://<tenantname>.qtestnet.com/mcp",
      "headers": {
        "Authorization": "<Bearer xxxxxxxx-xxxx-xxxx-xxxx-xxxxxxxxxxxx>"
      }
    }
  }
}-
Change following in the code:
-
<servername>to indicate your qTest server name. -
<tenantname>to match the URL for your qTest instance. -
<Bearer xxxxxxxx-xxxx-xxxx-xxxx-xxxxxxxxxxxx>to the Bearer Token. Make sure to keep the wordBearerin the token.
-
-
Save the file.
After setup, if you don't see mcp.json in the Add Context field, open Cursor Settings and select MCP Tools to get it to show up.
To configure Visual Studio Code to connect to qTest, follow these steps:
-
Create or open the
mcp.jsonfile you want to add the configuration to. -
Copy and paste the following configuration into the
mcp.jsonfile:
{
  "mcpServers": {
    "<servername>": {
      "type": "http",
      "url": "https://<tenantname>.qtestnet.com/mcp",
      "headers": {
        "Authorization": "<Bearer xxxxxxxx-xxxx-xxxx-xxxx-xxxxxxxxxxxx>"
      }
    }
  }
}-
Change following in the code:
-
<servername>to indicate your qTest server name. -
<tenantname>to match the URL for your qTest instance. -
<Bearer xxxxxxxx-xxxx-xxxx-xxxx-xxxxxxxxxxxx>to the Bearer Token. Make sure to keep the wordBearerin the token.
-
-
Save the file and restart Visual Studio Code.
Whenever you want to call the MCP, ensure you have the mcp.json as context for the chat.
Verify your connection
In order to have your AI assistant interact with a tool on the MCP server, you must ensure the MCP servers are part of the chat context. Whenever you start a new chat session, verify that the contacts for the chat window contains mcp.json.
To verify that your MCP connection is working correctly, follow these steps:
-
Open your AI assistant.
-
Start a conversation with a simple command like: "Show me project [ID number]."
-
If the connection is successful, you should see details for the project you've inquired about.
What's next?
Now that you've connected to qTest MCP, you can learn MCP prompting best practices to get the most out of your natural language interactions.