Custom Fields Reporting
With Explore Data, you can create reports that include custom site fields that you created in qTest Manager.
Include custom site fields in Explore Data
After you create a custom site field, it automatically populates to the applicable Explore Data report.
Please note that Insights only includes reports at the site level because it supports cross-project reporting. If you have custom fields at the project level, these can't be included in Insights reports. To check if the custom field you want to add is available for Insights, go to Field Settings in your Project. If the field is marked as both CUSTOM and SITE FIELD, it will be available in Explore Data.
If you have a large number of site fields, it can affect performance across your qTest instance. We recommend that you establish a method to regulate the amount of site fields in your instance, such as a limit on users who can create site fields, or on the amount of site fields that can be created. Any instruction or discussion of site fields, including integration with site fields, assumes that your instance contains a reasonable amount of site fields. For more information about site fields, refer to Site Fields.
To include custom fields in your Explore Data view, follow these steps:
-
Select your report category from the Explore Data dropdown menu. You can include custom site fields in the following Explore Data reports:
-
Requirements
-
Test Cases
-
Test Runs
-
Test Run Logs
-
Defects (qTest)
-
-
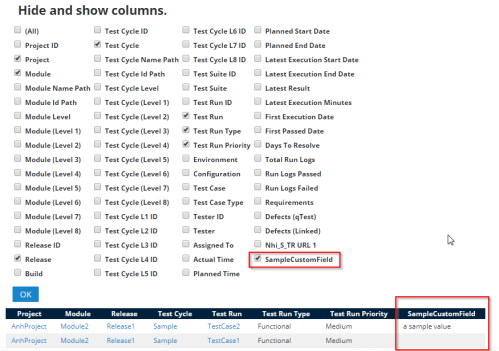
Select the
 Gear icon to view the Hide and show columns section.
 -
Select the checkbox next to the name of the custom field you want to include as column in Explore Data.
Please note that site level fields don't automatically update when an Explore Data report is open. You may need to close and open the report again to reset the grid layout to see recent changes.
-
Select OK to view the column.