2025.8 OnPremises Load Balance Upgrade Guide for Windows
This article provides step-by-step instructions to upgrade qTest components from 2025.2 to 2025.8 OnPremises for a load balancing environment, where qTest components are running on their own Windows server. Please read the instructions thoroughly before starting your upgrade.
Complete the OnPremises Technical Services Request form (opens in new tab) to request assistance or obtain self-installation links, whether you're upgrading or performing a fresh install.
Windows: Ctrl+F5
Mac/Apple: Apple+R or Command+R
Linux: F5
About the Command Line Wizard
The qTest 2025.8 Command Line Wizard is a command line interface application that allows you to configure basic settings for qTest applications in your purchase package.
You should understand these Command Line Wizard characteristics before you begin:
-
For each step, the installer will prompt you for a specific input value. After you provide a value, the installer will validate the input. If the value is incorrect, or additional permissions are required, an explicit error message displays so it’s easy to know how the input value should be corrected.
-
Default values display in square brackets [ ]. To use the default value, simply hit the Enter key.
-
Input values for yes/no questions, should be 'y', 'yes','n', 'no' (ignore case sensitive.) Any value other than those listed will be treated as a 'no.'
-
-
To terminate the configuration at any time without completing it, press Ctrl+C.
In the event you cannot start the Command Line Wizard again after terminating the configuration, backup then remove the qTest.config file. Retry starting the Command Line Wizard again.
Before You Begin
Read the following:
-
Back up your qTest data before you upgrade.
The Command Line Wizard will prompt you for each installation instruction. You need to perform action items and gather specific connection information before you begin the upgrade process.
Enter in the same configurations as in your 2025.2 qTest.config file within the Command Line Wizard unless there are configuration changes to account for.
If you need to change your previous configurations, review the application checklist provided in 2025.8 OnPremises Load Balance Installation Guide for Windows so you can see what information you will need.
Ports
Make sure the appropriate Ports for the prerequisite applications and qTest applications are open prior to any self-assisted upgrade. You should only open the HTTPS ports if you plan to serve SSL from the application.
Prerequisite applications
|
Product |
Port |
Transport Protocol |
Application Protocol |
Source |
Destination |
Configurable |
|---|---|---|---|---|---|---|
|
PostgreSQL |
5432 |
TCP |
TCP |
qTest Manager, Insights, Sessions, Parameters |
Database (PostgreSQL) Server |
Yes |
|
Elasticsearch |
9200 (TCP) 9300 (if using ES Clustering) |
TCP |
HTTP |
qTest Manager |
Database (Elasticsearch) Server |
Yes |
|
Network File System (NFSV4) |
2049 |
TCP/UDP |
TCP/UDP |
qTest Manager, Sessions |
NFS |
No |
Native Linux and Windows
|
Product |
HTTPS Port |
HTTP Port |
Transport Protocol |
Application Protocol |
Source |
Destination |
Configurable |
|---|---|---|---|---|---|---|---|
|
Manager/API |
443 |
80 |
TCP |
HTTPS |
Web Browser, API |
qTest Manager Application Server/API Server |
Yes |
|
Sessions |
8443 |
8080 |
TCP |
HTTPS |
Web Browser, API |
qTest Application Server |
Yes |
|
Scenario |
6443 |
6080 |
TCP |
HTTPS |
Web Browser, API |
qTest Application Server |
Yes |
|
Insights |
9443 |
9080 |
TCP |
HTTPS |
Web Browser, API |
qTest Application Server |
Yes |
|
Parameters |
5443 |
5080 |
TCP |
HTTPS |
Web Browser, API |
qTest Application Server |
Yes |
|
Pulse |
4443 |
4080 |
TCP |
HTTPS |
Web Browser, API |
qTest Application Server |
Yes |
|
Launch |
3443 |
3080 |
TCP |
HTTPS |
Web Browser, API |
qTest Application Server |
Yes |
Please note that we strongly recommend that you use the HTTPS ports in your setup.
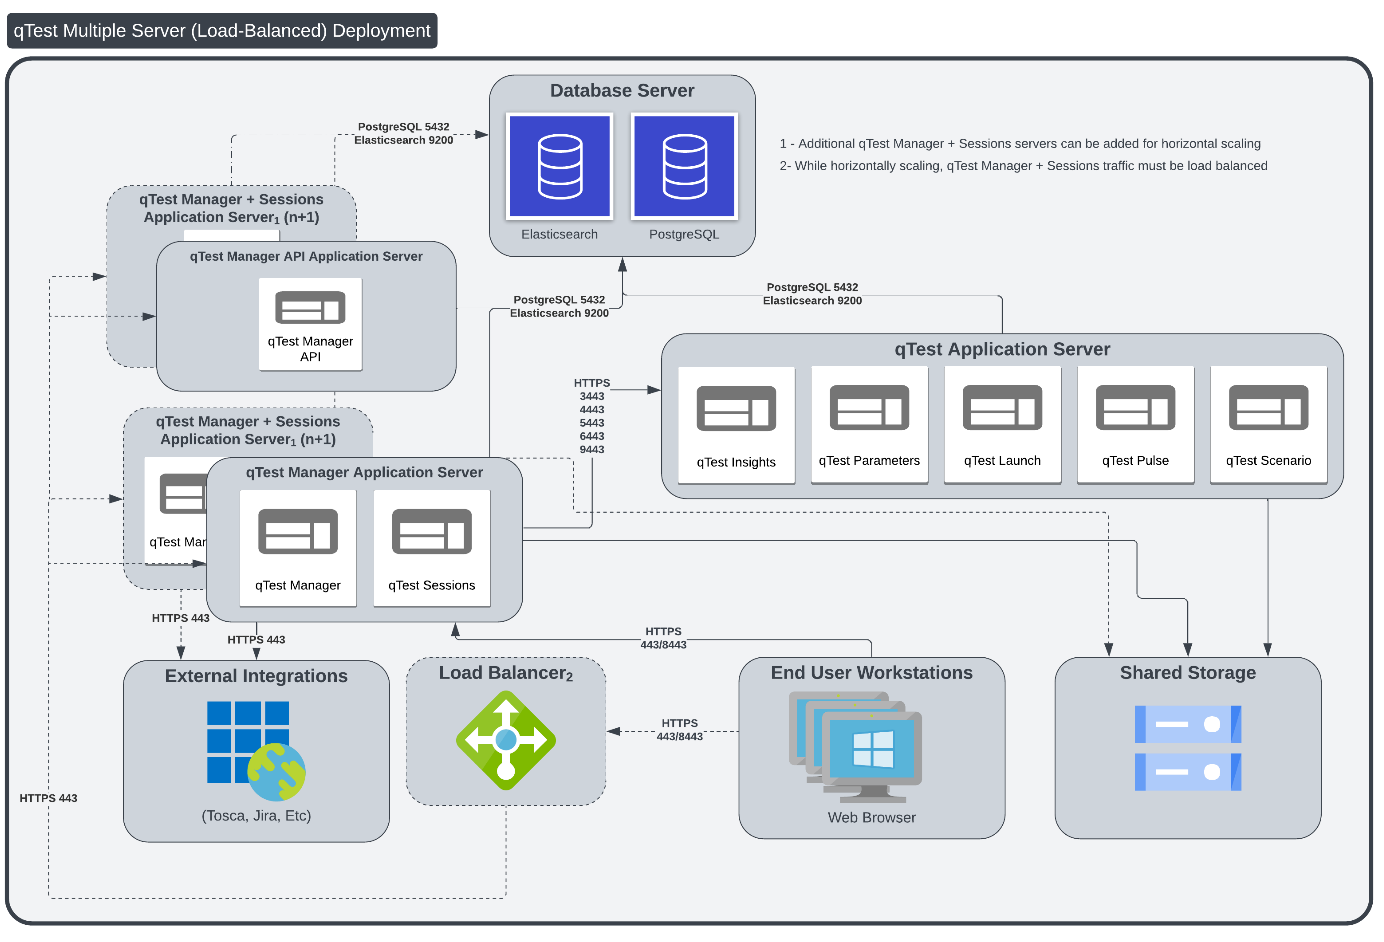
qTest Applications with a Load Balancing Model
Refer to this Server Sizing Guide to view different deployment model samples.
The sample below uses five servers.
-
1 load balancing server for Manager
-
3 application node servers
-
1 database server
-
Server 1: Manager Load Balancer is a server that acts as a load balancer for the two qTest Manager and qTest Sessions servers. We will install and use NGINX on this server for that purpose.
-
Server 2:
-
qTest Manager application node which is an instance of qTest Manager deployed in a Windows server.
-
qTest Sessions application node which is an instance of qTest Sessions deployed in a Windows server.
-
NFS Client
-
-
Server 3:
-
qTest Manager application node which is an instance of qTest Manager deployed in a Windows server.
-
qTest Sessions application node which is an instance of qTest Sessions deployed in a Windows server.
-
NFS Client
-
-
Server 4:
-
qTest Insights application node.
-
qTest Parameters application node.
-
qTest Launch application node.
-
qTest Pulse application node. Make sure you know which version of the Pulse Executor you want to install.
-
-
Server 5: Prerequisite applications, including Elasticsearch, PostgreSQL and the Shared Network Drive.
-
PostgreSQL: a database engine used to manage qTest Manager, Sessions, Parameters, Insights, Launch, Scenario, and Pulse. All application nodes must use the same PostgreSQL database.
-
Elasticsearch: a database engine used for enhanced search capabilities
-
Shared Server: a server that hosts shared components that are required to run qTest Manager and Sessions. It should be accessible from all application nodes to store attachments and search index.
-
NFS Server (Network File Systems): used to share directories and files with others over a network. We will use NFS to manage and share files created by qTest Manager and Sessions applications deployed on the 2 qTest Manager and qTest Sessions servers.
-
-
Upgrade qTest Applications
In the Load Balancing model, there are multiple application nodes (qTest Manager and qTest Sessions on Server #2 and Server #3 in the above diagram). You will need to upgrade each server and take into consideration the applications installed on each server.
Upgrading an application node will follow the same set of instructions as upgrading qTest applications on a single server. Refer to 2025.8 OnPremises Single Server Upgrade Guide for Windows to upgrade qTest application nodes on a Windows server.
Import qTest License
After the upgrade, you need to manually copy the qTest License file from Manager 2025.2 and then import it to 2025.8. (These instructions are also covered in the Configure Manager article linked above.)
-
Access your qTest Manager instance via your browser using the URL as specified in the qTest.config file.
-
You will be redirected to the Licenses - Users tab in the Site Administration panel.
-
Select the Import License File button.
-
Browse to your license file located under the installation directory for qTest Manager 2025.2.
Example: <installation_dir>\manager\build\.tc\license.lic
-
Your license file will import into qTest Manager 2025.8.
Switch to PostgreSQL search
Optionally, you can switch from Elasticsearch to PostgreSQL search after you install or upgrade OnPremises. PostgreSQL search is more stable and secure, but there are still a few known issues that we're currently working on.
To switch to PostgreSQL search, you'll need to update some variables in your qtestctl folder. During this transition, you'll need to turn off Elasticsearch indexing, turn on PostgreSQL indexing, and switch the user interface to the PostgreSQL index.
Note that, if you update all of these environment variables at once without giving your instance time to index, your search function won't return results until PostgreSQL is done indexing. However you decide to perform these configuration tasks, be sure to restart qtestctl for each configuration change.
Turn on PostgreSQL indexing
Initial indexing can take anywhere from a few minutes to a few days, depending on the size of your data and your processing power. While qTest does send a notification when indexing is done, if you miss this notification, you can check your main.log file to find out if your instance is done with initial indexing. Just go to opt/qtestctl/manager/build/logs and locate the main.log file. When indexing is finished, this log will display the following message: "Sending indexing completion notification to users".
After initial indexing, if you're ready to start using PostgreSQL, follow these steps:
-
Stop the qTest Manager instance with the following command:
systemctl stop qtest -
Find your qtestctl folder. By default, this is located in
C:\qtestctlfor Windows. -
Open the following file:
qtestctl/manager/build.gradle. -
This file contains the instructions to initialize qTest Manager. Locate the
DB_PASSlist, which should look like this:CopyDB_PASS: "${Crypto.decryptString(config['manager.postgres.auth.pass'])}",
'manager.test.configuration': configEnabled,
S3_SECRET_KEY : Crypto.decryptString(config['manager.storage.s3.secretkey']),
SSL_PASS: sslPass,
SECRET_KEY: "${Crypto.decryptString(config['common.data.secretkey'])}",
AES_SECRET_KEYS: "${Crypto.decryptString(config['common.data.passwordsecretkeys'])}"
]) -
Add the following variables to the
DB_PASSlist:CopyDB_PASS: "${Crypto.decryptString(config['manager.postgres.auth.pass'])}",
'manager.test.configuration': configEnabled,
'qtest.elastic.search.replacement' : true,
'qtest.index.elastic.search' : false,
'qtest.index.Postgres' : true,
S3_SECRET_KEY : Crypto.decryptString(config['manager.storage.s3.secretkey']),
SSL_PASS: sslPass,
SECRET_KEY: "${Crypto.decryptString(config['common.data.secretkey'])}",
AES_SECRET_KEYS: "${Crypto.decryptString(config['common.data.passwordsecretkeys'])}"
]) -
Save your changes to the file to apply them.
-
Start your qTest Manager instance with the following command:
systemctl start qtest
Note that, if you update all of these environment variables at once, your search function won't return results until PostgreSQL is done indexing. To avoid this, you can turn on PostgreSQL indexing with the 'qtest.index.Postgres' : true variable. When PostgreSQL is done indexing, you can then switch the user interface to this index with the 'qtest.elastic.search.replacement' : true variable. However you decide to perform these configuration tasks, be sure to restart qtestctl for each configuration change.
Verify PostgreSQL is active
After you've updated the qtestctl file, you can verify that PostgreSQL is functioning properly by reviewing the feature flags in Chrome.
Follow these steps to verify PostgreSQL:
-
Open your Manager instance in Chrome, then navigate to the developer console. You can find this by right-clicking anywhere on the website and selecting Inspect from the dropdown.
-
Navigate to the Console tab and enter the following command to view an expandable map of all the qTest feature flags:
qtest.featureFlags -
Locate the following feature flags and verify that they match these listed states:
qtest-elastic-search-replacement: { boolVariation: True }: If this is set to true, the search results in the user interface are from the PostgreSQL index. If it is false, the results in the user interface are from the ElasticSearch index.-
qtest-index-elastic-search: { boolVariation: False }: If this is set to false, Elasticsearch is not performing the indexing. -
qtest-index-Postgres: { boolVariation: True }: If this is set to true, PostgreSQL is indexing.
If everything matches, you've successfully switched the backend of your search functions to PostgreSQL.