2024.4 OnPremises Load Balancing Upgrade Guide for Linux
In this article, we provide step-by-step instructions to upgrade qTest components from 2024.1 to 2024.4 OnPremises on a load balancing environment, where qTest components are running on their own RHEL/Ubuntu server. Please read the instructions thoroughly before starting your upgrade.
Complete the OnPremises Technical Services Request form (opens in new tab) to request assistance or obtain self-installation links, whether you're upgrading or performing a fresh install.
Windows: Ctrl+F5
Mac/Apple: Apple+R or Command+R
Linux: F5
About the Command Line Wizard
The qTest 2024.4 Command Line Wizard is a command line interface application that allows you to configure basic settings for qTest applications in your purchase package.
You should understand these Command Line Wizard characteristics before you begin:
-
For each step, the installer will prompt you for a specific input value. After you provide a value, the installer will validate the input. If the value is incorrect, or additional permissions are required, an explicit error message displays so it’s easy to know how the input value should be corrected.
-
Default values display in square brackets [ ]. To use the default value, simply hit the Enter key.
-
Input values for yes/no questions, should be 'y', 'yes','n', 'no' (ignore case sensitive.) Any value other than those listed will be treated as a 'no.'
-
-
To terminate the configuration at any time without completing it, press Ctrl+C. Hint: In the event, you cannot start the Command Line Wizard again after terminating the configuration, backup then remove the qTest.config file. Retry to start the Command Line Wizard again.
Before You Begin
Read the following:
-
2024.4 OnPremises Prerequisite Software for Linux and Kubernetes
-
Back up your qTest data before you upgrade.
The Command Line Wizard will prompt you for each installation instruction. You need to perform action items and gather specific connection information before you begin the upgrade process.
Enter in the same configurations as in your 2024.1 qTest.config file within the Command Line Wizard unless there are configuration changes to account for.
If you need to change your previous configurations, please review the application checklist provided in 2024.4 OnPremises Load Balance Installation Guide for Linux so you can see what information you will need.
Ports
Make sure the appropriate Ports for the prerequisite applications and qTest applications are open prior to any self-assisted upgrade. You should only open the HTTPS ports if you plan to serve SSL from the application.
Prerequisite applications
| Product | Port |
|---|---|
| PostgreSQL | 5432 (TCP) |
| Elasticsearch |
9200 (TCP) 9300 (if using ES Clustering) |
| Network File System (NFSV4) | 2049 (TCP and UDP) |
Native Linux and Windows
| Product | HTTP Port | HTTPS Port |
|---|---|---|
| Manager | 80 | 443 |
| Sessions | 8080 | 8443 |
| Scenario | 6080 | 6443 |
| Insights | 9080 | 9443 |
| Parameters | 5080 | 5443 |
| Pulse | 4080, 4090 | 4443, 4493 |
| Launch | 3080 | 3443 |
qTest Applications with a Load Balancing Model
Refer to the Select your OnPremises Systems and Deployment Model for Manager 2024.4 to view different deployment model samples.
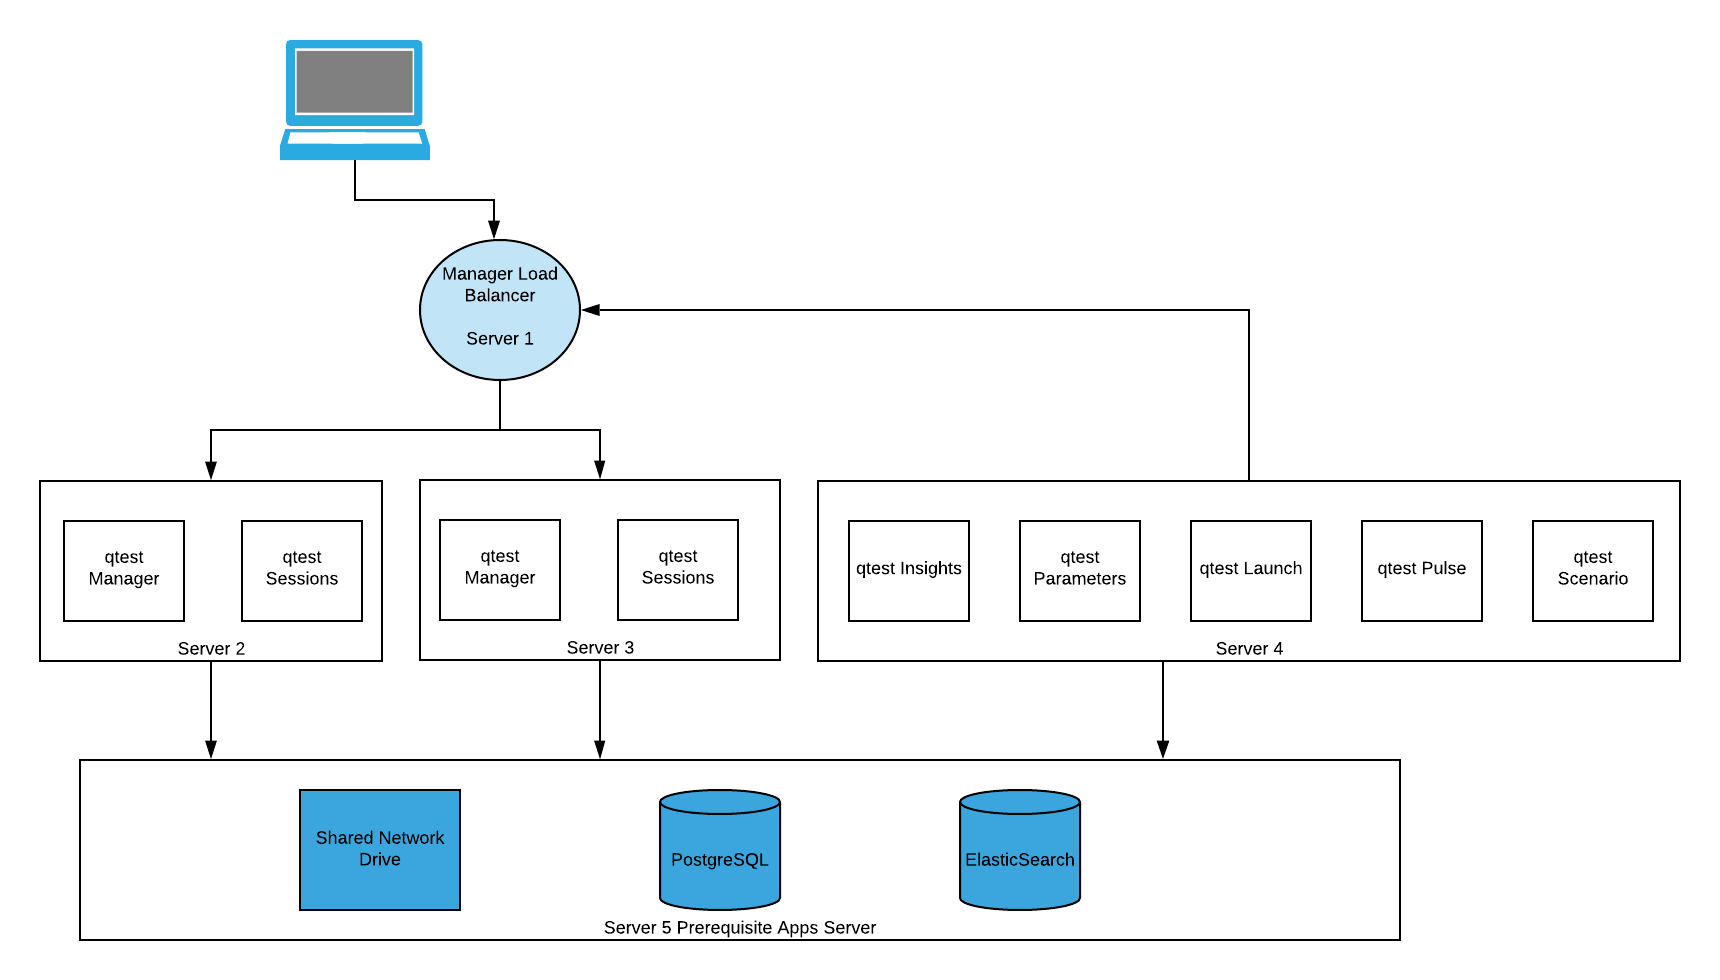
The sample below uses five servers.
-
1 load balancing servers
-
3 application node servers
-
1 database server
-
Server 1: Manager Load Balancer is a server that acts as a load balancer for the two qTest Manager servers. We will install and use NGINX on this server for that purpose.
-
Server 2:
-
qTest Manager application node which is an instance of qTest Manager deployed in a Linux server.
-
qTest Sessions application node which is an instance of qTest Sessions deployed in a Linux server.
-
NFS Client
-
-
Server 3:
-
qTest Manager application node which is an instance of qTest Manager deployed in a Linux server.
-
qTest Sessions application node which is an instance of qTestSessions deployed in a Linux server.
-
NFS Client
-
-
Server 4:
-
qTest Insights application node.
-
qTest Parameters application node.
-
qTest Launch application node.
-
qTest Pulse application node. Make sure you know which version of the Pulse Executor you want to install.
-
-
Server 5: Prerequisite applications, including Elasticsearch, PostgreSQL and the Shared Network Drive
-
PostgreSQL: a database engine used to manage qTest Manager, Sessions, Parameters, Insights, Launch, Pulse, and Scenario. All application nodes must use the same PostgreSQL database.
-
Elasticsearch: a database engine used for enhanced search capabilities
-
Shared Server: a server that hosts shared components that are required to run qTest Manager and Sessions. It should be accessible from all application nodes to store attachments and search index.
-
NFS Server (Network File Systems): used to share directories and files with others over a network. We will use NFS to manage and share files created by qTest Manager and Sessions applications deployed on the two qTest Manager and qTest Sessions servers.
-
IPv4 Public IP: we will not use the public IP address since this server will not be exposed to the outside world
-
Private IP: 10.0.10.230
-
-
-
Upgrade qTest Applications
In the Load Balancing model, there are multiple application nodes (qTest Manager and qTest Sessions on Server #2 and Server #3 in the above diagram). You will need to upgrade each server and take into consideration the applications installed on each server.
Upgrading an application node will follow the same set of instructions as upgrading qTest applications on a single server. Refer to 2024.4 OnPremises Single Server Upgrade Guide for Linux to upgrade qTest application nodes on a Linux server.
Import qTest License
After the upgrade, you will need to manually copy the qTest License file from Manager 2024.1 and then import it to 2024.4. (These instructions are also covered in the Configure Manager article linked above.)
-
Access your qTest Manager instance via your browser using the URL as specified in the qTest.config file.
-
You will be redirected to the Licenses - Users tab in the Site Administration panel.
-
Select the Import License File button.
-
Browse to your license file located under the installation directory for qTest Manager 2024.1: Example: <installation_dir>\manager\build\.tc\license.lic
-
Your license file will import into qTest Manager 2024.4.