Sessions 2024.1 to 2024.4 Load Balancing Upgrade Guide for Docker
In this article, we provide instructions to upgrade qTest Sessions 2024.1 to 2024.4 on multiple RHEL/Ubuntu machines using Docker. Please read the instructions thoroughly before starting your installations.
Complete the OnPremises Technical Services Request form (opens in new tab) to request assistance or obtain self-installation links, whether you're upgrading or performing a fresh install.
Windows: Ctrl+F5
Mac/Apple: Apple+R or Command+R
Linux: F5
Before You Begin
Read the following:
-
qTest Sessions 2024.4 only works with qTest Manager 2024.4 or later.
-
qTest Sessions 2024.1 was delivered with docker deployment package 4.16 and qTest Sessions 2024.4 is delivered with docker deployment package 4.18. You will need to download docker deployment package 4.18 to perform the upgrade.
-
If you are using an older version, you will need to upgrade to qTest Sessions 2024.1 before proceeding to this version.
-
It is important to review the Recommended Hardware Requirements article before you begin and back up your data before you upgrade.
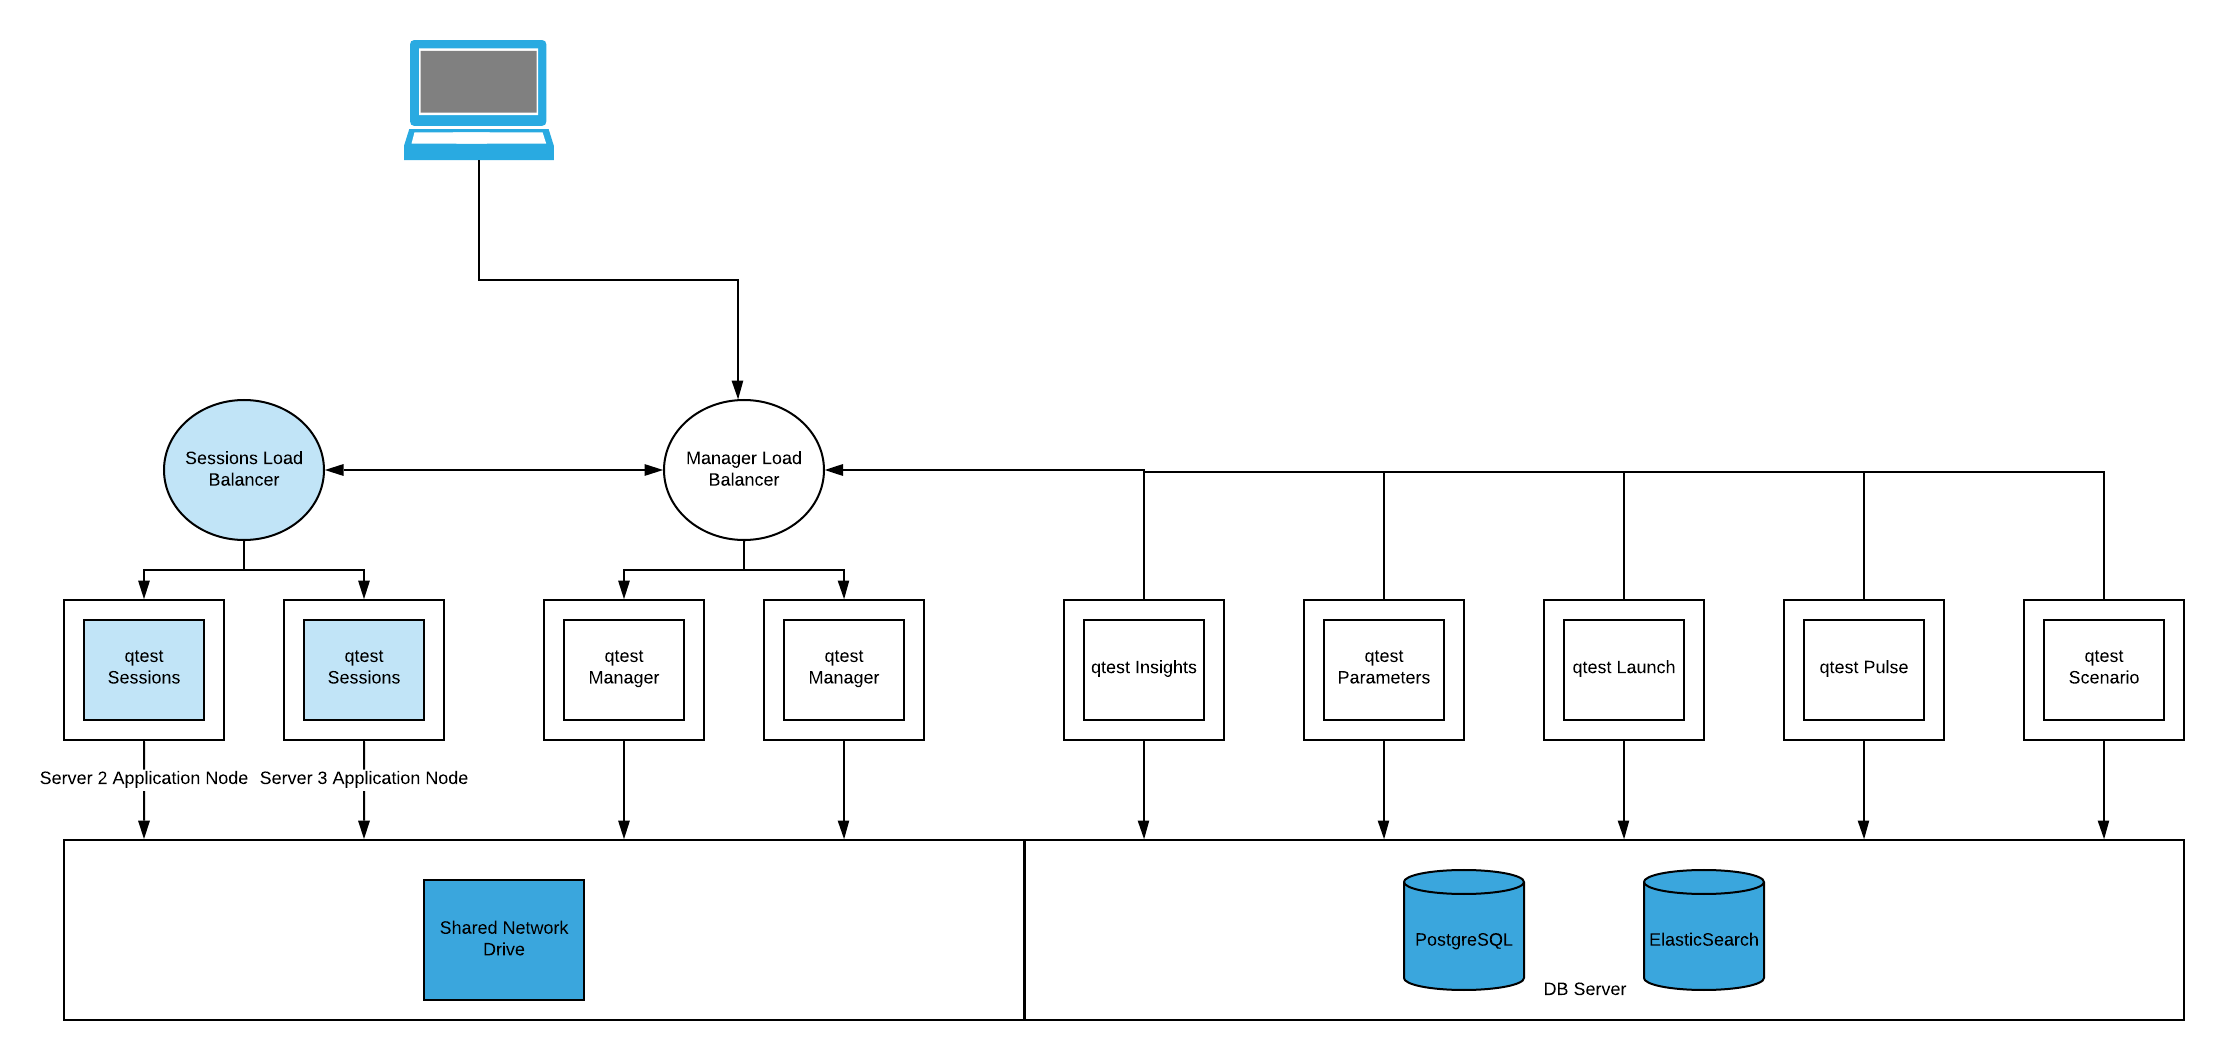
The highlighted items are qTest Sessions and the components it needs to run. This article will cover upgrading qTest Sessions application nodes, which are Machine #2 and Machine #3 in this example.
Upgrade qTest Sessions
In the Load Balancing model, there are multiple application nodes (qTest Sessions on Machine #2 and qTest Sessions on Machine #3 in the above diagram). You will need to upgrade each node.
Access your qTest Sessions server on Machine #2 and start the upgrade process.
Shutdown the Previous Deployment
-
Open the Terminal.
-
Access the directory where you extracted the previous docker deployment package 4.16, shut it down and create a backup.
$ ./shutdown
$ ./backup
Download the Deployment Package
-
Download docker-deployment-4.18 package.
$ wget <ENTER DOWNLOAD LINK HERE>
-
Extract the package.
$ tar -zxf <DOWNLOADED PACKAGE FILE NAME>
-
Access the docker-deployment-4.18 directory.
$ cd docker-deployment-4.18
Configure qTest Sessions
Choose one of the two options below to configure qTest Sessions:
-
To keep all applications in your previous deployment from being upgraded, override the /profiles directory of docker-deployment-4.18 with the directory of docker-deployment-4.16
$ cp -r /<path to your docker-deployment-4.16 package>/docker-deloyment-4.16/profiles/ /<path to your docker-deployment-4.18 package>/docker-deloyment-4.18/profiles/
-
Above command will copy the old configuration file at /docker-deployment-4.16/profiles/default.in to /docker-deployment-4.18/profiles/default.in
-
-
Next, open the file at /path/to/docker-deployment-4.18/profiles/default.in, locate and ensure the version value of 4.18, is as below:
version = "4.18" -
Another option is to use ./configure command and specify the Sessions application that you want to configure.
$ ./configure --apps "sessions" –-cluster "<public IP of Machine 1>"
-
Enhanced Security Option
During an attempted CSRF attack, user credentials may potentially be inherited and then used to maliciously perform undesirable actions, usually affecting a change of state of server. Please note that this does not result in any data theft.
Enter this command:
$ ./configure --sessions-security-csrf-trusted-source-pattern "<qtest-manager-domain>[:port]|<qtest-sessions-domain>[:port]"
-
If you are configuring an external configuration, such as Jira, then the Jira URL should be whitelisted:
$ ./configure --sessions-security-csrf-trusted-source-pattern "<qtest-manager-domain>[:port]|<qtest-sessions-domain>[:port]|<jira-domain>"
For example
$ ./configure --sessions-security-csrf-trusted-source-pattern "qtest-manager.com|sessions.com|jira.atlassian.net"
-
Upgrade qTest Sessions
Execute the command below to upgrade qTest Sessions:
$ ./upgrade
Start Deployment Process
-
Start the deployment process by executing the startup script which will download application images and qTest Sessions components to the Docker container.
It may take a while to complete depending on your network connection.$ ./startup
-
When it's done, you can access qTest Sessions and verify the new version.
Upgrade qTest Sessions on Machine #3
Access Machine #3 where qTest Sessions 2024.1 has been installed.
Repeat the steps above to upgrade it to qTest Sessions to 2024.4.
Machine #4 (sessionslb - the Load Balancer)
Access the directory where you've extracted the docker deployment package 4.16, and shut it down using following commands:
$ ./shutdown
-
Download the docker deployment 4.18 package:
$ wget <ENTER DOWNLOAD LINK HERE>
-
Extract the package
$ tar -zxf <DOWNLOADED PACKAGE FILE NAME>
-
Access the extracted package directory:
$ cd docker-deployment-4.18
Configure the Load Balancer
Choose one of the below options to configure sessionslb - the load balancer.
-
To keep all applications in your previous deployment from being upgraded, override the /profiles directory of docker-deployment-4.16 with the directory of docker-deployment-4.18
$ cp -r /<path to your docker-deployment-4.16 package>/docker-deloyment-4.16/profiles/ /<path to your docker-deployment-4.18 package>/docker-deployment-4.18/
-
Above command will copy the old configuration file at /docker-deployment-4.16/profiles/default.in to /docker-deployment-4.18/profiles/default.in
-
Next, open the file at /path/to/docker-deployment-4.18/profiles/default.in, locate and ensure the version value of 4.18, is as below:
version = "4.18"
-
-
Another option is to use ./configure command to configure sessionslb.
-
If you deploy the load balancer with HTTP:
$ ./configure --apps "sessionslb" --cluster "<public IP address of Machine 1>" --sessions-url "http://<public IP address of current machine>:<qTest Sessions port>" --sessions-http "<qTest Sessions port>"
-
If you deploy the load balancer with HTTPS:
$ ./configure --apps "sessionslb" --cluster "<public IP address of Machine 1>" --sll-key "<SSL Key>" --ssl-cert "<SSL Cert>" --ssl-ca "<SSL Ca>" --sessions-url "https://<public IP address of current machine>:<qTest Sessions https port>" --sessions-https "<qTest Sessions https port>"
-
Start the Load Balancer
Next, execute the following command to start the load balancer.
$ ./startup
Troubleshooting
If any of steps above are not successful, you will need to rollback to qTest Sessions 2024.1 (including docker, sessions, sessionslb on machine #2, #3, #4) following these steps:
-
Access each machine.
-
Restore backup data by accessing the earlier docker deployment folder and running the restore command:
$ cd /path/to/docker-deployment-4.16$ ./restore
$ ./startup
- When restore process is complete, contact Customer Support to troubleshoot the issue with upgrading qTest Sessions on a Docker Load Balancing environment.