Settings
This article provides details on global settings that are available to a qTest Site Administrator.
Use the Settings page to manage settings that apply across different projects inside qTest.
How to Get Here
Navigate to Administration and select the Settings tab.
System Information
This section displays the following information for your specific system and environment:
-
Server Base URL
-
Server ID
-
qTest Version
-
Operating System
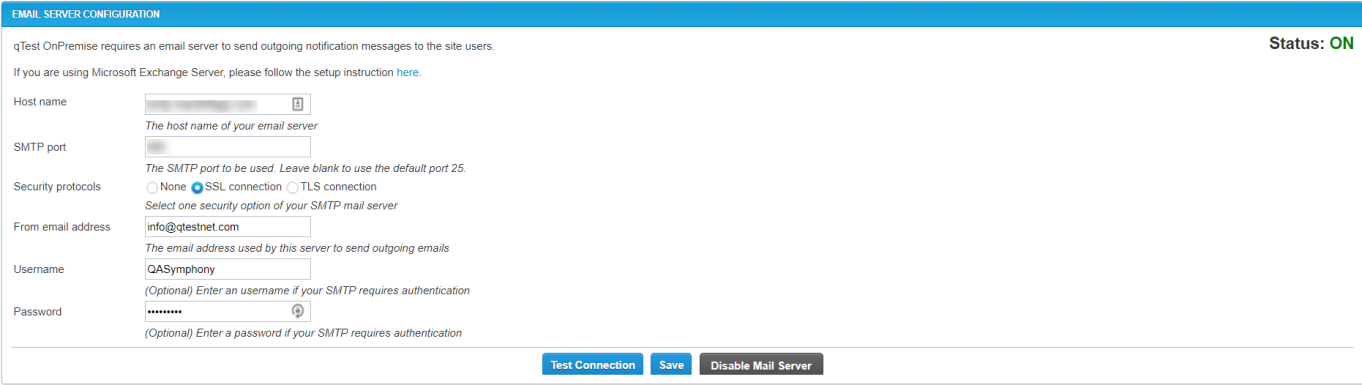
Email Server Configuration
qTest OnPremises requires an email server to send outgoing notification messages to the site users. This section allows you to establish and maintain your email notifications.
qTest Explorer | Sessions
Enter the URL associated with your qTest Explorer | Sessions application. Test the Connection and Save.
qTest Scenario
Enter the URL associated with your qTest Scenario application and the API Key. Test the Connection and Save.
qTest Parameters
Enter the URL associated with your qTest Parameters application. Test the Connection and Save.
qTest Pulse
Enter the URL associated with your qTest Explorer/Sessions application. Test the Connection and Save.
qTest Launch
Enter the URL associated with your qTest Launch application. Test the Connection and Save.
Generate an Insights Dashboard Token
-
Locate the Insights section of the window.
-
Select the Generate button to create a new, secure Dashboard Token.
At any time you can generate a new, secure Dashboard Token that will replace the previously created Dashboard Token. The new token will be used by qTest to generate a shareable URL.
-
Green circle icon = Dashboard Token is active
-
Gray circle icon = Dashboard Token is expired
-
-
The Expiration Date default is 90 days from token generation. However, you can change it to another expiration date using the drop-down.
-
Select Save.
A Dashboard URL generated before the Insights 1.15.6 release will continue to work until the dashboard's expiration date.

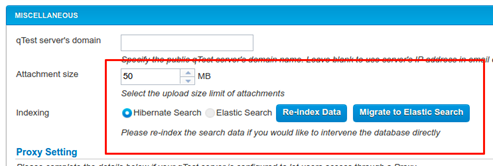
Miscellaneous
qTest Server's Domain
Displays your qTest Server domain.
Attachment Size
This section allows you to edit the attachment size used for uploading attachments to Requirements, Test Cases, etc.
Data Indexing
OnPremises version 9.5.3 includes Elasticsearch as a prerequisite, allowing for greater search capabilities within Manager.
| Fresh Installs for 9.5.3 | Elasticsearch will be automatically enabled. |
| Upgrades to 9.5.3 | By default, the previously used Hibernate Search will be selected. You must migrate to Elasticsearch. |
Additionally, Elasticsearch must be enabled to use Tricentis Analytics reporting, which is compatible with Manager 9.6.1.
These Data Indexing administration functions allow you to choose when you want to migrate your data from Hibernate to Elasticsearch, as the re-indexing may take some time to complete.
Migrate to Elasticsearch
-
Select the Migrate to Elasticsearch button. (This may take some time to complete and may affect other users. So please use discretion when performing this step.)
-
Once the migration is complete, the Migrate to Elasticsearch button disappears.
-
Reload the page, and the Elasticsearch button enables.
-
Select the Elasticsearch radio button and save your changes to begin using your Elasticsearch database.
It is HIGHLY recommended to select the Re-index Data button after switching to Elasticsearch. This ensures that any new data that was created, after performing the migration process, is indexed to the Elasticsearch server.
Re-index Data
Re-indexing your data could be used for the following scenario and others like it.
Example: A new test case is created, but it is not appearing in your search. Select the Re-index Data button as a manual step before contacting Support.

Proxy Setting
If your qTest server is configured to let users access through a proxy, you will need to supply the following information.
-
Proxy URL
-
Proxy username
-
Proxy password
-
Secured Proxy URL
-
Secured Proxy username
-
Secured Proxy password
Internationalization

Limit Test Cases Linked to Requirement
By default, you can link a maximum of 100 Test Cases to one requirement in a single operation. To link more Test Cases than the limit, you need to use multiple operations. Alternatively, you can have your administrator set a higher limit in the Maximum Number of Test Cases field.
Re-sync Jira connections
If your Jira integration stops syncing updates with qTest, use the Sync Jira Connections button to force start a sync for all requirements, defects, and releases in all of your projects.
Before you use this option, make sure you have an active project with a working Jira connection. Avoid using this button more than once a day, as syncing multiple projects can take a varying amount of time.
You can still resync data from individual projects, if you need to.
AI Generated Test Cases (Beta)
To start using the AI Generated Test Cases feature, you need to activate it at the site level first.
After you activate this feature at the site level, you can turn it on for each project where you want to use AI in Test Case Settings.
To generate test cases with AI, follow these steps:
-
Go to Administration > Settings and scroll down to AI Generated Test Cases. Then, select the checkboxes to agree with the Tricentis General Terms of Use, AI Solutions Product-Specific Terms, and Privacy Policy.
-
Change the Activation Status to On.
Note that this feature is currently in Beta, so some features may not work as expected at this time.