Configure test analysis
Test analysis configuration lets you embed up to ten metrics into your test results and give each metric a target value. NeoLoad Web compares every run against those targets. If a metric surpasses its target, the test fails, so you find the regression in the run that caused it.
Add metrics to your test results
To adjust the metrics displayed in a test view's graph, follow these steps:
-
In NeoLoad Web, go to Tests.
-
Inside the test you want to configure, select Select metrics and SLOs.
-
In the configuration dialog, add or remove metrics relevant to your test results.
The resulting graph can show up to ten metrics, displayed as solid lines. For information on how to read metric values, check out Values tab.
Set up regression detection
Regression detection compares your current test results against a target value called an Objective. Metrics show you what happened. Objectives make NeoLoad Web judge the result for you.
To detect regressions, follow these steps:
-
In the Select metrics and SLOs dialog, check the Objective box beside each metric you want NeoLoad Web to evaluate.
-
In the Objective modes section, select an Choose an objective mode.
If a value in your test results surpasses your Objective, the test fails.
NeoLoad Web doesn't detect regression if you set no objectives, or if you don't enter a value for the metric in the test results.
Choose an objective mode
Each mode works out its target value differently. The following table compares the modes:
|
Mode |
How the target is set |
What you need |
|---|---|---|
|
You enter a fixed value yourself. |
A value you know the metric has to stay within, such as a response time agreed in a service level agreement. |
|
|
NeoLoad Web copies the values from a test result you choose. |
One earlier test result that you trust as a reference. |
|
|
NeoLoad calculates the value from your recent passed results. |
At least 2 completed tests that include the metric. |
For a first setup, use Baseline objective mode. It fills in the target values for you, and its tolerance setting gives you direct control over how sensitive the check is.
Static objective mode
Use static objectives to compare one of your metric's actual value with a fixed value you specify.
To specify a static objective, follow these steps:
-
In the Select metrics and SLOs dialog, check one or more Objective boxes to specify a custom metric value.
-
In the Objective modes section, select Static.
-
Enter the Values for metrics comparison.
Baseline objective mode
Use baseline objectives to use existing test results as the comparison baseline for your current test. This automatically populates the Value fields with the values of the chosen baseline.
You can't manually edit baseline objective Value fields.
To select existing test results as a baseline, follow these steps:
-
In the Select metrics and SLOs dialog, check one or more Objective boxes to specify a custom metric value.
-
In the Objective modes section, select Baseline.
-
Select a Reference result for that metric and its Tolerance and deviation ranges. This automatically populates the value fields.
Set a baseline objective for average response time.
In this example, you want to track the 90th and 50th percentile response times in your test result graph, and set a baseline objective for the average transaction response time with a 10% tolerance. To do this, configure the following:
-
For all-transactions, add the Perc 90 and Perc 50 statistics, and leave their Objective toggled off. These metrics only appear in the graph for comparison.
-
For all-transactions, add the Avg. TTFB statistic, which measures the average transaction response time, and turn on its Objective toggle.
-
In Objective modes, select Baseline, then set Reference result to your desired test result and Tolerance to 10%. In this example, NeoLoad Web automatically populates the Value field using the metric's value from result #2. If the test result exceeds the defined baseline, NeoLoad Web will mark this test as failed.
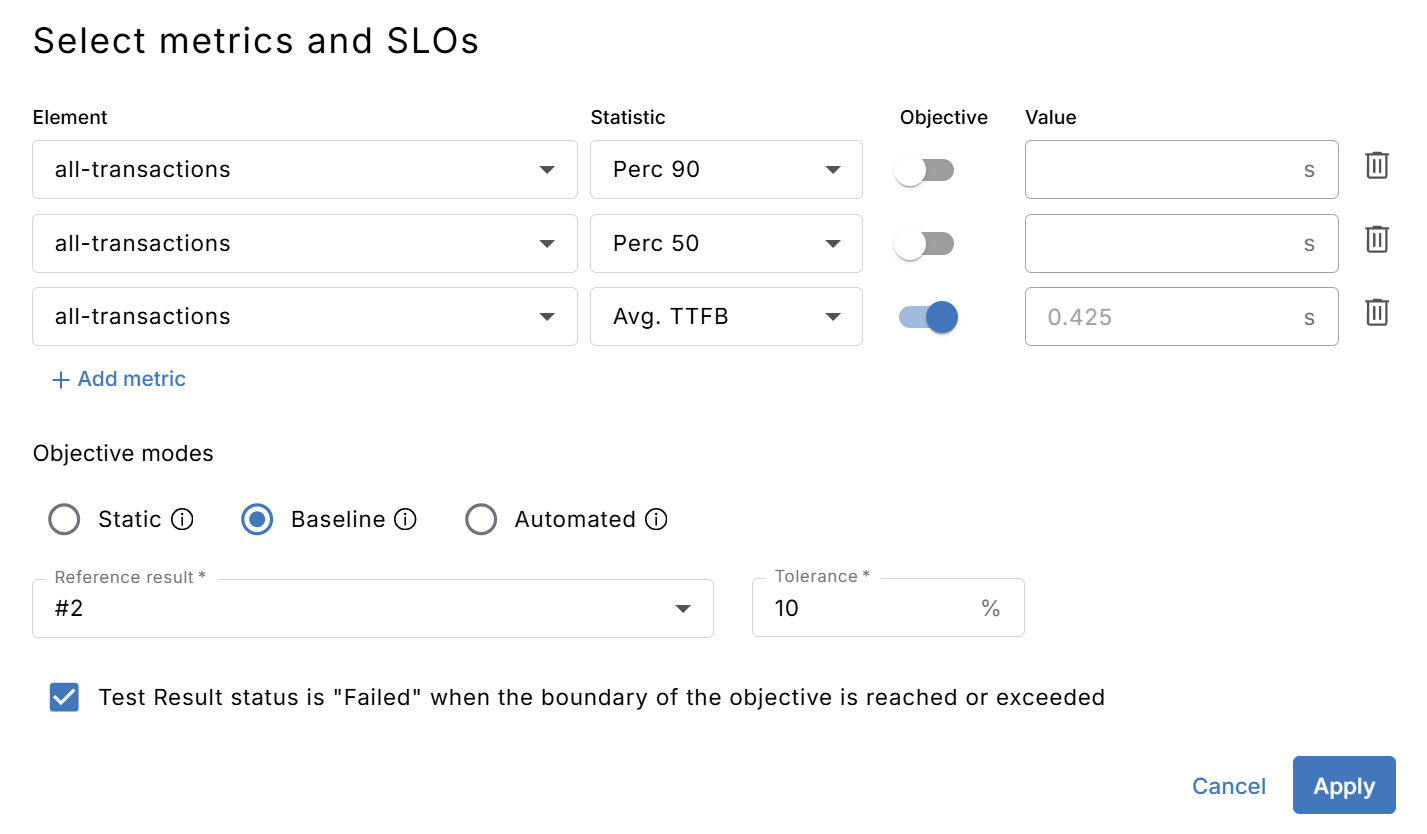
Click to enlarge: Configuring a baseline objective for average transaction response time.
Automated objective mode
With an automated objective, NeoLoad calculates the objective's value at the end of the test result, using the most recent Passed results. Specifically, NeoLoad goes through the last 50 successful test results to calculate the automated objective's value.
To specify an Objective that uses a computed target value, follow these steps:
-
In the Select metrics and SLOs dialog, check one or more Objective boxes to specify a custom metric value.
-
In the Objective modes section, select Automated.
To obtain an Objective value, you must complete at least 2 tests that include the required metric.
Tolerance and deviation ranges
Test results vary between runs. Baseline and automated objectives let you set how much variation is acceptable before NeoLoad Web reports a regression:
-
Baseline objective mode: Set a Tolerance percentage. The tolerance percentage defines a permissible deviation range for a metric without indicating a regression. It allows minor changes in the test results without marking the test as failed.
-
Automated objective mode: Set a multiple of the standard deviation. By default, this deviation is set to twice the standard deviation. For more flexibility, you can increase it to three or four times the standard deviation.
What's next
Now that your test detects regressions, here's what you can do next:
-
Add Series tiles to track a metric across several test runs.
-
Create a comparison dashboard to compare up to four test results side by side.