Configure zones as an admin
Zones define where your tests run. As an admin, you manage them for the whole account in Settings > Zones, where each zone type has its own tab: NeoLoad Cloud, Static
Only users with admin permissions can access this area. Testers select a zone you've configured when they create a test.
Before you start
What you need depends on the zone type you want to configure:
-
NeoLoad Cloud zones need no infrastructure of your own. NeoLoad Web hosts them, and you enable the regions you want to use.
-
Static zones need a controller and one or more load generators that you install yourself.
-
Dynamic zones need an infrastructure provider that you set up first.
Enable NeoLoad Cloud zones
NeoLoad Web offers cloud zones across many regions and providers, but they're off by default. Enable the ones your teams need. Testers can then select them, and they don't need to set up any infrastructure.
To enable a cloud zone, follow these steps:
-
Go to Settings > Zones and select the NeoLoad Cloud tab.
-
Find the zone you want. Use the search and filter options above the table to narrow the list.
-
Turn on the toggle in the Status column. The change takes effect immediately.
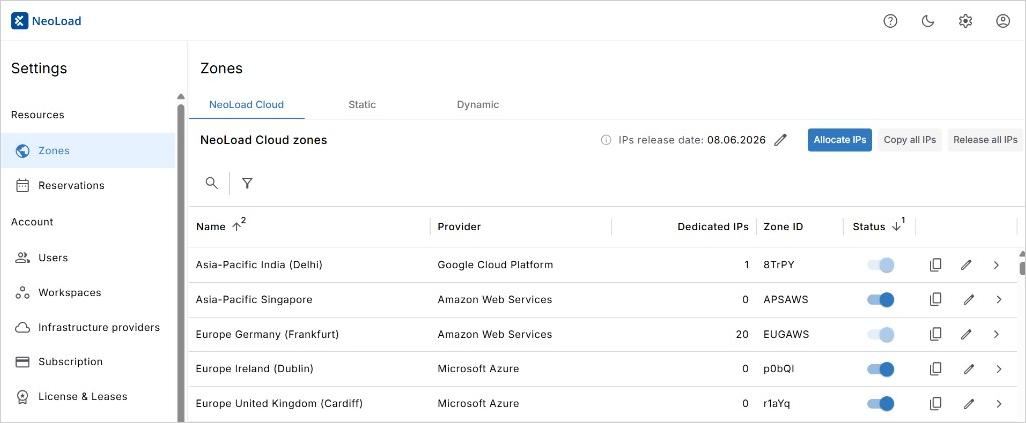
Click to enlarge: The NeoLoad Cloud tab, where you turn each zone on or off in the Status column
Each row shows the zone's Provider, its Dedicated IPs count, and its Zone ID. Disabled zones show N/A instead of an IP count, because you can only allocate IPs to a zone that's enabled.
You can't disable a zone that holds dedicated IPs. Its Status toggle stays locked until you release the zone's IPs.
Create a static zone
A static zone groups controllers and load generators that you host yourself, either on-premises or in your own cloud account. Create the zone first, then point your agents at it.
To create a static zone, follow these steps:
-
Go to Settings > Zones and select the Static tab.
-
Select Create zone.
-
Enter a name for the zone, then confirm.
The new zone appears in the table with a Zone ID and a count of Controllers and Load generators, which stays at zero until you attach agents to it.
To attach an agent to the zone, copy the Zone ID and enter it in the agent's Zone identifier setting. For the exact setting, check out Configure the Controller agent and Configure the Load Generator agent.
Create a dynamic zone
A dynamic zone runs controllers and load generators on demand in your own Kubernetes or OpenShift cluster, through an infrastructure provider. NeoLoad Web starts the containers when a test begins and removes them when it ends.
Before you start
You need at least one infrastructure provider. Without one, the Provider list shows No providers available and you can't create the zone. To set one up, check out Create an agent-based infrastructure provider.
Create the zone
To create a dynamic zone, follow these steps:
-
Go to Settings > Zones and select the Dynamic tab.
-
Select Create zone.
-
Enter a Name for the zone.
-
Select a Provider. The list shows each provider by name with its platform type, such as Kubernetes.
-
Select a Resource sizing. NeoLoad Web shows the memory and cores it gives the controller and each load generator for the size you pick, so you can match the sizing to your test load.
-
Optionally, expand Docker images to override the default controller and load generator images. Use this if you pull images from a private registry, or if your tests need a specific image such as the JMeter controller.
-
Select Apply.
Rename or delete a zone
You can safely rename a zone, but take care when you delete one, because it affects every test that uses that zone. Here's how each case behaves:
-
When you rename a zone, tests that use it keep their zone configuration. NeoLoad Web updates them with the new name for you, so there's nothing to fix afterwards.
-
When you delete a zone, tests that use it lose their zone configuration. You have to configure a zone again in every affected test before those tests can run.
Before you delete a zone, check which tests use it. NeoLoad Web doesn't reassign those tests to another zone, and it doesn't warn the test owners.
Allocate dedicated IPs
By default, cloud zones send traffic from shared IP addresses that change between runs. Allocate dedicated IPs to a zone when your firewall needs to allow a fixed set of addresses.
Dedicated IPs consume cloud credits. NeoLoad Web shows the cost before you allocate.
To allocate dedicated IPs to a cloud zone, follow these steps:
-
Go to Settings > Zones and select the NeoLoad Cloud tab.
-
Select Allocate IPs.
-
Select the Zone you want the addresses for. NeoLoad Web shows how many load generators across all tests and workspaces currently use that zone.
-
Enter the number of addresses in IP count. The counter shows the number of IP addresses you request and the number available in the zone.
-
Select Allocate.
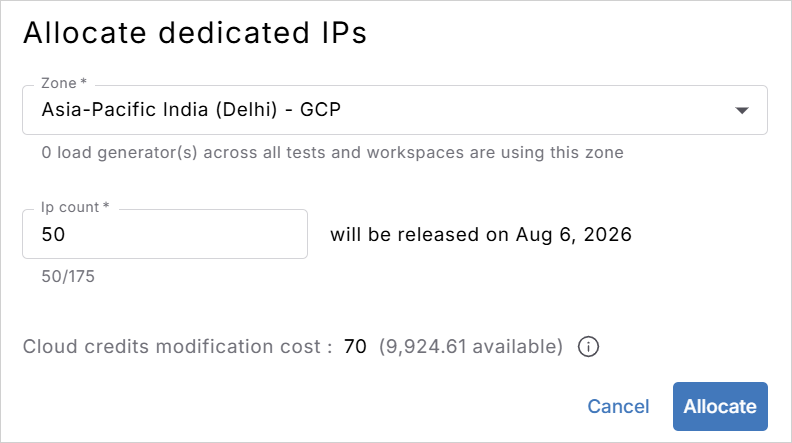
Click to enlarge: The requested IP count against the addresses free in the zone, and the cost in credits
The addresses take a few minutes to allocate. Once they're ready, the count appears in the Dedicated IPs column for that zone. All the addresses share one release date, which you can change at any time. For the full set of options, check out Dedicated IPs.
What's next
Now that your zones are configured, here's what you can do next:
-
Select a zone for a test to see how testers use the zones you set up.
-
Manage dedicated IPs to copy, resize, or release the addresses you've allocated.
-
Create a reservation to hold a zone's resources for a specific time slot.