Zones
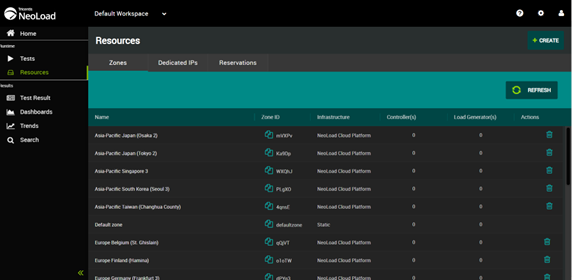
The Zones tab of the NeoLoad Web Resources section allows creating and managing Zones.
A Zone is a set of resources regrouping Controller Agents and/or Load Generators Agents. Zones can be created to provide ready-to-use resources -Controllers and Load Generators- to be used when launching a test from NeoLoad Web.
The Zones created are then available when preparing a test launch in the Run a Test section of NeoLoad Web. For more information, see Create a test.
Create Zones
As an Administrator, you can create 3 types of zones for your Account: NeoLoad Cloud, static, and dynamic.
Creating a Zone allows defining a set of Controller Agents and Load Generator Agents that will be used to run a test from NeoLoad Web.
When preparing a test launch from NeoLoad Web, the Zone(s) including Controller Agents and Load Generator Agents available and compatible with the test can be selected.
Tip: If you want a proxy to be used for the Controller(s) and Load Generator(s) to access your application, you must configure it in NeoLoad >Preferences >Proxy. For more information, see Proxy in NeoLoad documentation.
As an Administrator, you can create a NeoLoad Cloud zone. This is the default option.
There are 3 default Cloud zones. Zones available for creation are listed in alphabetical order. You can select multiple NeoLoad Cloud zones during a single create operation. The number of zones you select for creation update in the create button.
To create a NeoLoad Cloud Platform zone, follow these steps:
-
In the left navigation panel, select the Resources view.
-
In the top right part of the view, click the CREATE button.
The Zone dialog is displayed.
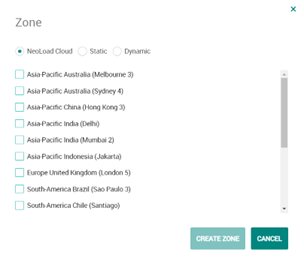
Note: NeoLoad Cloud is the default.
-
Select zone(s).
You can select multiple zones.
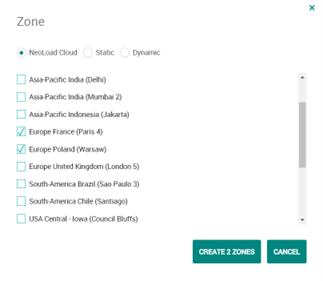
The number of zones you create are present in the Create zone button.
Example: In the above image, two zones are selected: Europe Poland and Europe Paris. The create button says Create 2 zones.
- Click the Create zone button.
The dynamic Zone is created and appears in the list of the Zones view.
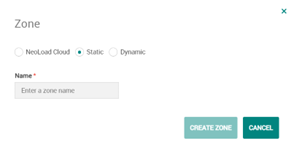
As an Administrator, you can create a Static zone. To create a Static zone, go to the Resources-Zones panel. Once Static zone is selected, you can install Controller Agents and/or Load Generators Agents and connect to NeoLoad Web. The created zone is available for launching tests.
To create a Static zone, follow these steps:
-
In the left navigation panel, select the Resources view.
-
In the top right part of the view, click the CREATE button.
The Zone dialog is displayed.
-
In the Infrastructure radio button, enable Static.
-
In the Name field, enter a name describing the zone to create.
-
Click the Create zone button.
The static Zone is created and appears in the list of the Zones view.
As an Administrator, you can create a Dynamic zone. To create a Dynamic zone, go to the Resources-Zones panel. Once Dynamic zone is selected, you can install Controller Agents and/or Load Generators Agents and connect to NeoLoad Web. The created zone is available for launching tests.
In this configuration, the client connects to dynamic infrastructure providers such as Kubernetes or Openshift. Tricentis uses this infrastructure to start Controller Agents and/or Load Generators Agents.
This means the infrastructure is started on-demand.
To create a Dynamic zone, follow these steps:
-
In the left navigation panel, select the Resources view.
-
In the top right part of the view, click the CREATE button.
The Zone dialog is displayed.
-
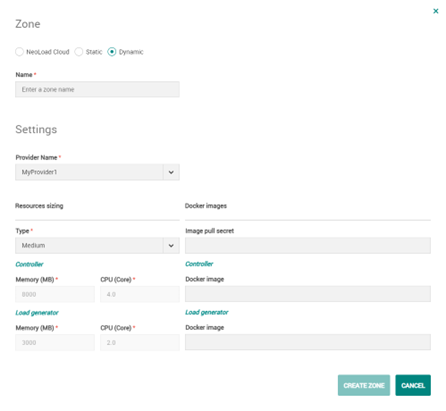
In the Infrastructure radio button, Enable Dynamic.
The Zone dialog expands to enter the settings of the Dynamic zone.
-
The Zone dialog expands to enter the settings of the Dynamic zone..
-
Name:In the Name field, enter a name describing the zone to create.
-
Provider Name: Select the Infrastructure previously created in Add a Provider to use for tests launched from NeoLoad Web.
-
Resources sizing: A click on the Type list box allows selecting predefined resources sizing for the infrastructure: Small, Medium, and Large are predefined settings that automatically configure the memory and CPU sizes for both the Controller and the Load Generator. Selecting Custom allows entering manually the required size for the memory and CPU of the Controller and Load Generator.
Sizing is applied in Kubernetes/OpenShift with ratio.
Request ratio: 0.9 (ex: If "2000MB" is set for the Controller memory, the Controller memory request in Kubernetes/OpenShift will be 2000*0.9=1800MB).
Limit ratio: 1.25 (ex: If "2" is set for the Load Generator CPU, the Load Generator CPU in Kubernetes/OpenShift will be 2*1.25=2.5 core).
XMX ratio: 0.8 (ex: If "2000MB" is set for the Load Generator memory, the Load Generator XMX in the container will be 2000*0.8=1600MB). -
Docker images: A specific version of a Controller and/or a Load Generator can be used in the infrastructure by using Docker images.
Image pull secret: If images are on a private registry, this is the key used to retrieve the images referenced in the fields below.
Docker image: In each Docker image field (Controller and Load Generator), the Docker image to retrieve can be specified. When nothing is specified, the default images are used: "neotys/neoload-controller:latest" and "neotys/neoload-loadgenerator:latest".
-
-
Click the Create zone button.
The dynamic Zone is created and appears in the list of the Zones view.
Manage Zones
Tip: The Default zone groups all the Controller and Load Generators Agents connected to NeoLoad Web via the URL connection parameter specified in the settings interface but for which no Zone identifier was assigned to. This is meant to help you gain time if you do not want to assign a Zone ID to a Controller or Load Generators Agent. By default, the Controller and Load Generators Agents connected to your NeoLoad Web will be available in the "Default zone" when preparing a test launch.
Columns
Name: The name assigned to the Zone.
Zone ID: This ID is automatically generated when creating a Zone. The Zone ID must be inserted in the Controller Agent and/or Load Generator Agent settings interface for NeoLoad Web. See below for more information.
Copy to clipboard button : Click here to copy the zone ID in one click.
Infrastructure (Dynamic infrastructure only): The name of the Infrastructure. It can be static or have the name of the Infrastructure Provider previously created in Add a Provider.
Controller(s): This section displays the number of Controllers Agents registered for the Zone that are currently connected to NeoLoad Web.
Load Generator(s): This section displays the number of Load Generators Agents registered for the Zone currently connected to NeoLoad Web.
A click on the REFRESH button updates the number of Controller and Load Generators Agents connected for the Zone.
When a Zone is selected in the table, the Details panel on the right displays additional information about the Controllers and the Load Generators included in the Zone.
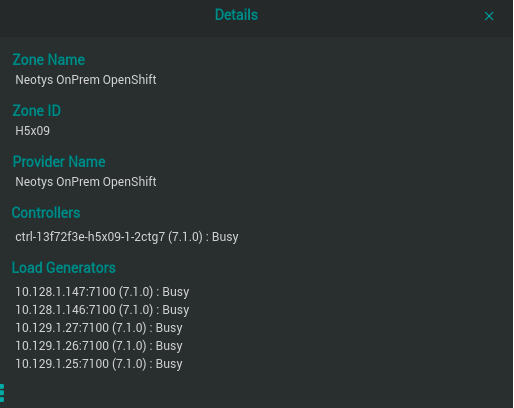
Note: When a Zone uses a dynamic infrastructure, the Details panel displays the Load Generators used during the test.
Controllers: The name format of the Controller is: "<Name of the machine><(Controller version number)>".
The status can be:
-
Available: The Controller can be used for a load test.
-
Busy: The Controller is currently used in a load test.
-
Reserved (reservation mode "on"): The Controller has been reserved for a load test.
Load Generators: This section lists all the Load Generators available in the Zone. The name format of the Load Generator is: "<Name of the machine>:<port version number> (<LG version number>): <status>”
The status can be:
-
Available: The Load Generator can be used for a load test.
-
Busy: The Load Generator is currently used in a load test.
-
Reserved (reservation mode "on"): The Load Generator has been reserved for a load test.
Associate a Controller Agent with a Zone
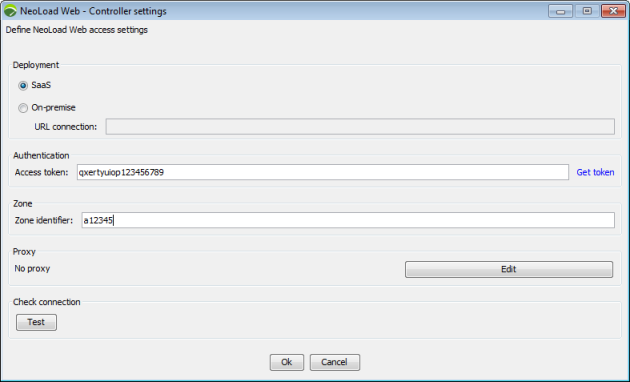
Click on the copy icon  to copy the Zone ID to the clipboard to further paste it in the Zone identifier field of the Controller Agent(s) or Load Generator Agent(s) settings interface for NeoLoad Web.
This allows these agents to register to the Zones defined in NeoLoad Web.
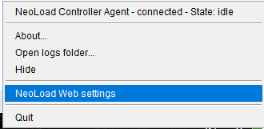
Tip: To open the NeoLoad Web settings for a Controller Agent or a Load Generator Agent, right-click the required Agent and select NeoLoad Web settings.