Record an HTTP application in tunnel mode
Some applications cannot be recorded in proxy mode. When the application cannot use the defined proxy, it is necessary to use the tunnel mode. This mode makes it possible to record any application, either web or native, standard or customized, for any platform in any version.
The tunnel mode requires to have administrator rights on NeoLoad machine and works for Windows and Mac OS X.
When an application is able to use the proxy set on the device, it is advised to record it in proxy mode, for it is easier to use. For more information, see Record an HTTP application in proxy mode.
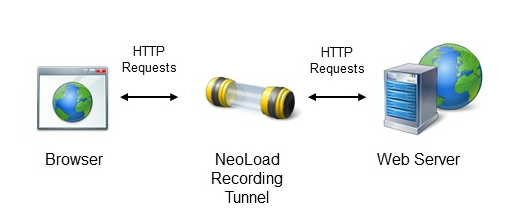
On one side, the tunnel simulates the web server for the browser, and on the other side, it processes the requests and responses with the web server. The recorder catches the transactions to build the scenario. NeoLoad allows filtering the recording and skipping or including some requests to get an accurate scenario.
NeoLoad reroutes the web traffic to itself thanks to its own DNS server. As a consequence, NeoLoad will open the NeoLoad DNS port (UDP/TCP 53) and one port for each application recorded:
-
TCP 80: for HTTP applications
-
TCP 443: for HTTPS applications. An IP is also required for each web server.
-
The relevant port depending on the application recorded.
The tunnel mode is not compatible with Windows Internet sharing.
Before recording the scenario, it is recommended to close all HTTP client applications (other Web sessions, Twitter client, and so on). NeoLoad records all the HTTP flows going through the machine. It is necessary to close HTTP clients or define exclusion rules in NeoLoad to avoid unwanted requests in the recording.
Activate the tunnel mode
Before recording an application in tunnel mode, it is necessary to activate the tunnel mode parameters in Tunnel Mode Recorder settings group box of the HTTP Recorder panel accessible through Edit > Preferences > General settings.
If the tunnel mode is not properly set, a warning message displays when the recording starts.
Start recording in tunnel mode
You can start recording an application with:
-
the Start Recording toolbar button
-
the Record > Start Recording command
-
the Start Recording button in the User Path panel
-
the Record Here option with a right-click on a page, Transaction or logical action
-
the Recording API
Before recording the scenario, it is recommended to close all HTTP client applications (other Web sessions, Twitter client, and so on). NeoLoad records all the HTTP flows going through the machine. It is necessary to close HTTP clients or define exclusion rules in NeoLoad to avoid unwanted requests in the recording.
Starting a new recording creates a User Path and places all the web pages visited during the recording into that User Path.
The tunnel mode only works if, when browsing the application, you use its hostname or fully qualified domain name and not the IP address of the application server.
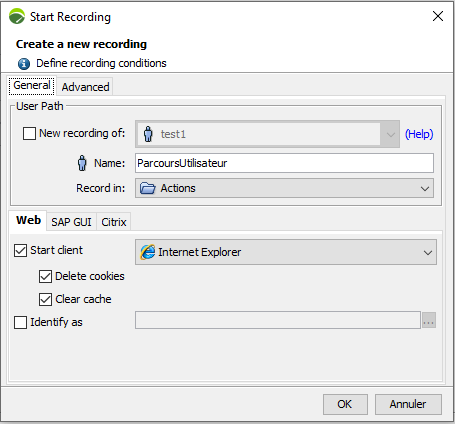
The User Path group box defines the new User Path:
-
New recording of: Check this option to select the User Path you want to update. For more information, see Update a User Path
-
Name: Enter a name to identify the User Path. When the recording ends, all the recorded pages and requests are contained in this User Path.
-
Record in: Select the Container into which the pages visited are to be recorded. For more information about how Containers work, see Structure of a User Path.
Init, Actions and End Containers follow a set order of play: 1. Init Container. 2. Actions Container. 3. End Container.
The Client settings group box makes it possible to automatically launch the selected browser and open the test URL http://www.neotys.com/recorder.html using the automatically-configured recorder settings. If this page displays correctly, the recorder has been properly set up. Closing the browser stops the recording. The Client settings group box also enables you to delete cookies and clear the browser cache before the recording.
Start client: This option configures the DNS used for the recording and starts the selected browser.
-
Delete cookies: This option permanently deletes cookies from the NeoLoad machine prior to recording in order to simulate a user's first visit to the application.
-
Clear cache: This option permanently clears the browser cache in order to simulate a user's first visit to the application.
Identify as: This option allows the browser used while recording to simulate another browser. The option is particularly useful when a browser is unavailable on the machine (mobile browser for instance). When the browser used is identified as an iPhone device, the server returns the mobile version of the application.
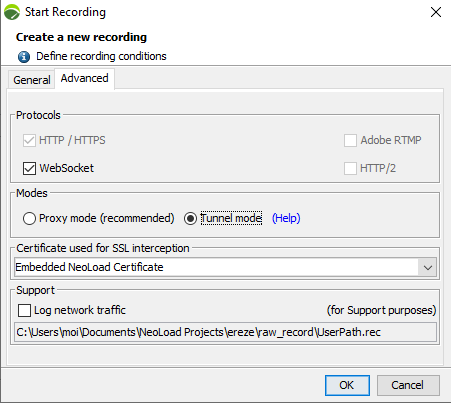
The Protocols group box helps select the protocols which NeoLoad can record. NeoLoad records the HTTP protocol by default:
-
HTTP/HTTPS: This selected option is dimmed to indicate that NeoLoad records the application in HTTP/HTTPS in all conditions.
-
WebSocket: This option makes it possible to record a WebSocket application. For more information, see WebSocket requests.
Recording an RTMP application in NeoLoad is subject to certain limitations.
In the Certificate used for SSL interception group box, the combo list displays the root certificate used by default to sign the SSL connections.
For more information, refer to the Certificates
The Modes group box makes it possible to choose a recording mode:
-
Proxy mode: Selecting this option makes it possible to launch the recording in proxy mode.
-
Tunnel mode: Selecting this option makes it possible to launch the recording in tunnel mode.
A click on the OK button closes the Start Recording dialog and displays the Tunnel mode recording wizard to prepare the recording.

Click the Detect servers button to display the Detecting servers bar.

The Detecting servers bar shows the IP address of NeoLoad. When NeoLoad and the application sit on two different machines, it is necessary to change the IP address of the DNS server of the machine using the application to reroute transactions towards NeoLoad.
At that moment, the application must be started to have NeoLoad detect the servers used in the application. In the application, every action in the scenario must be performed to have the Detecting servers bar analyze the application.
A click on the Stop server detection process icon closes the Detecting servers bar and updates the Tunnel mode recording wizard. The Servers list step displays all the application servers and domains to record:
-
Hostname is the name of the server or domain.
-
Port is the port requested by the application. It must be checked, and modified when necessary.
-
SSL must be selected when the connection to the server or domain is cyphered.
The servers list is empty for the first User Path. Otherwise, it shows the servers used by the User Paths already created for the application.
The servers list can be modified with the Add and Remove buttons. It can also be modified at the end of the scenario recording.
In the Tunnel mode recording wizard, clicking the Next button launches the Configuration check step.
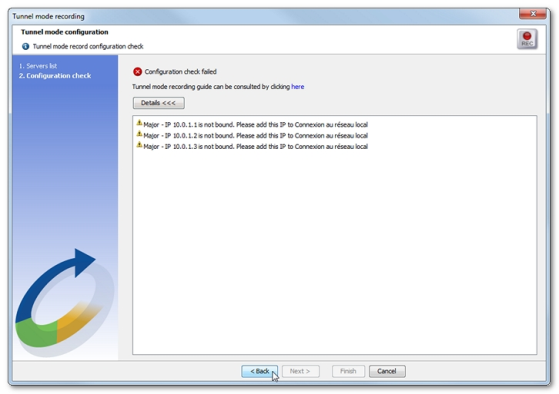
When issues are raised, it is necessary to correct them before starting the true recording of the application:
-
Additional IPs may be required to connect to SSL servers, as described in Activate the tunnel mode. It may be necessary to assign more IPs in the operating system.
On Windows Seven for example, it is necessary to choose Control Panel > Network and Sharing Center > Local Area Connection > Properties > Internet Protocol Version 4 (TCP/IPv4) > Properties > Advanced to display the Advanced TCP/IP Parameters dialog. In the IP addresses section, a click on the Add button allows specifying the first IP for the identifiers range, for example 192.168.1.210. All parameters must be saved for new virtual IP addresses to be taken into account.
-
Ports may be already used: When a port is required by NeoLoad although it is already used by another application, NeoLoad cannot process the record. That application process that used the port must be stopped.
Once IPs and ports are ready, clicking Back in the Tunnel mode recording wizard makes it possible to restart the Configuration check step. When the configuration is ready, a click on Finish closes the wizard.
The Recording bar is displayed to record the application.

When the application and NeoLoad sit on two different machines, it is advised to refresh the DNS cache. For example, on Windows Seven, with the ipconfig /flushdns command line.
Browsing the application and performing every action of the scenario automatically create the recording in NeoLoad.
When all actions are complete, a click on the Stop Recording icon stops the recording and closes the Recording bar. The Post-recording wizard opens up to help configure the recorded scenario. For more information, seePost-recording wizard. Subsequently, the scenario can be edited and improved. For more information, see User Paths.
When the recording is over, the IP address of the DNS server must be set back on the machine using the application.
When a problem prevents the recording to terminate correctly, the Internet connection may be suspended after the recording. Stopping the recording prematurely does not make it possible for NeoLoad to reset the operating system DNS configuration. The configuration must be restored from the neoload.log file : The log keeps track of the original DNS configuration before it is modified for the Tunnel mode. For example:
2012/11/13 09:27:20 INFO - neoload.DNS: Original DNS server IP is : 192.168.1.4
2012/11/13 09:27:20 INFO - neoload.DNS: Original DNS server is configured by DHCP : false
The first line shows the IP address of the primary DNS server. The information helps reset the network configuration back to its original state.
The second line tells whether the DNS server was retrieved from the DHCP server.
To record an application in tunnel mode, follow these steps:
-
Click Start Recording.
-
In the Start Recording dialog, specify a new User Path.
-
To record in tunnel mode, select the Tunnel mode option.
-
To record from the machine using the application, unselect the Launch browser option. Click OK.
-
Start your application.
-
In the Tunnel mode recording wizard, click Detect servers.
-
The Detecting servers dialog gives you the IP address of the NeoLoadmachine.
-
When NeoLoad and the application are on different machines, change the DNS server parameters of the machine using the application:
-
Note down the current IP address of the DNS server.
-
Change it with the IP address of the NeoLoad machine.
-
-
Browse the application as expected in your scenario using its hostname or fully qualified domain name and not its IP address.
-
Click on the Stop server detection process icon.
-
In the Tunnel mode recording wizard, rectify the servers list and the record configuration. Click Finish. The Recording bar is displayed.
-
When necessary, refresh the DNS cache. Browse the application as expected in your scenario using its hostname or fully qualified domain name and not its IP address.
-
Click the Stop recording icon.
-
Reset the IP address of the DNS server of the machine using the application.
-
If needed, configure your scenario further in the Post-recording wizard.