Share a project
Any new collaborative project must be shared on the collaboration server. Sharing a project makes it possible for all connected users to check out the project and contribute to it. For more information, see Check out a project (SVN) and Clone a repository (GIT).
To share a project, it is necessary to configure properly the connection to the collaboration server. For more information, see Configure the connection to a collaboration server.
There are two approaches to share a project:
-
Sharing an existing project
-
Creating a new shared project
A project can be shared only once. When it is shared, it belongs to one collaboration server. To share a project across several collaboration servers, it is necessary to save it under another name with File > Save as, to enter the parameters of the new collaboration server in the project Preferences, and to share the duplicated project.
Share an existing project
For SVN
To share an existing project on an SVN server, the Share > Share Project command must be chosen.
For more information about how to configure the connection to an SVN server, see Configure the connection to a collaboration server.
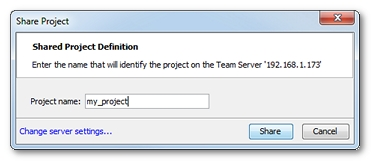
On sharing an existing project, NeoLoad requests a name for the project. It is the project collaborative name. It may be different from its local name. The collaborative name labels the project on the collaboration server.
The title bar of a shared project contains the local name of the project, and also its collaborative name. For example: [petstore] /petstorev2 means that the project local name is petstore, and its name on the collaboration server is petstorev2.
When a project uses variables of file type or JavaScript libraries whose resources are outside of the project, NeoLoad displays a warning message saying that the resources cannot be shared. Sharing the project can then be canceled in order to put the resources within the project. Otherwise, any team member who retrieves the project cannot use the variables. The project is inconsistent.
To share a project on an SVN server, follow these steps:
-
Choose Share > Share Project.
-
Enter a name for the collaborative project.
-
Click Share.to share the project on the collaboration server.
A message dialog confirms that the project is available to all on the collaboration server.
For GIT
To share an existing project on a GIT server, the Share > Share Project command must be chosen.
Information: For more information about how to configure the connection to a GIT server, see Configure the connection to a collaboration server.
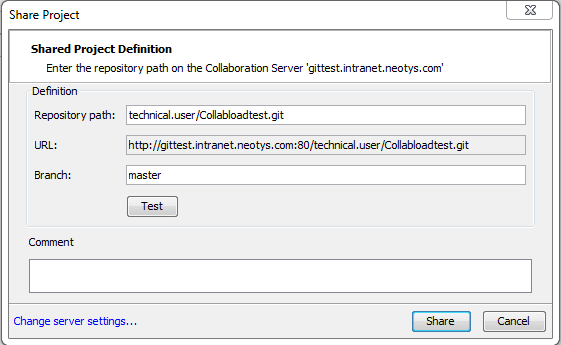
The Repository path field must be filled in with the path to the repository shared on the GIT server. The path entered in this field must end with “.git” to be valid.
When the path is already stored into your clipboard, NeoLoad automatically fills in the field.
The URL field displays the URL to the project shared on the GIT server. It matches the information entered in the Collaboration Preferences menu.
The Branch field can be filled in with the name of a new branch the project is to be shared onto. A project cannot be shared on an existing branch.
A click on the Test button allows checking the connection to the GIT server.
To share a project on a GIT server, follow these steps:
-
Choose Share > Share Project.
-
In the Repository path field, enter the path to the repository shared on the GIT server.
-
Fill in the URL field with the URL to the project shared on the GIT server.
-
Populate the Branch field with the name of a new branch the project is to be shared onto.
-
Click Share.to share the project on the collaboration server.
A message dialog confirms that the project is available to all on the collaboration server.
Create a new shared project
For SVN
To share a NeoLoad project on an SVN collaboration server, NeoLoad must be configured to connect to an SVN server. For more information about how to configure the connection to an SVN server, see Configure the connection to a collaboration server.
To create a new shared project, choose the File > New command.
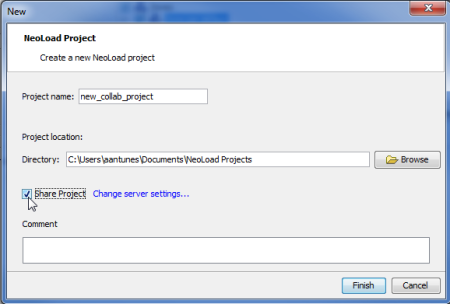
The project name can only contain letters, digits or underscore. Any punctuation characters, space or dash are not allowed.
In the New dialog, check the Share Project option.
When creating a shared project, the collaborative name of the project and its local name are the same.
Once the project is shared, a message confirms that the project is available to all on the collaboration server.
For GIT
To share a NeoLoad project on a GIT collaboration server, NeoLoad must be configured to connect to a GIT server. For more information about how to configure the connection to a GIT server, see Configure the connection to a collaboration server
To create a new shared project, choose the File > New command.
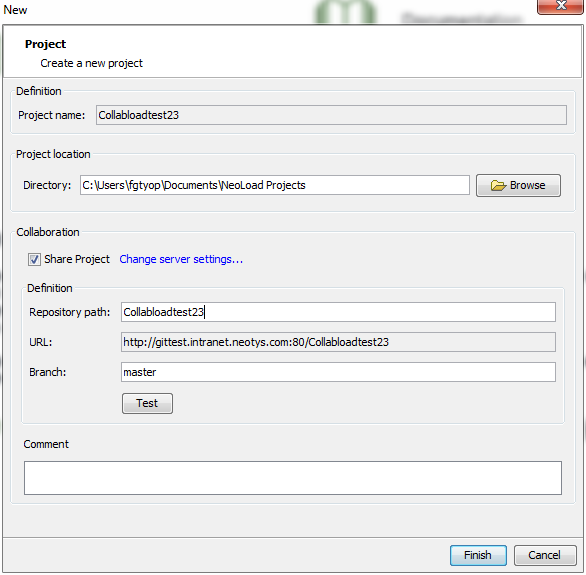
The project name can only contain letters, digits or underscore. Any punctuation characters, space or dash are not allowed.
In the Collaboration zone, tick the Share Project check box.
The Repository path field must be filled in with the path to the repository shared on the GIT server. The path entered in this field must end with “.git” to be valid.
When the path is already stored into your clipboard, NeoLoad automatically fills in the field.
The URL field displays the URL to the project shared on the GIT server. It matches the information entered in the Collaboration Preferences menu.
The Branch field can be filled in with the name of a new branch the project is to be shared onto. A project cannot be shared on an existing branch.
A click on the Test button allows checking the connection to the GIT server.
A click on the Finish button creates the new project and shares it on the GIT server.