Import and export a project
Import a project
NeoLoad features an Import wizard which allows the user to import the contents of an existing NeoLoad project into the current project.
The import takes into account all the User Path resources. Any linked files (variable source files, linked JavaScript library files) are automatically copied to the current project. Files specified by an absolute path on the hard disk and not included in the imported project directory will not be copied.
The imported resources (servers, pages, Virtual Users, Populations ...) must not already exist in the current project under the same name. If a resource does already exist, NeoLoad will prompt you to rename the resource to be imported in order to avoid any conflicts.
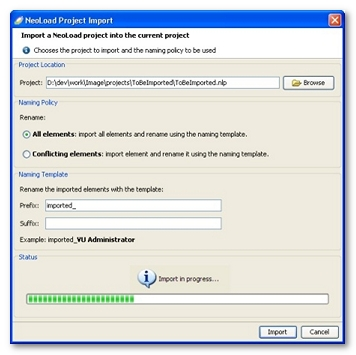
To import a project, follow these steps:
-
Click on the File > Import a project menu item.
-
Select the project on the hard disk to be imported by clicking on the file with the
nlpextension, or select the zipped archive. -
Choose the renaming policy:
-
All elements: NeoLoad imports all the resources, systematically applying the renaming template. In the event of a conflict, that is to say, if a resource that has been renamed using the template already exists, NeoLoad prompts you to choose another unused name.
-
Conflicting elements: Only the items with a naming conflict are renamed, in accordance with the renaming template.
-
-
Choose the renaming template. You may specify a prefix and/or suffix to be used to form the new name for the item if it is renamed.
-
Select Import.
If your project is password-protected, the import wizard asks you for the password.
You can choose to import a password-protected project without entering the password. However, this deletes all encrypted information, such as passwords, or other sensitive information in variables—which may break your tests. To import without password anyway, select Open without password.
-
The import begins; in the event of a naming conflict, a pop-up window allows you to change the name of a resource if the name already exists.
Export a project
The Export Project wizard allows you to:
-
Export and automatically send a project to NeoLoad Technical Support.
-
As well as the project itself, the exported archive may also include configuration files, log files and one User Path validation result. The exported archive is directly uploaded to our FTP server.
-
Export a project for backup or transfer to another machine.
The archive can then be imported into an existing project. For more information, see Import a project.
To export a project, follow these steps:
-
In the menu bar, choose File > Export Project....
-
In the Export Results step, select the elements to export.
-
Click Next.
-
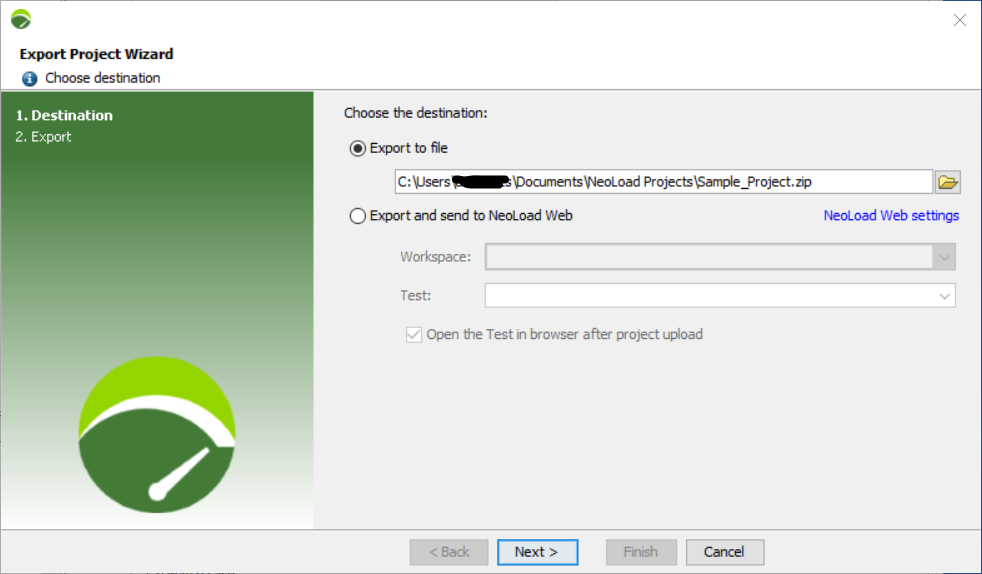
In the Destination step, choose:
-
Export to file: NeoLoad will export and zip your project into an archive file and store it locally in the location you specify.
-
Export and automatically send to technical support via FTP: NeoLoad will export the project and any debug item to an archive that will be automatically uploaded to the NeoLoad Support FTP server.
Note: The first time you export a project to support, you need to validate the identity of the host. The fingerprint to verify is:
SHA256:0Id8gmIefUdrVL5g9Sc0kBcIOghqd7R7njiVD94UYJs.
-
-
Click Next.
-
If exporting to our Support server, select which items to include:
-
Log files (recommended)
-
Configuration files (recommended)
-
a User Path validation result: NeoLoad takes the last validation result for the selected User Path, or launches a validation if the User Path has yet to be validated.
-
-
For identification purposes, enter the ID number supplied by NeoLoad Technical Support or your company name.
-
Click Next.
-
When you click Next, NeoLoad creates the archive and uploads it to the FTP site. You may continue to use NeoLoad normally during the upload process. Once the archive has been uploaded, the NeoLoad Support is automatically informed of its reception.
Export a project to NeoLoad Web
Exporting a project to NeoLoad Web makes it possible to regroup all the resources of a test configured in NeoLoad to run it in NeoLoad Web.
For more information about running a test in NeoLoad Web, see Run a test in the NeoLoad Web documentation.
The Export Project Wizard is accessible with a click on File > Export Project to NeoLoad Web... or by clicking the Export your project to NeoLoad Web icon  .
.
The Export Project Wizard guides you through the project export.
-
You have two export options according to the destination you choose.
-
Export to file: NeoLoad will export and zip your project into an archive file and store it locally in the location you specify.
-
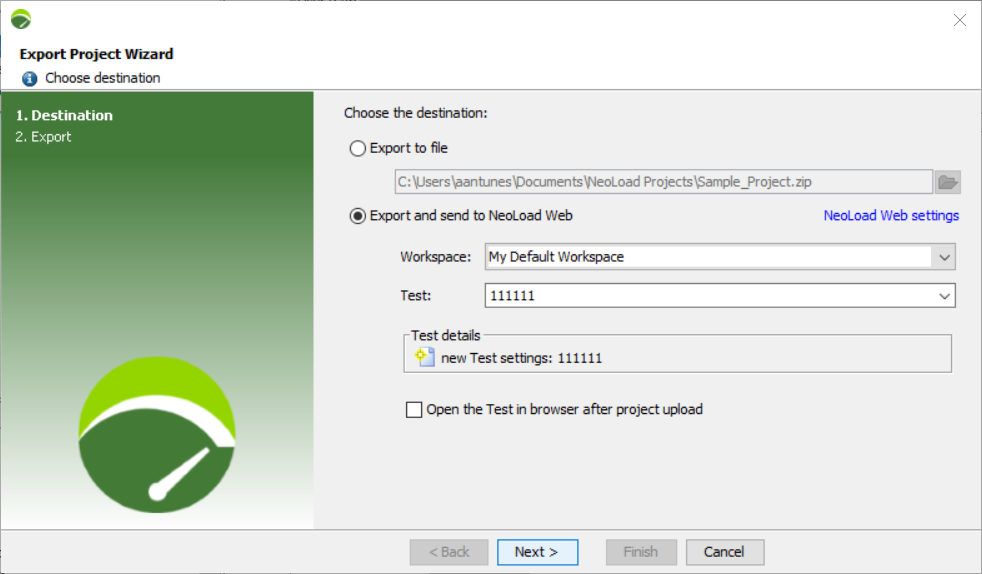
Export and send to NeoLoad Web: use the Workspace and Test dropdown menus to select a Workspace and a Test settings to export your project.
Note: Workspaces and Tests are ordered alphabetically in the menus and the Test menu is searchable. To quicken your search, the list of Tests is filtered as you type.
-
You can either send your export to an existing Test. Once you select a Test, the Test details panel gives you information about the Test selected. The link Open in Neoload Web enables you to open the test settings in the correct Workspace in NeoLoad Web to give you more details on the existing NeoLoad Web Test.
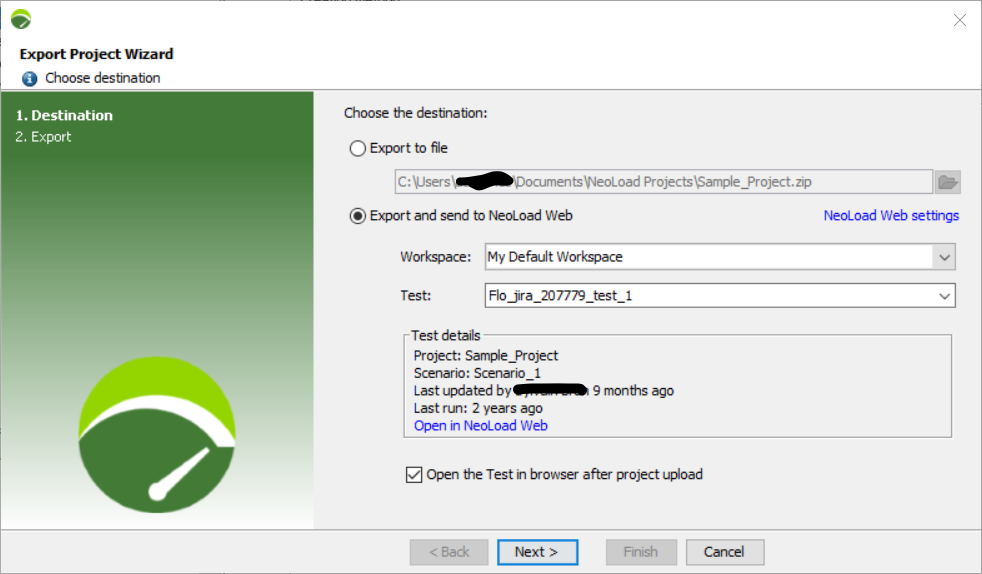
Or you can send your export to a new Test that you create on the fly from NeoLoad when you type a name not used yet for a test.
-
-
Click Next.
-
NeoLoad processes the export and the upload of the project in NeoLoad Web.
-
Click Finish.
NeoLoad Web opens if you left the option Open the Test in browser after project upload selected.
You are led to the Tests view where the project is now available as a ZIP file that can be uploaded in the Run a Test section. For more information, see Run a test in the NeoLoad Web documentation.