Single zone settings
Only one zone can be defined as the default zone. When searching for hosts, adding Load Generators is done within this zone.
When a zone is highlighted in the Load Generators group box, the Zone Settings dialog can be displayed either with:
-
a double-click on the zone
-
a click on the wrench-like Settings button
-
the Settings contextual command
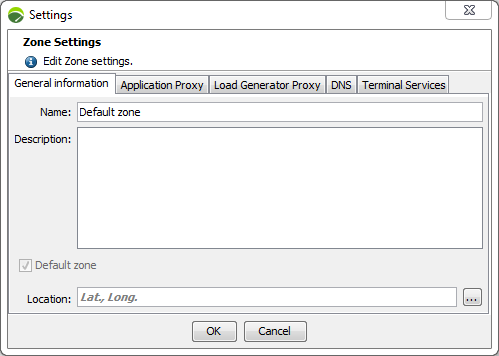
General information
4 items may be configured for each zone:
-
Name: Used to identify the zone.
-
Description: Used to add comments about a zone.
-
Default zone: Sets the zone as the default zone.
-
Location: To define the geographical position (latitude, longitude) of the zone.
Note: A connection to the Internet allows the application to be connected to a Neotys server containing a copy of the ©OpenStreetMap base. This function is used to display a higher detailed level. The list of towns shown on this map does not depend on Neotys.
To define the geographical position of a zone, follow these steps:
-
Click
 to open a localization aid map.
 -
Modify the zoom level with either:
-
[+] or [-] in the bottom left of the dialog
-
the mouse scroll wheel
-
-
Click the map to define the spot corresponding to the zone to localize then click Close.
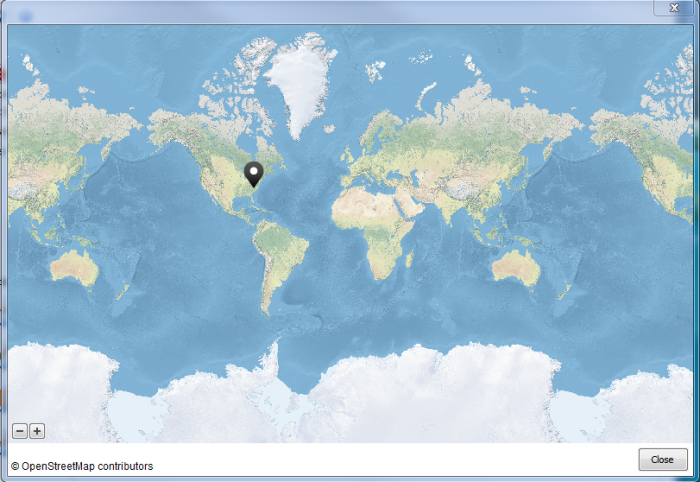
The Location field is updated with the latitude and longitude coordinates of the selected spot.

Applications Proxy
This section enables you to configure the proxy between the Load Generators and the applications you need to test.
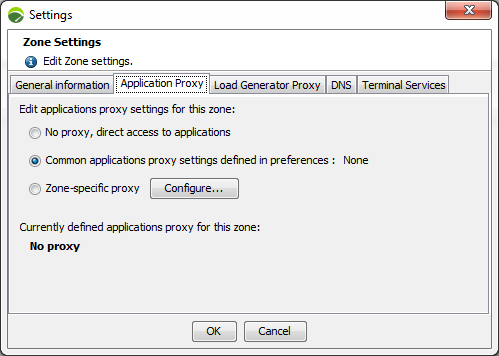
Specific proxy settings can be entered for each zone, with three setting options:
-
No proxy, direct access to applications: The Load Generators in this zone will not use a proxy server during the test.
-
Common applications proxy settings defined in preferences: The Load Generators in this zone will use the proxy configured in NeoLoad Preferences to be used for applications. For more information, see Proxy.
-
Zone-specific proxy: The Load Generators in the zone will use the proxy settings specifically configured for this zone with the Configure button.
-
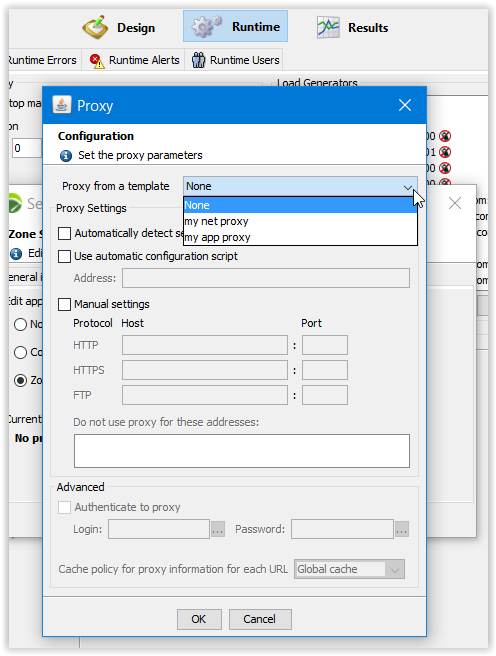
Select the Zone-specific proxy setting option.
-
Click the Configure button.
-
In the Proxy from a template dropdown list, select the proxy you want to use as a template.
-
Configure your proxy based on a template as described in Add a proxy.
By default, newly created zones use the common applications proxy settings, with the exception of zones in the NeoLoad Cloud Platform which do not use a proxy.
Whichever setting is used, a reminder of the proxy settings is displayed.
Load Generator Proxy
This section enables you to configure the proxy between the NeoLoad Controller and the Load Generators.
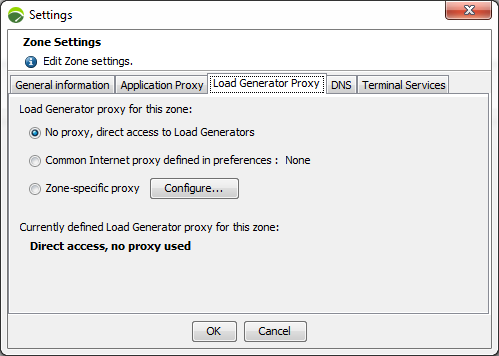
Specific proxy settings can be entered for each zone, with three setting options:
-
No proxy, direct access to the Load Generators: The Load Generators in this zone will not use a proxy server during the test.
-
Common proxy settings defined in preferences: The Load Generators in this zone will use the proxy settings configured in NeoLoad Preferences to be used for Internet. For more information, see Proxy.
-
Zone-specific proxy: The Load Generators in the zone will use the proxy settings specifically configured for this zone with the Configure button.
Whichever setting is used, a reminder of the proxy settings is displayed.
-
Select the Zone-specific proxy setting option.
-
Click the Configure button.
-
In the Proxy from a template dropdown list, select the proxy you want to use as a template.
-
Configure your proxy based on a template as described in Add a proxy.
DNS
Overriding DNS is useful if you need to run tests on a pre-production environment or on a specific cluster node of a production environment.
It is possible to configure IP addresses to override DNS resolution and distribute them to all Load Generators of a specific zone. Therefore, no DNS resolution will be performed for these host names.
IP addresses v4 and v6 are handled.
To override DNS for a zone, follow these steps:
-
Check the option Enable DNS overriding.
-
Click Add.
-
In the Host field, enter or select a hostname among all the servers defined in the project.
-
In IP Addresses, enter IP addresses directly in the field or click the pencil icon to open a text area dialog box.
Accepted separators are: comma, semi-colon, space, carriage return.
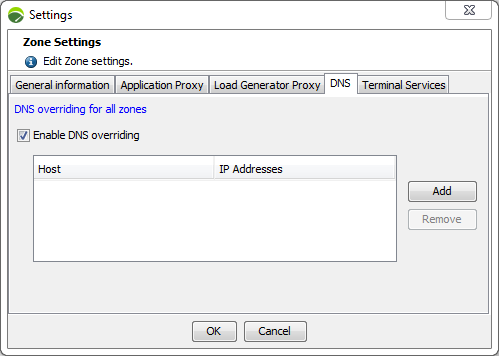
Note: If you configure several IP addresses, a random IP from the list will be used.
To access DNS settings for all zones, follow these steps:
-
Click the link DNS overriding for all zones.
Note: If, for a given hostname, IPs are defined at both Zones and Zone level, the list which will be used will be the one at Zone level.
Terminal Services
The Terminal Services tab is only available for the Windows version of NeoLoad.
For more information about Terminal Services prerequisites and installation, see Terminal Services installation guide.
The Terminal Services tab allows adding and configuring a connection to a Windows server. Several Remote Desktop Services sessions can be launched on the same machine. This allows running SAP GUI tests with a higher number of SAP Virtual Users as one Load Generator agent can be launched for each session opened on a Remote Desktop Service. For more information, see SAP GUI testing.
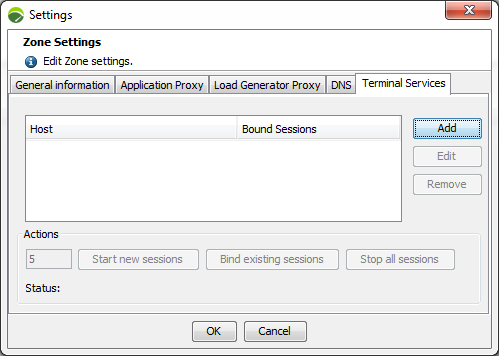
A click on the Add button opens the Terminal Server Settings dialog box.
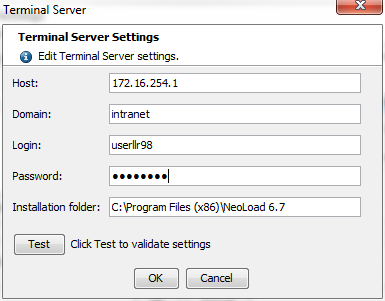
Host: The field must be filled in with the IP address of the Windows server to connect to.
Domain: Optionally, the field can be filled in with the domain where the Windows server is located.
Login: The field must be filled in with the user login used to connect to the Windows server.
Password: The field must be filled in with the password associated with the login specified above.
Installation folder: The field must be filled in with the path to the NeoLoad installation.
A click on the Test button allows checking that NeoLoad can connect to the host. It also checks that the NeoLoad version used is compatible with the Load Generator version installed on the Windows server.
Once the connection is configured, the Actions zone is activated.

Start new sessions: After specifying the number of sessions to launch in the left field, a click on the button starts the required Remote Desktop Services clients sessions on the server. The started sessions are then listed in the Bound Sessions column. Clicking the OK button adds the sessions in the Load Generators tree view under the related Zone, followed by the Windows icon.
Note: After starting Remote Desktop Services clients on the server, they must not be closed.
Bind existing sessions: When an existing session is available on the server, a click on the button makes it possible to associate it with the project. The bound sessions are then listed in the Bound Sessions column. Clicking the OK button adds the sessions in the Load Generators tree view under the related Zone, followed by the Windows icon.
Note: To bind an existing session with your project, a Load Generator must be started on the session to bind.
Stop all sessions: A click on the button stop all the sessions running on the server.
A click on OK validates the configuration and adds the sessions in the Load Generators tree view for the selected Zone.