Load Generator settings
When a host is highlighted in the Load Generators group box, the Load Generators settings dialog is displayed either with:
-
a double-click on the host
-
a click on the wrench-like Advanced host configuration button
-
the Load Generators settings context command
Network
In the Load Generators settings dialog box, the Network tab shows the following information:
-
In WAN Emulation, the green Installed status means that the machine is ready to simulate network constraints, as described in Install the WAN Emulation. The red Not installed status means that the WAN emulation has not been installed.
-
Network Interfaces lists all the network interfaces detected for the Load Generator. For those hosts acting as network routers for several networks, it is necessary to select the network card to be used by the Load Generator.
Note: If you want to select a specific network interface for several Load Generators, select them by keeping the "ctrl" button pressed and open the Load Generators settings dialog box. You can then select the network interface to use.
In IP Addresses, all the host IP addresses are listed on the selected interfaces. By default, a single IP address is selected and all the Virtual Users generated by that Load Generator use that same address.
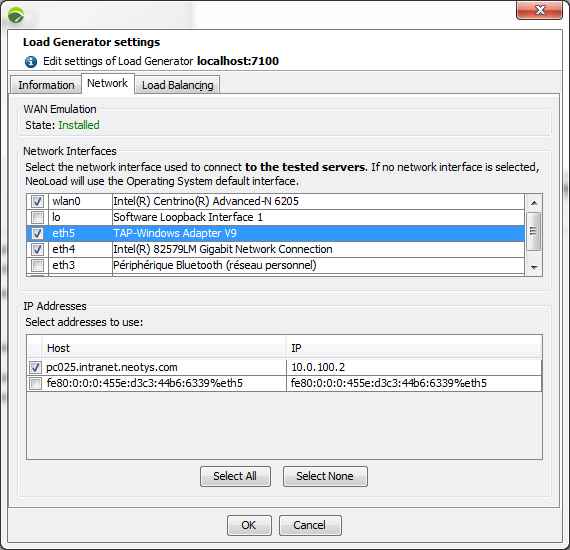
Defining several IP addresses allows the user to test applications that use a load balancer based on IP addresses. In this case, a random IP address is assigned to each Virtual User. The IP addresses must be available, i.e. not used by other machines within the network. It is necessary to check with a system administrator to make sure these addresses may be used.
Configure IP spoofing
To define IP addresses in the list, it is necessary to define additional IP addresses in the Load Generator operating system settings.
These parameters will modify the Load Generator network settings. It is advised to check this with a system administrator before changing the host settings. In some documentation, multiple IP address settings are referred to as virtual IP settings.
To configure IP spoofing on Windows, follow these steps:
-
In the Start menu, click Control Panel.
-
In Network Connections, right-click Local Area Connection and select Properties.
-
Select Internet Protocol (TCP/IP) in the list, then click on the Properties button.
-
Multiple IP address configuration is not available in DHCP mode. If DHCP mode is set (i.e. Obtain an IP address automatically is selected), this setting must be changed to the static IP mode (i.e. Use the following IP address).
-
Click on the Advanced button to display the list of defined IP addresses. Click on the Add button.
-
Enter the new IP address and subnet mask in the appropriate boxes. Then click on the Add button.
-
The new IP address should appear in the list.
-
Repeat steps 5 through 7 to define each IP address.
To configure IP spoofing on Linux, follow these steps:
-
Multiple IP address configuration is not available in DHCP mode. Change the settings to use static IP addresses. Use the
ifconfigcommand to add a new IP address.For example, the command line for adding 2 new IP addresses (say, 192.168.1.10 and 192.168.1.11) to the eth0 network interface would be:
ifconfig eth0:0 192.168.1.10ifconfig eth0:1 192.168.1.11
Load balancing
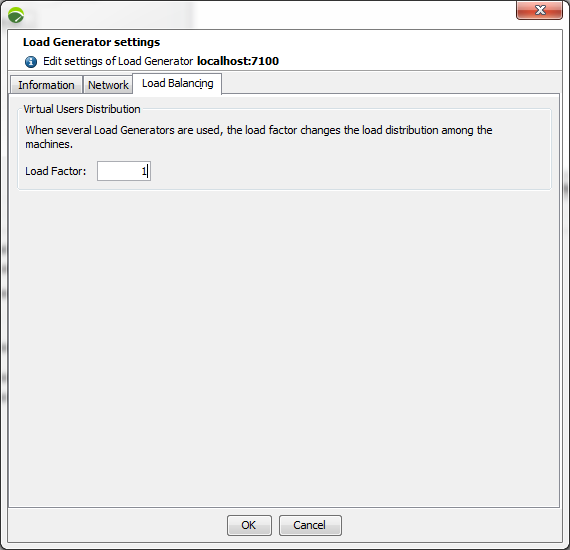
In the Advanced Host Configuration dialog box, the Load Balancing tab allows setting the number of Virtual Users on the Load Generators.
The Virtual Users used in the test are spread among all the available Load Generators. All the Load Generators generate the same number of Virtual Users by default.
ncreasing the load factor proportionally increases the number of Virtual Users created by each Load Generator. For example, where NeoLoad needs to creates five more Virtual Users and Load Generator A has a load factor of "3" and Load Generator B a load factor of "2", A will create three Virtual=…sers and B will create two. The more powerful machine\s may be configured to create a greater number of Virtual Users.
Automatically update Load Generators
When the test is launched, NeoLoad checks the versions of the Load Generators being used and prompts the user to update those that are obsolete. Once the Load Generators have been updated, the test continues as normal.
A Controller cannot update a Load Generator handled by a different Controller or launched in Terminal Services mode. In this case, a manual update needs be performed using the standard installer.
When the Load Generator Agent is started in non-privileged mode and does not have privileges required to update the program, then the Load Generator cannot be updated automatically. In this case, restart that agent in administrator mode or perform a manual update using the standard installer.
When the Load Generator service is started with the Network Service account and does not have the privileges required to update the program, it cannot be updated automatically. In this case, change the service account or perform a manual update using the standard installer.
Note: With NeoLoad Controller version 6.1, only Load Generators version 5.5, 6.0 and 6.1 can be automatically updated. For example, NeoLoad Controller version 6.1.2 can update a Load Generator version 5.5.2, 6.0.0 or 6.1.0, but NeoLoad Controller version 6.1.2 cannot update a Load Generator version 5.4.2. When automatic update is not supported, Load Generators must be updated manually using the standard installer.
To update a Load Generator, follow these steps:
-
In the Scenarios tab, in the Load Generators section, click the wrench-like Host advanced settings button.
-
Click on the Information tab.
-
Click on the Upgrade button. When the update is unavailable or unnecessary, the button is dimmed.