Start the Controller
The Controller is the management console of NeoLoad. It is used to design, run, and manage tests locally, and to manage Load Generator Agents and Monitoring Agents remotely.
The Controller includes a built-in Load Generator agent and a built-in Monitoring Agent. When the Controller is started, the two built-in agents are activated. They can be also started, separately and without launching the Controller, as described in Manage the Load Generator Agent and Manage the Monitoring Agent.
Manage the security
The communication between the Controller and the Agents is secured by default. The Controller must authenticate with a certificate to start the connection to either Agent.
To manage the certificate via command line, see the corresponding arguments below.
To manage the certificate via GUI:
-
Go to main menu Edit and select Preferences.
-
Switch to Advanced and see the section at the bottom of the page.

You can delete the current certificate, generate a new one, or export and import it in
pkcs12format using the buttons in the section.
Add a new certificate
The communication between the Controller and the Agents must be secured. To learn how to configure the settings, see how to configure the Load Generator Agent and how to configure the Monitoring Agent. When you need to secure the communication with a new certificate, you need to add the fingerprint to the Agent's configuration file:
-
Import an existing certificate or generate a new one as described above.
-
Copy its fingerprint. You can use the little copy button in the dialog.
-
Open the Agent's configuration file. They are located in
<installationDirectory>/conf/.-
The file for the Load Generator Agent:
agent.properties -
The file for Monitoring Agent:
monitoringAgent.properties
-
-
Find the
agent.accept.fingerprints=setting in the configuration file. Its value is empty by default. Use the copied fingerprint as the new value.Example:
agent.accept.fingerprints=SHA3-256/abcd0123456789
Open the Graphical User Interface
If you want to open the graphical interface of NeoLoad on Windows, choose one of the following options:
-
Choose Start > Programs > NeoLoad2024.3 > NeoLoad
-
Execute
NeoLoad 2024.3\bin\NeoLoadGUI.exe
If you want to open the graphical interface of NeoLoad on Unix, execute NeoLoad 2024.3/bin/NeoLoadGUI.
Execute NeoLoad on the Command Line
Before executing NeoLoad Controller, you can configure its properties via the environment. The Controller properties can be edited by setting the corresponding environment variable. However, modifying the environment variable overrides the properties set in the controller_user.properties file and in the controller.properties file. Below is an example of how to add an environment variable corresponding to a given Controller property key:
| Controller property key | Environment variable |
|---|---|
|
[Recorder] controller.recorder.pause=1000 |
NL_PROPERTY_RECORDER_CONTROLLER_RECORDER_PAUSE=1000 The standard format is: "NL_PROPERTY_CATEGORY_MY_PROPERTY=value" |
To start the Controller on the command line on Windows, follow these steps:
-
Execute
<install-dir>\bin\NeoLoadCmd.exe -
Type the commands to execute the NeoLoad options you want.
To start the Controller on the command line on Unix, follow these steps:
-
Execute
<install-dir>/bin/NeoLoadCmd -
Type the commands to execute the NeoLoad options you want.
Note Using NeoLoad arguments requires to:
- Conform to the arguments case.
- Specify the arguments values between quotation marks.
You can use the following arguments:
| Argument | Action |
|---|---|
-baseLabel <label>
|
Labels the base test when generating a comparison report. The default value is This argument requires the |
-baseTest <baseTest>
|
Names the This argument requires the |
-cacheUpdate
|
Launches a Virtual User iteration before starting test to update cache information. |
-certificatePassword <password>
|
Provides a password to the certificate file specified by the -certificatePath argument. |
-certificatePath </path/to/certificate.pkcs12>
|
Specifies the certificate file (pkcs12) that is used to secure the communication with Load Generators and Monitoring Agent. |
-checkoutProject
|
Checks out a project.
For example |
-Collab
|
Specifies the SVN third-party collaboration server URL. This argument requires the
For example This command is necessary when using an SVN third-party server to check out a project. It is not possible to clone a Git repository. In command line, the NeoLoad project has to be cloned with a Git client. |
-CollabLogin
|
Specifies the collaboration server login information.
For example This command is necessary when using a third party server to check out a project. |
-comparisonReport <files>
|
Generates test comparison reports (comma separated list of report files). NeoLoad configures the report format from the file extension ( |
-currentLabel <label>
|
Labels the current test when generating a comparison report. The default value is This argument requires the |
-customReportContents
|
When this argument is set, the report will be generated based on the last report contents settings defined for this project. Otherwise, the report will be generated with default settings. |
-debug
|
Runs the scenario in debug mode. |
-description <test description>
|
Describes the test. |
-exit
|
In GUI mode, exits NeoLoad when the test is completed. When a shared license is used, it is automatically released. |
-exitCodeFailIgnore
|
Sets the exit code to " |
-exportRaw <file>
|
Exports in the defined file the raw results of all the Transactions of a test |
-help
|
Displays the list of argument used. |
-inactivateKey
|
Deactivates the NeoLoad standard license key for this computer. |
-launch <scenario>
|
Starts the test with the specified scenario from the project specified by For more information, see the YAML syntax documentation. Please note:
This argument requires the For more information, see NeoLoad as-code. |
-leaseLicense
|
Specifies the license to lease.
For example Specifies the license to lease including Web VUs and SAP VUs.
For example |
-leaseServer
|
Allows specifying the license server to use (NTS or NeoLoad) to lease a license. Example to launch a project by leasing a license with NeoLoad:
|
-loadGenerators
|
Checks the YAML or JSON file describing the infrastructure to use. For more information, see the infrastructure descriptor format. If using an infrastructure including Cloud Load Generators, the |
-maxVuhEstimation <value>
|
Specifies the maximum number of VUH that can be estimated to launch the test. If the number of VUH estimated is lower or equal to the parameter value, the test can be launched. Otherwise, if the number of VUH estimated is greater than the parameter value, the test will not start. To prevent the usage of VUH, add the argument with value 0, example:
|
-monitoredHosts <Hosts>
|
Enables hosts to monitor during the test (comma-separated list of monitored machine names). Using this argument, only the listed machines are enabled. |
-NCPLogin
|
Connects to NeoLoad Cloud Platform using the specified login and password. The password hash command line utility must be used to hash the password before using this command. This command is necessary when using NeoLoad Cloud Platform to launch a load test with a Cloud Load Generator or Virtual User session. The format must be as follows: For example: For more information, see How do I use the Password Scrambler tool? |
-nlweb
|
Enables test data transfer to NeoLoad Web. This argument can only work if the connection with NeoLoad Web has been activated and a token has been declared. These 2 operations can be performed:
|
-nlwebAPIURL <APIURL>
|
Specifies the URL of the NeoLoad API in order to connect with NeoLoad Web when it is deployed on-premise. This argument requires the |
-nlwebProxy
|
Allows connecting NeoLoad Web by using a proxy. The argument must be used as follows:
This argument requires the This argument can also be used to connect a Controller Agent or Load Generator Agent to NeoLoad Web by using a proxy. For more information, see Platform set-up for Runtime. |
-nlwebToken <token>
|
Allows authenticating to NeoLoad Web with an access token. This overrides any configuration made in the Preferences screen. |
-nlwebWorkspace <workspace>
|
Specifies the Workspace ( |
-nlwebTest <Test>
|
Specifies the NeoLoad Web Test ( |
-nlwebZoneId
|
Allows overriding the Zone of the resource (Controller or Load Generator Agent). Example: |
-noGUI
|
Launches NeoLoad in non-GUI mode. This argument can be used in 2 different ways:
|
-NTS
|
Connects to Neotys Team Server (NTS) at the specified host name and port.
For example This command is necessary when using NTS to lease a license and/or to check out a project. |
-NTSLogin
|
Connects to Neotys Team Server using the specified login and password. The password hash command line utility must be used to hash the password before using this command.
For example For more information, see How do I use the Password Scrambler tool? This command is necessary when using NTS to lease a license and/or to check out a project. |
-NTSCollabPath
|
Specifies the Neotys Team Server (NTS) configuration parameter path.
This command is necessary when using NTS to lease a license and/or to check out a project. |
|
Short form: |
In the context of jobs automation and Cloud testing, replaces Load Generators planned in the scenario with other Load Generators. If you want to override LGs for a specified population, use
If you want to override LGs for any population, use Load Generators can be replaced for a single or several populations in a same scenario. This argument can be repeated as needed. The TXT file must contain the list of the Load Generators separated by a line drop. Examples of .TXT file content:
To override populations x and y:
To override all populations:
|
--projectPassword
|
If you're working with a password-protected project, use this argument to specify its password. |
-publishTestResult
|
When working with a shared project (on NTS or SVN), the results are published after the scenario is run. It is not possible to publish a test result for a project shared with Git. |
-project <files>
|
Uses a given project file (
For example:
Other example without declaring the “.nlp” file: For more information, see YAML syntax documentation. |
-report <files>
|
Generates a test report at the end of the test. NeoLoad configures the report format from the file extension ( For example This argument requires the |
-SLAJUnitMapping
|
Maps an "acceptable" SLA alert to "pass" or "fail". Defaults to "pass".
For example
This argument requires the |
-SLAJUnitReport
|
Creates a jUnit test results file based on SLA results. The generated XML report is jUnit compatible.
For example This argument requires the |
-SLAJUnitResults
|
Warning: This command is deprecated. The command to use is Creates a jUnit test results file based on SLA results.
For example This argument requires the |
-testResultName
|
It is the name of the test results published to Neotys Team Server and found in the NeoLoad GUI. It may include a date/time stamp, such as Can be used together with the
For example: Windows: becomes Linux: becomes |
-variables
<constant1=value1,constant2=value2> |
Overrides constant-type variable defined in project. If no variable is defined, a constant-type variable is created. For example:
This command overrides constant-type variable named "env" defined in project with the
Please note that it's possible to override constant-type variables with Environment Variables, for example: |
Here are some example commands to get you started:
| Command | Explanation |
|---|---|
|
|
|
|
|
|
|
|
Lease a license from Neotys Team Server (NTS) and check out a project from NTS.
Note: The |
-checkoutProject Project51 -launch "scenario1" -noGUI -NTS "http://10.0.5.11:18080" -NTSLogin "noure:QuM36humHJWA5uAvgKinWw==" -leaseLicense
|
Lease a license from Neotys Team Server (NTS) and check out a project from a third-party SVN server.
|
The system exit codes below reflect the status of the test:
-
0: PASSED (the test was executed without errors)
-
1: FAILED (the test was executed properly but SLA failed)
-
2: ERROR (the test could not be executed for an unknown reason: no license, etc.)
This list contains valid alternatives to discontinued arguments:
| Discontinued argument | Valid argument to use |
|---|---|
-NLS
|
Use -NTS
|
-NLSLogin
|
Use -NTSLogin
|
-SVNLogin
|
Use -CollabLogin
|
-SVNURL
|
Use -Collab
|
Start NeoLoad in administrator mode
You can start NeoLoad in administrator mode on Windows and on OS X.
By default, the NeoLoad Controller on Windows is started in non-privileged mode (as a normal user, not administrator).
In non-privileged mode, some NeoLoad functions are unavailable:
-
WAN Emulation on the local Load Generator, described in WAN emulation.
-
Recording applications in tunnel mode, described in Record an HTTP application in tunnel mode and Record a native application in tunnel mode.
To start the Controller in administrator mode (once), follow these steps:
-
Right-click
NeoLoad 9.0\bin\NeoLoadGUI.exeand select Run as administrator.
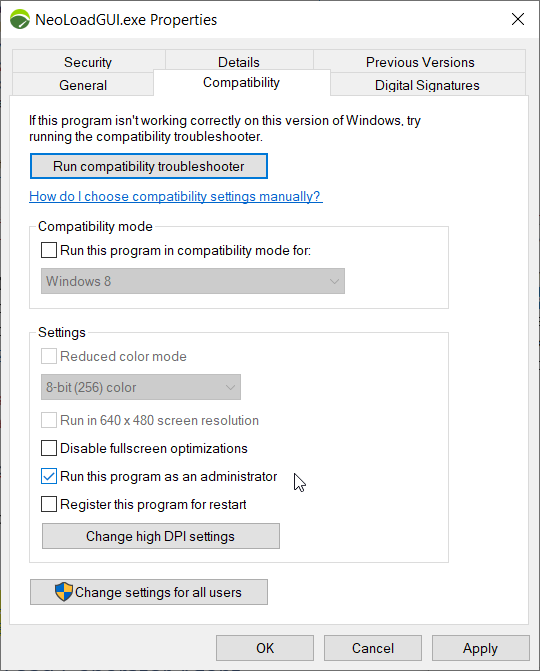
To always start the Controller in administrator mode, follow these steps:
-
Right-click
NeoLoad 9.0\bin\NeoLoadGUI.exeand select Properties.
-
On the Compatibility tab, select Run this program as an administrator.
By default, NeoLoad is started as a normal user with OS X.
As a normal user, some NeoLoad functions are unavailable:
-
Recording applications in tunnel mode, described described in Record an HTTP application in tunnel mode and Record a native application in tunnel mode.
Activating these functions is considered advanced usage and requires running NeoLoad as the "root" user.
To start NeoLoad as the "root" user with OS X, follow these steps:
-
Execute
NeoLoad 2024.3/bin/advanced/NeoLoadGUIAsRoot.app
When NeoLoad is run on OS X as root, preferences, logs files, and project files are specific to the "root" user and separate from the currently logged-in user. Any projects saved as the root user are readable by normal users but cannot be modified.