Java serialization requests
Java Serialization on top of the HTTP protocol allows remote service calls to be executed between the client and server using specific Frameworks such as Spring Remoting (Spring HTTP Invoker). The data exchange is carried out in binary and encapsulated in the HTTP protocol.
The Java Serialization module allows load testing web applications programmed in Java and using specific Frameworks such as Spring Remoting (Spring HTTP Invoker).
Note: To be able to handle Java Serialization requests, you will need to purchase the optional Java Serialization module. This module is included in the demo version of NeoLoad.
Note: RMI over HTTP is not supported.
Dependent libraries
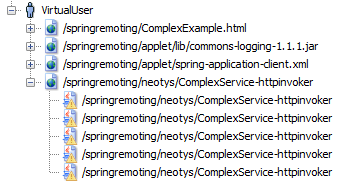
When recording Java Serialization requests, you will need to load the Java classes for the objects exchanged, as well as the client interfaces for the called services. For more information, see Java Serialization.
Recording
The following diagram shows how the Java Serialization module works during recording:
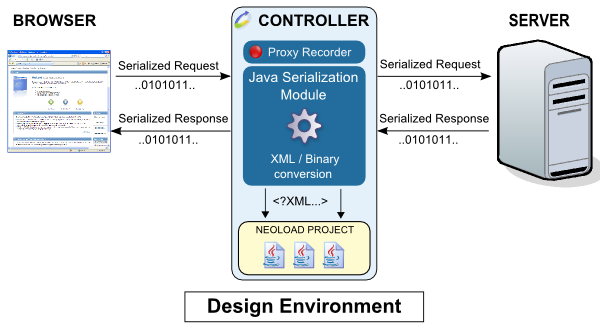
The binary data exchanged between the client and server passes through the recording proxy. The Java Serialization module comes into play as the data travels through the proxy, analyzing and decoding the requests. Once translated into XML, the requests are inserted in the project.
Note: Only requests with the Content-Type: application/x-java-serialized-object header are recorded.
Runtime
The following diagram shows how the Java Serialization module works during a test run:
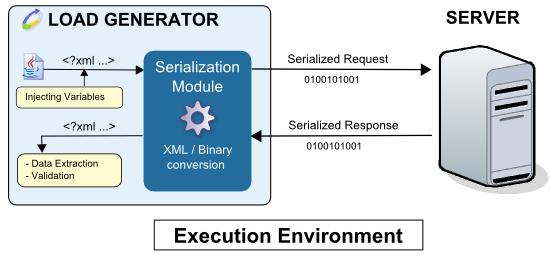
The XML request variables are evaluated and the module engine translates the XML to binary data. This data is then sent to the server. The binary response received is translated into XML, after which the validity checks and Variable Extractors in the played request are executed.
Record a Java serialization request
This section describes how to record the interaction between an existing Java client and the server.
To record a Java Serialization request, follow these steps:
Change the Java client settings so that it uses NeoLoad as a proxy:
hostname: host name or IP address of the machine with running NeoLoad.
port: the HTTP recording port used by NeoLoad, default is
8090. This setting may be changed in Preferences.For a Java applet application: No modifications are required to record Hessian requests.
For a Java application using JNLP: Configure the Java settings:
Open the Java settings in the Windows control panel.
Select the General tab, and click on the Network settings button.
Select Use proxy server and set the machine name as localhost and the NeoLoad proxy port (default is 8090)
Validate these settings and re-start your Java application before making a new recording.
For a standalone Java application: Configure the
http.proxyHost and http.proxyPortsystem properties.
For example, place the following code in your code:
System.setProperty("http.proxyHost", "localhost");System.setProperty("http.proxyPort", "8090");or modify the command line:
java -Dhttp.proxyHost=localhost -Dhttp.proxyPort=8090 ...
Launch NeoLoad.
Begin a recording. Since a standalone Java application does not require a browser, it is recommended to clear the Launch browser check box. For more information, see Record a test scenario.
Launch the Java client. If everything is working correctly, the HTTP requests sent by the Java application should be visible in NeoLoad.
Stop recording.
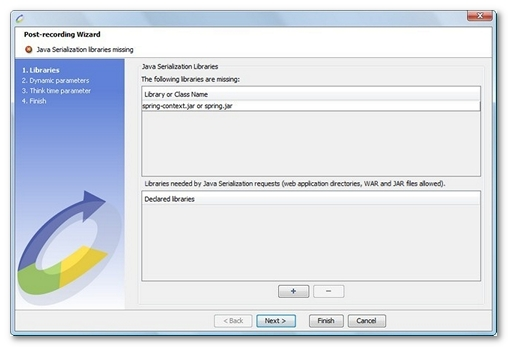
Post-recording wizard
At the end of recording, the JAR declaration panel is displayed if any Java classes or JAR files are missing:
All the classes for the Java objects exchanged between the client and server, as well as the JARs for the Framework used to transport the customized Java objects must be loaded.
This panel only displays part of the missing classes; not all the missing classes can be resolved.
To declare the missing Java Serialization libraries (JAR files), follow these steps:
Open the file explorer by clicking the + button.
Select an appropriate WAR file for the application, or the directory containing the deployed web application, then click Select. NeoLoad automatically retrieves the required JAR files from the selected application. You also may select the JAR files to be loaded manually in NeoLoad. Repeat the operation as many times as is necessary.
A message confirms the declaration. If the operation fails, make sure that all the required Java Serialization libraries have been declared.
When the libraries have been successfully declared, the following screen appears:
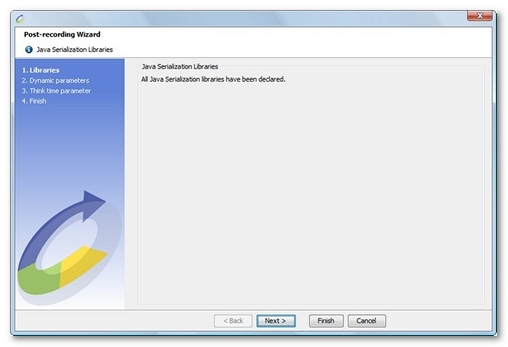
Declaring the Java Serialization libraries at the end of recording is a compulsory step if all the requests are to be played back.
You may declare missing Java Serialization libraries at a later stage.
Declaring Java Serialization libraries is carried out in the project's Java Serialization libraries manager in the project preferences. For more information, see Java Serialization.
Java Serialization requests with missing Java Serialization libraries are identified by a warning symbol: