Record a RealBrowser user path
With NeoLoad, you can record a web application user path through the browser.
The recording launches a Chromium instance and intercepts all interactions between the user and the browser.
Each interaction turns into a Browser Action, and the target elements (DOM elements) of those interactions are identified using the RealBrowser recorder internal algorithm.
A RealBrowser recording leads to a valid Check VU most of the time. However, more complex applications may require some immediate design to be functional.
The RealBrowser recorder is accessible via:
-
The Start recording button in the toolbar.
-
The Record > Start RealBrowser Recording menu.
To enable a recording, follow these steps:
-
Open the RealBrowser tab in the recorder launcher panel.
-
Toggle the Enable RealBrowser recording checkbox.
Note: Unlike other NeoLoad protocols, the RealBrowser protocol is standalone when recording. When you enable this protocol, it disables other types of recorders.
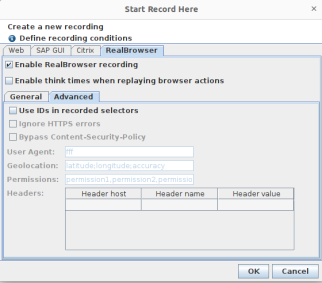
Recorder launcher settings
There are a variety of settings that can impact the behavior of the browser. These settings are located in the recorder launcher. Record with the settings that make the most sense for your use case.
Once selected, the settings are included in the OpenBrowser action. This ensures record time and run time share the same behavior.
Note: All settings defined in the RealBrowser recorder panel are persisted in the user preferences.
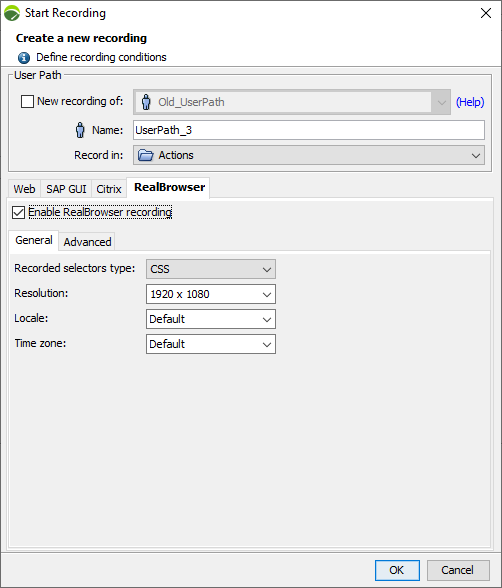
General settings
| Name | Description | Format | Default value |
|---|---|---|---|
| Resolution |
The resolution that the browser is launched with. This parameter is useful to test responsive applications where the display changes depending on the browser height and width. The Maximized special value allows the browser to take the full screen width, but the actual value that is added to the OpenBrowser action is the one evaluated directly in the browser. |
Width x Height | Height 1920 x 1080 |
| Locale |
The locale that the browser is launched with. Some websites and applications can detect the browser locale and display their content in the appropriate language. Expected format is ISO-3166 Country Codes and ISO-639 Language Codes. Example: en-EN, fr-FR. |
String | Default |
| Time zone |
The timezone that the browser is launched with. This parameter is useful for applications whose content depends on the timezone data. Expected format is a TZ database name from the TZ database. Example: Europe/Paris. |
String | Default |
Advanced settings
| Name | Description | Format | Default Value |
|---|---|---|---|
| Use IDs in recorded selectors | When enabled, includes the ID attribute of targeted elements in the list of detected selectors, if available. Disable this option when the target application is known to have dynamic IDs that change between each page refresh. | Boolean | true |
| Ignore HTTPS errors | When enabled, any HTTPS/certificate error is ignored. For example, this gives you the ability to record apps in development behind a self-signed certificate. | Boolean |
false |
| Recorded selectors type | The type of selectors that are recorded in a session. You can choose between CSS and XPath. | Constants | "CSS" |
| User Agent | The user agent that is sent with each browser request during the record. | String | Empty, will use the original browser user agent |
| Headers | Adds the specified headers that are sent with each browser request during the record. In the form of name=value, you can also specify a host to prevent those headers being sent to other servers. | String, String, String | |
| Geolocation | Change the browser geolocation with the specific coordinates. Expected format is: latitude, longitude, accuracy. Values need to be in decimal format. | Decimal, Decimal, Decimal with semicolon-separated | Empty, will use the original browser Geolocation. If accuracy is not defined, the value will be 0 |
| Bypass CSP | Toggle bypassing page's Content-Security-Policy. Set this to true to bypass all content security policies in the browser context. | Boolean | |
| Permissions | Adds the specified permissions in the current browser context. The expected values can be: midi, midi-sysex (system-exclusive-midi), notification, camera, microphone, background-sync, ambient-light-sensor, accelerometer, gyroscope, magnetometer, accessibility-events, clipboard-read, clipboard-write, payment-handler. | List of String with comma-separated | Empty |
| Ignore Screenshots | Disable all screenshots taken while recording. | Boolean | False |
Record an application
After the parameters are set, click OK. A Chromium browser instance opens with the NeoLoad Recording Welcome page. Here you have two possibilities:
-
Click on one of the last recorded URLs.
-
Enter a new URL in the browser address bar.
Now you can simulate the actions you want to replicate at scale. All your interactions (minus those listed in record limitations) are recorded as Browser Actions in a new user path.
When recording, a toolbar appears that provides additional capabilities:

-
Pause the record, in case there are interactions that you don't want to record.
-
Resume the record.
-
Stop the record.
-
Change the current top-level container that receives the recorded actions.
-
Change or create the current transaction that receives the recorded actions.
-
Add mouse over action during recording.
Record Mouseover actions
To record mouse over actions, follow these steps:
-
Select Mouseover from the record toolbar.
-
On the webpage, right-click where you want to add a mouse over action.
-
Continue the user path in NeoLoad.
-
To disable mouse over mode, select the Mouseover action icon
 on the record bar.
Record WaitSelector actions
-
Select the WaitSelector action icon
 on the record toolbar.
 -
On the webpage, right-click where you want to add a WaitSelector action.
-
Continue the user path in NeoLoad.
-
To disable the WaitSelector mode, select the WaitSelector action icon
on the record bar.

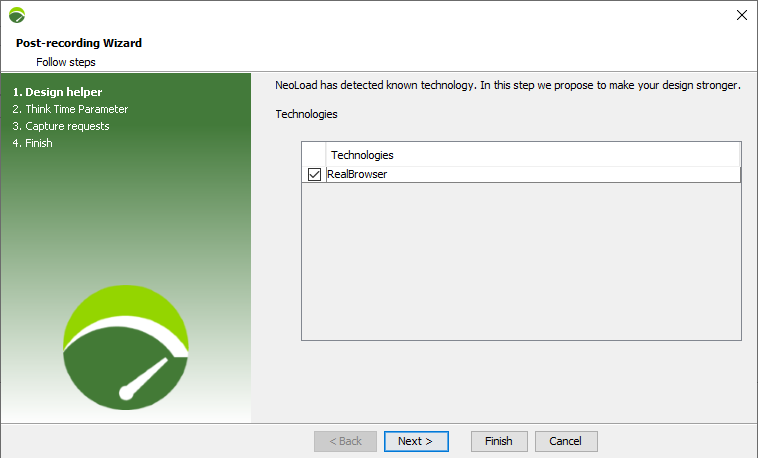
Post-recording Wizard
When a recording session ends, a Post-recording Wizard panel appears. It gives the following options:
-
Redesign the just-recorded user path to increase its robustness (recommended)
-
This step surrounds all recorded actions for this user path into a try-catch block. It also adds an extra CloseBrowser action at the end. This improves the error management and ensures browsers are correctly closed at the end of each iteration when a scenario at scale is run.
-
-
Override recorded think-times
Press Finish if you want to skip these steps.
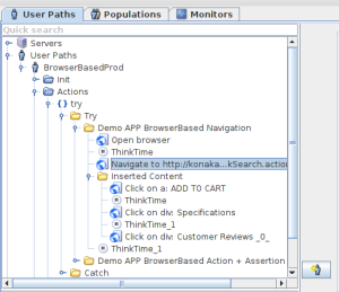
Use the Record Here feature
You can insert more steps inside your user path with the Record Here feature:
-
In User Paths, right click on the action where you want to insert new steps.
-
Click on the Record Here item. Note that the values configured from the Open browser are used in the Record Here.
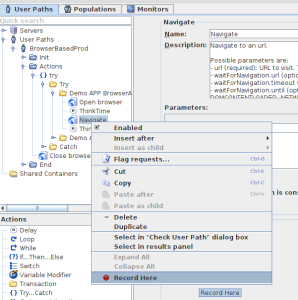
The RealBrowser Recorder plays all preceding actions and new actions.
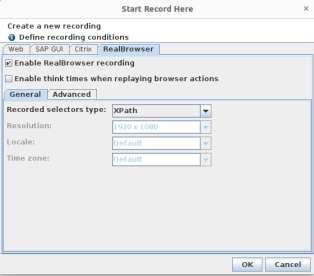
If enabled, you can play the Think Time when you record. By default, the following are enabled in the RealBrowser tab.
-
Recorded selectors type
-
Use IDs in recorded selectors
To Enable/Disable Think Time in the Start Record Here panel, follow these steps:
-
Open the Record panel with the Record Here mode
-
Select Enable think time when replaying browser actions.
When enabled, Think Time plays in the Record Here mode.
You can find your recordings in the default Inserted Content container. You have the ability to choose the name of the container.
Use an Application Proxy to Record
Please refer to the section describing how to use an Application Proxy at runtime.
The difference in Application Proxy usage between record time and runtime is that instead of basing the proxy url protocol on the first Navigate action in the user path, the HTTPS protocol is favored and defaults to the HTTP protocol if empty.
Define custom attributes
A custom HTML attribute to identify elements easily during testing is:
<div data-test-id="123456">...</div> You can hint the recorder to exploit attributes when you add realBrowser.customAttributeSelectors=data-testid under the RealBrowser section in the controller_user.properties file.
This file is located under:
-
For Windows:
C:\Users\${user}\AppData\Roaming\Neotys\NeoLoad\${neoload.version}\conf -
For Linux:
/home/${user}/.neotys/neoload/${neoload.version}/conf/
Note: To record several custom selector attributes, you can separate them by ';". For example: realBrowser.customAttributeSelectors=customSelectorAttribute1;customSelectorAttribute2;customSelectorAttribute1
Record limitations
By default, the RealBrowser recorder doesn't record these actions:
-
MouseOver. For example, if you click inside a submenu, we don't record the previous hovering of the main menu. However, you can enable this by selecting the MouseOver action icon
on the record bar. -
Scroll. While most RealBrowser actions auto-scroll to show target elements, in cases, such as infinite scrolling, you can manually add Scroll actions to the user path in design.
-
The browser Forward and Back button events. This means these actions don't appear in the user path. You can include them in the user path design by using the button parameter in the BrowserClick.
-
HTTP authentication prompts interactions. Consequently, after recording, you need to set your credentials in the recorded OpenBrowser action.
Note that each tab records only one navigation action. Any other navigation comes from clicks or key presses on page links.