Get started with collaborative projects
Before starting a collaborative project, it is advised to get prepared to the following steps.
A collaborative test project is composed of elements shared for the Virtual Users, shared Containers, variables, populations, servers, monitors, preferences of the project, and Load Generators zones.
The process to design a test project includes several steps. A major step consists of defining one or more Virtual Users with other shared elements like servers, variables, and so on.
-
When NeoLoad is installed on the same machine as the collaboration server, it is necessary to ensure localhost is not used as the hostname of the remote server.
-
It is advised to assign one or more design steps to every member of the team. It is necessary to prevent several members work on the same Virtual User, the same population, the same zone, the same monitored machine, or the same scenario.
-
Every member on a shared project must refrain from working on the design steps assigned to the rest of the team. This prevents conflicts. The members of the team should work on their Virtual Users only.
-
It is advised to share a project on its first design version (first record in general). Creating shared resources, such as servers, is performed by one team member. This prevents naming conflicts from occurring. Once the version is posted, the other team members can retrieve it and contribute to it consecutively.
-
Deleting elements of other members must be approved by their designers.
-
Regular updates of the project are very useful to identify as early as possible potential conflicts induced by forgetful team members.
-
Each time a project is updated, it is strongly advised to use the Project Sanity Check wizard to identify any missing element in the project.
-
Similarly, publishing a project must be performed whenever possible.
-
A project must always be updated before it is published. Updating a project may well help revise it, plan corrective actions, prevent conflicts, and so on.
-
Actions performed when solving conflicts may be difficult to understand, all the more as NeoLoad must process a large number of conflicts. When the update wizard identifies one or more conflicts, team members are advised to close the wizard and duplicate the shared Virtual User or Container showing the conflicts. Team members can perform backups of their work to make sure elements are not unexpectedly deleted by the conflicts resolution process.
-
Before launching a test, it is useful to check the consistency of a shared design with the Project Sanity Check described in Check the sanity of a project at design time. Updating a project may have created inconsistencies after, for instance, deleting elements which are required by a Virtual User.
-
Before launching a test with a collaborative scenario, the Execution Sanity Check wizard may detect any missing element which may corrupt or block the test. It is necessary to correct any issues raised, as described in Check the test sanity before execution.
-
Tagging a project is strongly advised to lock some versions of the project as soon as it proves sensible to do so (project milestone, test campaign, archiving, and so on).
Configure the connection to a collaboration server
Configuring the connection to a collaboration server consists in specifying the location where collaborative projects are shared and how to access them.
To configure the connection, it is necessary to have an SVN or a GIT server installed on a networked machine:
-
Or any standard SVN server
-
Or any GIT server
The Collaboration Server screen is available through the Edit > Preferences command and in the Collaboration area. The same configuration screen is accessible directly with the Share > Collaboration Preferences... command.
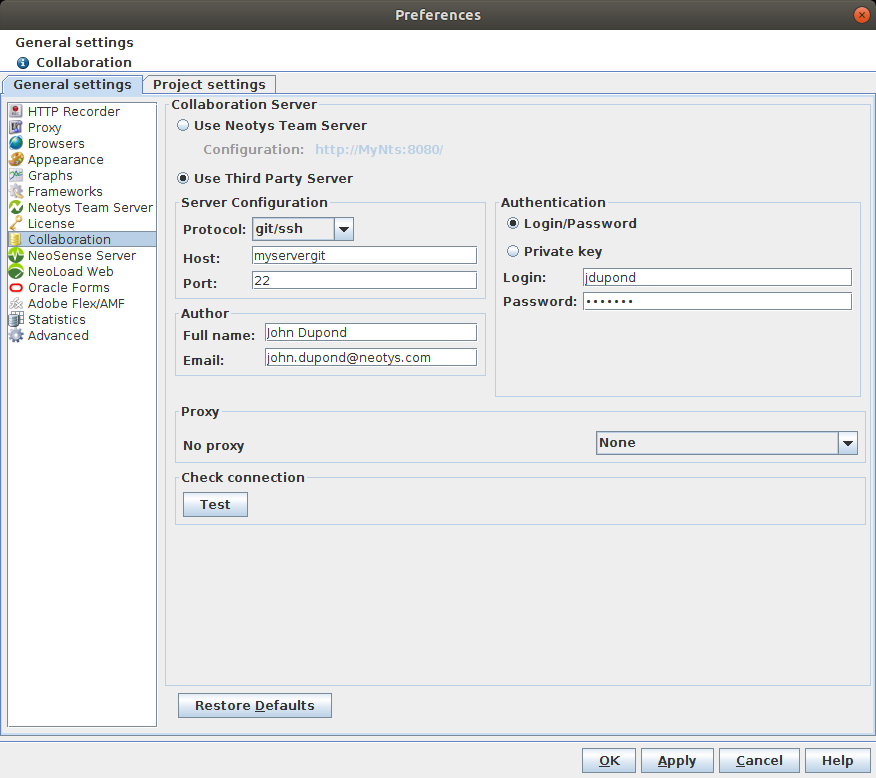
The protocols available to connect to a collaborative server are:
-
SVN
-
SVN over HTTP
-
SVN over HTTPS
-
SVN over SSH
-
SVN via a custom tunnel
-
GIT over SSH
-
GIT over HTTP
-
GIT over HTTPS
The Use Third Party Server section makes it possible to enter the parameters of the collaborative server after the protocol selected in Protocol. The Test button helps check the connection. When the parameters specified to connect to the server are inaccurate, an error message is displayed. When the accessed server is in SSH or in tunnel, the message is in the language of the server installation.
The Proxy section displays the access proxy to the collaboration server, when defined. For more information about using a proxy to access the collaboration server, see Proxy.
Note: A click on the Restore Defaults sets the Use Third Party Server section with the SVN parameters commonly used.
To configure a connection to a collaboration server, follow these steps:
-
Click Share > Collaboration Preferences....
-
You can either:
-
select Use Neotys Team Server (Neotys Team Server is configured in the Neotys Team Server area of the General Settings Preferences).
-
select Use Third Party Server
-
-
In the case you are using a third party server:
-
Select the connection protocol to the collaborative server.
-
Enter the connection parameters to the server.
-
Click Test to check and validate the connection.
-
Click OK to close the Preferences screen.
-