Update LiveCompare Service Configuration Wizard
You can use the Update LiveCompare Service Configuration Wizard to do the following:
-
Encrypt, re-encrypt or decrypt SQLite databases.
-
Set a new password for the LiveCompare service account.
-
Change the LiveCompare URL scheme, for example from http: to https:.
Security is ensured as external SQLite analysis tools cannot examine or modify encrypted databases.
Database encryption
When LiveCompare is configured to encrypt SQLite databases, it encrypts the following:
-
Workspace databases stored in the <user data dir>\private\workspaces folder on the LiveCompare server.
-
Newly created workspaces.
-
Unencrypted workspaces that are registered in LiveCompare.
-
Object Links Cache databases.
-
Existing and newly created performance history data and SC_MON data databases.
-
SQLite databases used by LiveCompare and stored in the <user data dir>\private folder.
Note that LiveCompare does not encrypt SQLite External Data Sources.
Before changing LiveCompare’s database encryption status, either:
-
From Unencrypted to Encrypted, or
-
From Encrypted to Re-encrypted, or
-
From Encrypted to Unencrypted
you will need to back up the user data directory on your LiveCompare server.
Time required for database encryption
Encryption or decryption of existing SQLite databases is performed in the last step of the Update LiveCompare Service Configuration Wizard. Databases are encrypted at an approximate rate of 30MB per second. The time taken for SQLite databases to be encrypted, re-encrypted or decrypted depends on their size. The following table provides some approximate values.
| User data size | Runtime |
|---|---|
| 100MB | 3s |
| 1GB | 33s |
| 100GB | 5m |
| 1TB | 1h |
Run the Update LiveCompare Service Configuration Wizard
Before running the Update LiveCompare Service Configuration Wizard, make sure that no users are logged in to LiveCompare, and that no apps or workflows are running. To start the Wizard, select the ‘Update LiveCompare Service Configuration’ app from the Windows Start menu. The following screen is displayed.
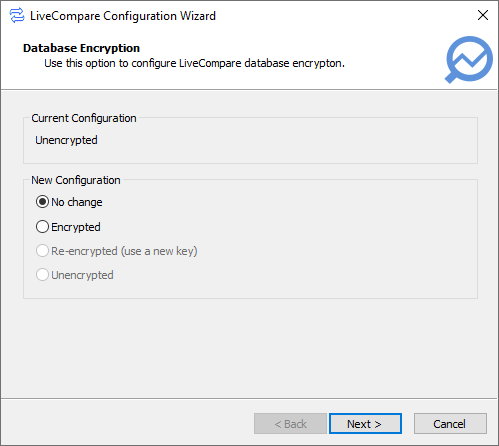
The Current Configuration section indicates the current database encryption setting, either Encrypted or Unencrypted.
The New Configuration section allows you to adjust the configuration.
Before changing LiveCompare’s database encryption status, either:
-
From Unencrypted to Encrypted, or
-
From Encrypted to Re-encrypted, or
-
From Encrypted to Unencrypted
you will need to back up the user data directory on your LiveCompare server.
-
Select ‘No change’ to keep the configuration as it is.
-
Select ‘Encrypted’ to encrypt workspace databases on the LiveCompare server. This option is only available if the current configuration is ‘Unencrypted’.
-
Select ‘Re-encrypted (use a new key)’ to re-encrypt the workspace databases using a new key. This option is only available if the current configuration is ‘Encrypted’.
-
Select ‘Unencrypted’ to decrypt the workspaces. This option is only available if the current configuration is ‘Encrypted’.
Click Next > to continue. The following screen is displayed.
 screen.")
If you have chosen ‘Encrypted’ or ‘Re-encrypted (use a new key)’, click ‘Generate Random Seed’ to generate a random seed to use for the encryption. Alternatively, enter or paste a seed value into the Seed field. If any other option is chosen, the Seed field is disabled.
Click Next > to continue. The Service Configuration screen is displayed.

Complete the screen fields by specifying:
-
The account name and new password for the existing LiveCompare service account, or
-
The account name and password for a new LiveCompare service account.
In each case, the account should be local to the LiveCompare server machine and a member of the local Administrators group.
Note: Changing the LiveCompare service account name will invalidate any existing RFC Destinations that use a secure network connection. See the Create secure RFC Destinations help topic for details.
Click ‘Next>’ to continue. The Account Rights screen is displayed.
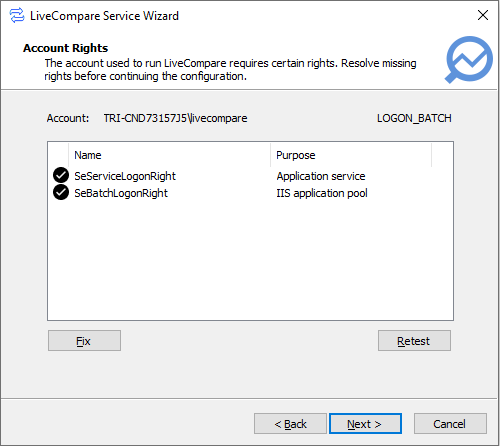
This screen lists the rights required for the LiveCompare account. Rights that are present marked with  . Rights that are missing are marked with
  . If any rights are missing, click ‘Fix’ to apply the missing rights to the LiveCompare account.
To apply any missing rights manually, carry out the following steps.
-
Run the Local Security Policy applet on the LiveCompare server.
-
Select the Security Settings > Local Policies > User Rights Assignment folder.
-
If the SeServiceLogonRight right is missing, display the properties for Log on as a service, and add the LiveCompare account.
-
If the SeBatchLogonRight right is missing, display the properties for Log on as a batch job, and add the LiveCompare account.
-
Click ‘Retest’ and check that there are no missing rights.
Click Next > to continue. The URL Scheme screen is displayed.

Select the URL scheme to be used by LiveCompare. If you choose ‘https’, IIS must be configured separately to support https, as described here. If you are upgrading from an earlier release of LiveCompare and have changed the URL scheme, the URLs of any existing URL-based reports will be adjusted to reflect the new scheme.
Note: A warning message is displayed if the URL scheme does not match the scheme used for the ReportBaseUrl field set in the Configuration - Reports screen for an earlier release of LiveCompare. In this case, you must use the same URL scheme or update the ReportBaseUrl field once LiveCompare is configured.
Click ‘Next>’ to continue. The Completing LiveCompare Configuration screen is displayed.
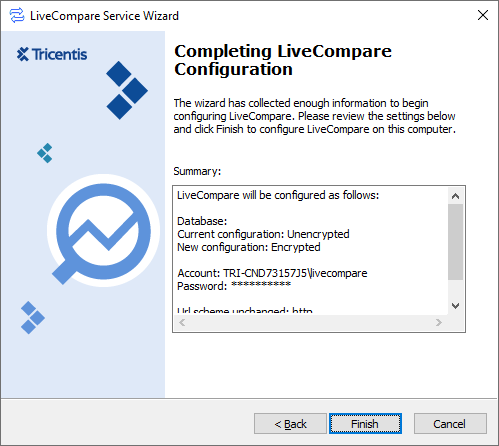
Review the summary settings and click Finish. Clicking Finish sets the username and password for the LiveCompare service account and updates the LiveCompare URL scheme if required. It also applies any changes to LiveCompare’s database encryption settings, encrypting, re-encrypting or decrypting existing SQLite databases as required.
-
This section describes the effects of encrypting SQLite databases.
-
This section describes the approximate time required to encrypt SQLite databases.
When the configuration process is complete, the LiveCompare Service Configuration screen is displayed.
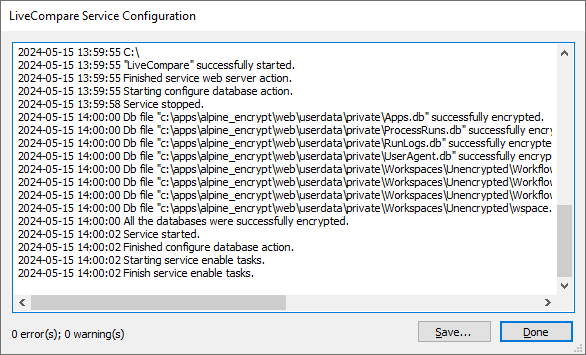
Click Done to close the screen or Save... to save the configuration log to a text file. If necessary, you may send the log file to Tricentis Technical support for analysis.
Export the database key
If you selected either ‘Encrypted’ or ‘Re-encrypted (use a new key)’ in the Database Encryption screen, carry out the following steps to export the database key used for the encryption as an XML file.
-
Log in to LiveCompare as a user with Administrator privileges and click
 to go to the LiveCompare studio.
 -
In the Administration screen’s Database section, click ‘Export Database Key’.
-
In the screen that follows, click ‘download the file’ to download a file named database_key.xml to your machine. Keep the file in a safe place.
-
For security, click ‘done’ to delete the server-side copy of the database_key.xml file.
Database encryption with unregistered workspaces
The following table describes some special cases that arise when using database encryption with unregistered workspaces.
| Current configuration | New configuration | Special cases |
|---|---|---|
| Unencrypted | Encrypted |
An unregistered workspace exists that was copied directly from another encrypted server. In this case, the workspace cannot be encrypted. The Update LiveCompare Service Configuration Wizard logs the paths of the database files that could not be encrypted. |
| Encrypted | Re-encrypted |
An unregistered workspace exists that was copied directly from another encrypted server, or a workspace was exported (so it is unencrypted) and then copied to the LiveCompare server without being registered. In these cases, the workspaces cannot be re-encrypted. The Update LiveCompare Service Configuration Wizard logs the paths of the database files that could not be re-encrypted. |
| Encrypted | Unencrypted |
An unregistered workspace exists that was copied directly from another encrypted server, or a workspace was exported (so it is unencrypted) and then copied to the LiveCompare server without being registered. In these cases, the workspaces cannot be decrypted. The Update LiveCompare Service Configuration Wizard logs the paths of the database files that could not be decrypted. |